
When radios, workload, and navigation converge, simplicity wins.
On an IFR approach with busy radios, a late vector and an unexpected hold, panel timers and GPS readouts can become distracting. A familiar wrist chronograph gives a single tactile elapsed-time reference — start at abeam or wings-level and glance to keep legs consistent. That simple backup supports reduced cognitive load and keeps timing reliable when avionics lag.
- Common leg times: 1, 1.5, 2 minutes.
- Start timing abeam or wings-level; stop on the next abeam/inbound fix.
- Prefer chronographs with large digits and a tactile start/stop button.
Which chronograph functions matter in flight
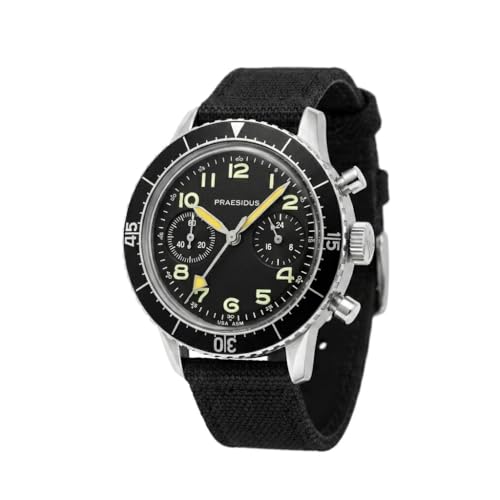
Pilots mainly use a few chronograph features in flight: start/stop, split/lap, and reading the elapsed minutes/hours on subdials or the rotating bezel. These cover timing holds, legs, and crossing fixes without overcomplicating cockpit work. For basic pilot-watch background and why these features exist, see what is a pilot watch.
Common controls and how to operate them
- Top pusher: usually start/stop the chronograph. Press once to start, press again to stop and read elapsed time on the central seconds and minute/hour subdials.
- Bottom pusher: usually reset the hands to zero, but only when the chronograph is stopped. Some watches offer a split/lap function: press the split pusher to freeze the elapsed readout while the chronograph continues running.
- Crown and rotating bezel: align the bezel marker to the seconds hand to track another running interval or use the crown to set subdial hands when needed.
Operational tips:
- Start timing at the selected point (abeam, wings-level) and stop at the next reference.
- Use split/lap to capture intermediate times (e.g., outbound/inbound legs) without interrupting the main run.
- If pushers screw down for water resistance, unscrew before use and re-secure after flight.
Do not reset a mechanical chronograph while it is running. Pressing reset under load can damage the movement. If a split function is available, use splits to record intermediate times instead.
Preflight chronograph checklist
Preflight chronograph checklist
- Verify operation and reset. Start, stop, and reset the chronograph on the ground to confirm smooth actuation and a clean zero. Listen for unusual resistance or sticky hands.
- Secure the strap. Confirm the strap or bracelet is tight enough to prevent movement but still comfortable. A sliding watch changes tactile feel and can spoil timing cues.
- Ensure crown and pushers clear. Unscrew any screw‑down pushers. Check that the crown and pushers won’t catch on clothing, harness, or equipment when reaching to operate them.
- Set bezel/zero reference. Align the bezel marker or note a fixed dial reference to represent the start point for legs or holds. Use a high‑contrast mark for quick glances.
- Perform a dry run. Practice starting, stopping, and using split/lap functions while seated, then repeat with flight gloves on. Familiarity under realistic conditions prevents fumbling in flight.
Tip: Never reset a chronograph while it is running; unscrew pushers first and practice controls with any flight gloves or layers to ensure positive, repeatable presses.
Step-by-step routine for outbound/inbound legs
-
Choose a consistent start reference
Decide before the leg whether to start abeam (wings-level) or over a waypoint. Use the same reference every time to eliminate a common source of timing error.
-
Start method: split/lap vs start/stop
If the chronograph is already running, press split/lap at the start reference to record the moment without interrupting the run. If starting from zero, press start exactly at the chosen reference; avoid resetting during flight.
-
Capture inbound/outbound marks
Use split/lap to mark the outbound abeam and again for inbound entry; use stop only at the end of the timed leg. This preserves intermediate marks for cross-checks and post-flight logging.
-
Record elapsed time immediately
Write down elapsed minutes and seconds at each mark and note the reference (abeam/waypoint). Later conversion to groundspeed or ETA is faster with a recorded elapsed time—see timing legs and calculating groundspeed for methods.
-
Convert elapsed minutes to groundspeed/ETA
Use groundspeed (kt) = (distance_nm / elapsed_min) × 60. For ETA: add (remaining_distance ÷ groundspeed) × 60 minutes to the current time. Practice the math with a few canned examples for speed.
-
Make it repeatable
Always use the same start reference, the same chronograph function sequence, and the same logging format. Consistency is the single best way to reduce timing scatter.
Start–Split–Stop–Log
Start at the chosen reference or use Split if the watch is running. Stop only at leg end; Log elapsed time immediately.This sequence keeps a continuous running time while preserving clear marks for each leg.
Timing and managing standard holds
-
Choose and start the cue
Start timing when abeam the fix or wings-level outbound after the turn. If the chronograph is already running, use the split/lap function; otherwise start the chrono cleanly on that cue.
-
Time the outbound leg
Let the chronograph run for the outbound leg and capture the elapsed with a split as the outbound leg ends or the fix is crossed. Record that split time — it is the reference for the inbound comparison.
-
Compare on inbound
When established inbound, compare inbound elapsed to the desired inbound time. If inbound time exceeds the target, shorten the next outbound by the difference; if inbound is short, lengthen the next outbound.
-
Use the bezel for quick offsets
Rotate the bezel to line a zero/index with the chrono seconds or split to display a correction at a glance. Use the bezel to add/subtract planned seconds without mental math while flying.
-
Reset vs lap for repeats and non‑standard holds
Use split/lap to preserve each circuit’s elapsed time while starting a fresh lap for the next circuit. Reserve a full reset only when the hold is complete or the chronograph will be stopped — never reset a running reference needed for adjustment.
Practical quick rules
Start cue: abeam or wings‑level outbound. Mark outbound: use split to capture the reference time. Adjust by comparison: inbound longer → shorten outbound; inbound shorter → lengthen outbound. Bezel: set index to show correction instantly. Laps not resets: lap/split for repeated circuits; reset only when finished.Chronograph myths — quick corrections
Chronographs time intervals well but do not replace GPS for groundspeed, position, or cross-checks.
Instrument drift, reaction time, and changing winds mean a second source (GPS/ADF) is essential.
Quartz movements keep steadier short‑term time; well‑regulated mechanicals can be adequate but vary more.
Mechanical timing shifts with temperature, magnetism and wear; quartz uses a stable oscillator.
Resetting erases current elapsed data; use lap/split or the bezel to preserve ongoing intervals.
Losing the running time removes the reference needed to compare inbound/outbound legs or hold cycles.
Single readings are vulnerable to start/stop mistakes and workload; logging and cross‑checks reduce error.
Recording elapsed times and comparing to NAV/GPS catches false starts, missed splits, or unexpected wind changes.
In‑flight timing checklist
-
Preflight checks (memorize)
Verify start/stop/split, unlock screw‑down pushers, secure strap, ensure bezel turns; rehearse starts with gloves.
-
Start cues for legs
Start at abeam, wings‑level, or over the outbound fix—pick one cue and use it every time.
-
Start cues for holds
Begin timing on the briefed entry (inbound crossing or outbound abeam); use split to mark entry when useful.
-
Split vs reset
Use split to record intermediate times without stopping; reset only after stopping and before a new timed leg.
-
Bezel‑mark method
Rotate the bezel triangle to the current minute at start; read elapsed minutes by comparing the minute hand to bezel markers.
-
Groundspeed → ETA
Minutes = (distance nm ÷ groundspeed kt) × 60 — add elapsed minutes to current time for ETA.
Practice, Integrate, Cross‑Check
- Regular short drills make chronograph timing reflexive and reduce in‑flight workload.
- Ground practice exposes ergonomic issues (gloves, pushers, strap) before flight.
- Treat the chronograph strictly as a backup — primary navigation remains instruments/ATC guidance.
Build familiarity on the ground and in simple flight before relying on the chronograph under pressure. Regular practice makes start/stop timing reflexive, reduces workload, and exposes ergonomic quirks (gloves, pushers, bezel) in safe conditions.
Immediate practice actions: 1) dry‑timed hold in a simulator or on the ground—run full start/stop/split cycles and log results; 2) use the chronograph on the next short cross‑country leg to time one outbound or inbound segment and compare with GPS; 3) add chronograph checks to the preflight flow (function, straps, pushers). Elapsed times should be cross‑checked against instruments and reconciled with ATC instructions; treat the chrono as a backup.
Tried the outbound/inbound split method today on a nav exercise. The split function made it so easy to mark the abeam point.
One question: do you recommend using the split or a lap for overlapping holds? My watch only has split.
Good question — split will work for most overlapping situations if you use it to mark the abeam point and then resume timing for the leg. The main thing is to avoid resetting a running chronograph.
If you find yourself needing distinct successive marks, consider using the bezel to track the first mark while the watch continues running for the second, or practice doing a quick split-reset-resume on the ground to see if your movement supports it reliably.
Tip: if you have screw-down pushers, absolutely unscrew them before trying to use the chrono in flight. Broke a seal once by forcing it and regretted it for days.
Great article — I started using the bezel trick last month and it really reduced math-in-the-cockpit stress. Simple and reliable for single-pilot IFR holds.
Longer post: I had trouble converting elapsed minutes to groundspeed/ETA like the article suggests.
I practice the quick ETA formula on the ground but in the air I get flustered and forget to multiply/divide correctly. Any simple mnemonics?
Also, is it safe to rely on the chrono alone if ATC gives a short approach vector?
I use this stupid-simple trick: if you need NM per minute, divide groundspeed by 60. So if GS=120, that’s 2 NM/min. Then multiply by elapsed minutes. For ETA add/subtract that distance at cruise speed.
It sounds dumb but repeating it out loud helps when stressed.
Nice mnemonic from Chris — spot on. For the article’s quick ETA: (Elapsed minutes) × (Groundspeed/60) = distance traveled. Then apply that to remaining leg distance or time. Practicing it aloud in the cockpit until it’s second nature is the key.
Regarding relying on the chrono alone: never rely solely on a wrist chronograph. Cross-check instruments and follow ATC. The chrono is a tactile backup and timing aid, not a replacement for nav equipment or clearance compliance.
I liked the preflight checklist section. Rehearsing starts/stops with gloves saved me from fumbling on my last cross-country.
However, step 3 (clear controls) felt vague — what exactly should I check for besides obvious dirt/loose straps?
Good point — ‘clear controls’ means a few specific checks: ensure no clothing or headset cables can catch the pushers, verify the crown/pushers move freely without grinding, and confirm the strap won’t rotate on your wrist (which can obscure bezel alignment). Also check for condensation under the crystal before flight.