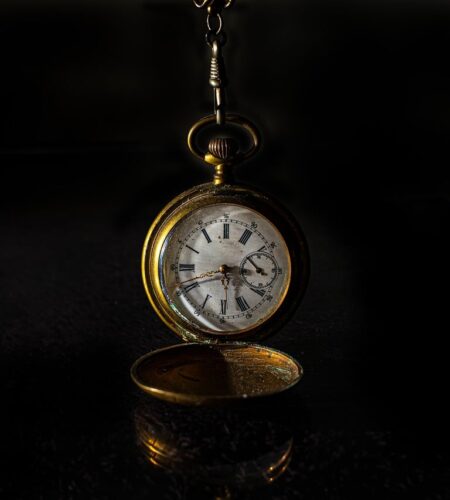
A beloved watch that photographs poorly can be fixed simply.
Holding a gleaming watch in hand, it often becomes a flat, reflective blob through the camera — scratches vanish, the dial reads lifeless, and colors shift. Common frustrations include reflections, tiny details lost to blur, shallow depth of field, and color casts from mixed light. A short, stepwise starter plan focuses on controlling reflections, stabilizing the camera, increasing depth of field, and correcting white balance so small adjustments give big visible improvements.
- Diffuse light and shoot at an angle to eliminate reflections.
- Use a tripod and remote shutter or self-timer for sharpness.
- Stop down to f/8–f/11 and set in-camera white balance.
One‑Hour Checklist
Small edits make a big difference. Crop, straighten, and remove dust spots sparingly.
Crop for impact; center or use the rule of thirds. Use spot healing for specks; avoid heavy sharpening. Export at ~1200 px on the long side, JPEG ~80% for fast sharing.Match gear to intent and budget
Match choices to the intended use: social posts, sales listings, or portfolio-quality editorials. The critical variables are magnification (how close and large the watch appears), working distance (space for lights and tools), and portability (how often the kit moves). A concise comparison helps clarify tradeoffs: see the detailed comparison of lenses and tubes for technical differences.
Magnification matters first — 1:1 yields true life-size reproduction; higher ratios reveal tiny details but increase depth‑of‑field challenges. Working distance affects lighting: more distance makes it easier to place diffusers or reflectors and avoid lens shadows.
Macro lenses cost more but preserve autofocus, image quality, and convenient working distance. Extension tubes and close‑up adapters are inexpensive and lightweight but remove infinity focus and can reduce convenience. For affordable practical picks, check a curated list of affordable macro lenses that perform well for watch close‑ups.
Practical rule: for casual shooting or quick sale photos, prioritize a compact macro or tubes and a steady tripod. Reserve high-end specialty glass for regular commercial work to avoid overbuying.
Focal length, working distance and aperture: choosing single-frame or stacking
How they interact
Three variables control apparent sharpness on a watch: magnification, aperture, and working distance. At macro distances, depth‑of‑field (DOF) is driven far more by magnification than focal length — as magnification rises, DOF collapses into millimetres. Longer focal lengths let the photographer keep a greater working distance for the same framing, which can slightly change perspective and handling, but DOF at a given magnification stays mostly the same.
Stopping down increases DOF, but only up to the point where diffraction softens detail. For many modern systems the practical sweet spot is around f/8–f/16, not automatically f/22 — see the aperture guide for watch macro for recommended apertures by sensor and magnification.
When to stack
Single-frame shooting is fine when the subject sits nearly flat in the tiny DOF (flat dials, low magnification) or when the required aperture stays within the sharp range. Focus stacking becomes practical when detail spans more depth than that DOF — typical for raised hands, deep indices, or >1:1 magnification. For step‑by‑step stacking workflow, consult the focus stacking tutorial for dials.
Quick rule: if achieving sufficient DOF forces an aperture where images look soft, either increase working distance, lower magnification, or stack.
Myth vs fact
Stopping down increases DOF but diffraction often reduces apparent sharpness beyond f/11–f/16.
Tiny apertures create wave‑based blur; a moderate aperture plus stacking or different composition is usually better.
At the same magnification, DOF depends on magnification and aperture more than focal length.
Long lenses are often used farther away, changing perspective, but DOF for a given subject size is similar.
Tiny apertures help but introduce diffraction; focus stacking or altering distance/magnification are better solutions.
Stacking increases useful DOF without relying solely on aperture, preserving resolution.
Lighting basics
Diffuse top softbox; small front fill. Tilt to control highlights. See reflections and LED panels.
Starting from zero
Jason Vong gives a clear beginner roadmap for gear and habits.
Use softbox and small reflector.
Match composition to intent
Composition should match the image’s purpose. Below are concrete framing rules for common intents.
Sale — condition first
- Front-on and 45° three-quarter: show the whole watch, centered with ~10% margin. Don’t cut lugs.
- Close details: crystal edges, dial/hands, crown, caseback, lug holes, bracelet clasp and serials.
- Macro shots of scratches, patina, or service marks. Include scale or measurement and a wrist/size reference. For sellers, include detailed condition shots to reduce returns.
Social — style first
- Hero dial crop and a wrist shot at 30–45° with shallow DOF.
- Environmental context: textures, props, natural light, diagonal composition to convey mood.
Catalog — consistent documentation
- Neutral background, same distance/angle across products.
- Standard set: front, 45°, side (crown), caseback, clasp/bracelet, lug-to-lug. Keep consistent framing and lighting for easy comparison.
Tip: Show flaws for sales, mood for social, and consistency for catalog. Always keep at least 10% margin around the watch.
Smartphone workflow for clean close‑ups
Practical phone steps
Set the phone to pro/manual mode (or use a manual app) and shoot RAW when possible. Prefer the phone’s telephoto or a clip‑on macro for more magnification; avoid heavy digital zoom.
Quick checklist:
- Mount: small tabletop tripod or clamp; improvise with stacked books and a phone clip for stability.
- Diffusion: soften LEDs with tracing paper, a translucent plastic sheet, or a folded white tissue; bounce with a white card for fill.
- Focus & exposure: tap to focus then lock AE/AF; use manual focus or focus peaking in the app; lower ISO and use a timer or remote to avoid shake.
For deeper, phone‑specific techniques, see the smartphone watch photography tips.
Reproducible shoot‑day checklist
-
Clean and stage the watch
Blow away dust, remove fingerprints with a microfiber and isopropyl swab, and tidy lug gaps. Secure or brace the watch so it cannot roll between frames.
-
Support and stabilize
Mount the camera on a low‑center tripod and solid head for repeatable framing; use a puck or brace for the watch. Consider the recommended low‑profile tripods to reduce vibration.
-
Set lighting and modifiers
Position diffused key and fill sources, check reflections in live view, and add flags or reflectors to control highlights and contrast.
-
Camera settings and focus
Use low ISO and select aperture for the desired DOF; focus manually with magnified live view or focus peaking. Decide single‑frame or stacking before shooting and lock exposure if needed.
-
Bracket, record, and label
Capture exposure and focus brackets, plus a reference frame showing orientation and any defects. Move images into a named folder and add short notes or metadata for each series.
-
Final anti‑shake check
Enable mirror‑up or use a remote/2‑second timer, disable in‑body stabilization on a tripod, and review 100% crops before packing up.
Turn off lens or body stabilization when on a tripod.
Use a remote release or 2s/5s timer to avoid contact blur.
If available, enable mirror‑lockup and wait a second after the release.
Review a 100% crop to confirm sharpness before changing setup.
Minimal post‑processing workflow
Minimal edit workflow
Start with a tight cull and pick the best frame at 100% for focus and composition. Apply this short sequence to every keeper to build consistency.
- Raw exposure and color: set a neutral camera profile, correct white balance, then adjust exposure, contrast, highlights and shadows using the histogram as a guide. Use Vibrance instead of heavy saturation for natural tones.
- Color tuning: make small HSL adjustments to tame brassy tones or boost dial accents. For a step‑by‑step approach to consistent color, start with the concise Lightroom workflow.
- Dust removal: inspect at 100% and remove blemishes with a heal/clone tool. Work on a duplicate layer or virtual copy so edits remain non‑destructive.
- Sharpening and noise: apply modest capture sharpening, mask sharpening to edges, and add light noise reduction only where required. Export in sRGB with appropriate output sharpening for screen or print.
What to practice next
Practice consistent white balance with reference cards, build a small set of export presets, try focus‑stack blending, and time trials for a one‑minute clean retouch.
- Essential four steps A four-step edit sequence: exposure/color adjustments, local color tuning, spot healing, and edge‑focused sharpening.
- Batch consistency Apply presets and copy settings across similar shots to keep catalog images uniform and faster to deliver.
- Clean retouching Remove dust at 100% and sharpen with masks to avoid haloes; prefer subtlety over heavy processing.
Practice one skill
- Limit practice to a single technique (lighting, stacking, or retouching) for focused progress.
- Keep a short log of settings and setups to reproduce successful results.
- Short, frequent sessions compound faster than occasional marathon shoots.
Small, steady practice beats sporadic perfection. Focusing on one skill—lighting, stacking, or retouching—makes improvement measurable.
Repeat short sessions, record exact setups, and refine one variable at a time. Those repeatable steps compound quickly; consistent technique reliably produces better watch photos.
Thanks for the stacking explanation — I get DOF, but can someone explain practical signs that tell you “stacking is necessary” vs “single frame is fine”? I shot a vintage dress watch and the lugs and hands couldn’t both be sharp in one frame, but I’m not sure if that’s just bad technique or a stacking case.
If the hands and the lugs are on noticeably different planes and you’re shooting at high magnification (1:1 or more) with f/8–f/16 and still can’t get both sharp, that’s stacking territory. Also if you need consistent sharpness across multiple watches for listings, stack.