
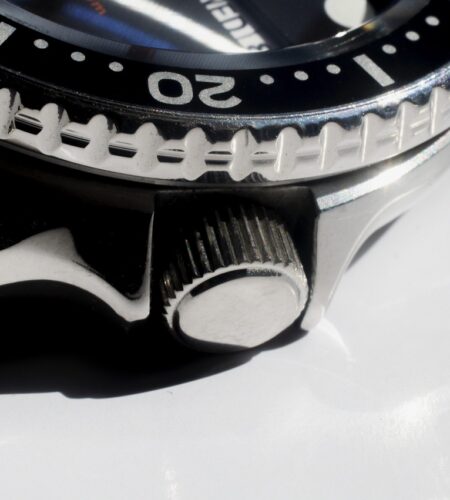
A ceramic insert looks perfect — will it actually fit?
An owner opens a parcel and holds a glossy ceramic ring up to the Seiko SKX case: it looks right, but the wrong insert can mean wasted money, a rattling bezel, or compromised water resistance. This is a practical fit-and-function problem, not a gamble — the right measurements and a careful selection make it solvable.
Measure the bezel seat carefully (inner and outer diameters and thickness), check the lip/profile and clip/tab style, and buy from a maker who lists tolerances. Small mismatches are fixable with the correct tolerance or a professional press; large differences are not.
- Digital calipers are essential for inner/outer diameter and thickness.
- Confirm clip/tab type and lip profile with the seller before ordering.
- Allow ~0.1–0.3 mm tolerance; use a thin gasket or pro install for minor gaps.
Quick verdict
Verdict: Measure the ceramic insert’s outer diameter (OD) and confirm the clip/retaining method — if both match the SKX bezel, the insert will fit; if either differs, it will not.
Core rule: OD + clip = fit. The insert must sit on the bezel lip and the tabs or clip must engage the existing retaining ring or spring.
Quick action steps:
- Measure the insert OD with calipers across the top.
- Check insert thickness and lip profile against the bezel.
- Verify clip/tab type matches the SKX retaining system.
- Buy only inserts labeled “SKX-compatible” or with a return policy.
Parts of the SKX bezel and why 'insert-only' matters
What’s inside the SKX bezel assembly
The SKX bezel is three related pieces: the outer steel bezel ring (the metal carrier that snaps to the case and contains the ratchet), the removable insert (in this case ceramic, the decorative ring with minute markers and the lume pip), and the bezel/case interface (click spring, locator tabs, and the case lip that set rotational position).
Why the difference matters for alignment
If a part is sold as “insert-only”, the ceramic disk will sit inside the existing steel ring and inherit whatever rotational position that ring enforces. That can leave the minute markers or lume pip misaligned with the internal chapter ring (minute track) because the outer ring’s locator tabs or index stop dictate final orientation. Buying a full bezel ring (steel carrier plus insert) gives control over how the markers line up relative to the case and chapter ring.
Quick checklist before buying:
- Confirm listing language and photos: “insert-only” vs “complete bezel ring.”
- Look for visible steel carrier and locator tabs in photos.
- Measure outer diameter and clip type to match the SKX ring.
For practical alignment steps and troubleshooting, see aligning a chapter ring and bezel markers.
Compatibility factors that actually matter
Several geometric and mechanical details together determine whether a ceramic insert will seat and stay in an SKX bezel. Matching one or two numbers (for example, outer diameter alone) is seldom sufficient.
Key measurements and geometry
- Outer diameter (OD): Must clear the bezel ring bore without binding. A few tenths of a millimeter difference can still cause wobble or tight spots.
- Inner diameter (ID) / flange width: The insert’s inner lip must clear the case and leave room for the chapter ring or dial edge.
- Thickness: Controls how the insert sits relative to the bezel top and how much the retaining clip engages.
- Ledge / step height: The bezel ring usually has a shelf that the insert rests on. Ledge height and position must match the insert flange.
Mechanical retention details
- Clip type and engagement: SKX bezels use a specific clip/spring geometry. Inserts with a different flange profile won’t engage the clip reliably.
- Retention spring tension and contact area: Ceramic is rigid and tolerant of less deformation — insufficient contact area or weak spring means the insert can pop out.
- Chamfers, bevels, and alignment features: Small chamfers help seating; indexing tabs or flats align markers. Missing features lead to misalignment or loose fit.
Practical implication: verify OD, ID, thickness, ledge height, and clip profile together — not just one or two values — before trusting a swap.
Step-by-step: measuring an SKX bezel seat
-
Prepare tools and workspace
Use a digital caliper (0.01 mm resolution), a depth micrometer or the caliper depth rod, a small non-marring pry tool, a loupe or smartphone macro lens, and a ruler or coin for scale in photos. Work on a soft, well-lit surface and protect the crystal with tape before any pry.
-
Remove and inspect the bezel
Gently lift the bezel using a plastic pry tool at the gap; never force it — stop if resistance is high and consult a watchmaker. Clean debris from the seat so measurements and photos are clear.
-
Measure diameters and check roundness
Measure outer diameter (OD) of the insert seat and inner diameter (ID) where the insert bears, taking readings at 12, 3, 6, and 9 o’clock and note the largest and smallest values. Record all values in millimeters.
-
Measure depth, ledge and clip dimensions
Use the caliper depth rod to measure seat depth (thickness) and the ledge height where the insert sits. Measure slot widths or visible clip recesses with the caliper jaws to capture clip engagement size.
-
Capture profile photos and notes
Photograph top and side profiles with a ruler or coin for scale and a macro close-up of clip tangs and spring area. Note clip count/positions and any chamfers, tapers, or corrosion that could affect fit.
Do not force parts; if the bezel resists removal or clips look bent, stop and seek professional help.
Why ceramic inserts vary and what to demand from sellers
Ceramic inserts look similar at a glance, but small differences in production change fit and function. Ceramics are sintered and often shrink during firing, so OD/ID can drift. Glazing or polishing alters surface thickness and edge radii, and lume pockets (cut, filled, or painted) change local thickness and ledge engagement. Finally, trimming and chamfering for clip clearance vary by supplier and determine whether the insert sits flush or binds.
What to insist on from sellers
Ask for clear, verifiable details before buying:
- Measurements: OD, ID, overall thickness, and ledge height (in mm). Request stated tolerances (±0.05–0.1 mm is reasonable).
- Photos: top, side, and underside close-ups showing clip recesses and marker detail; include a ruler or caliper for scale.
- Finish notes: whether markers are engraved, painted, or lume-filled and whether the surface is glazed or matte.
- Clip layout: number, position, and profile of clip cutouts.
Sellers who provide these specifics greatly reduce the risk of an ill-fitting insert.
Installation options and trade-offs
Practical routes to fit a ceramic insert
Choose an approach based on how permanent the change should be and how much risk to the bezel’s click and watertightness is acceptable.
- Press-fit (clip engagement). Best when the insert exactly matches the SKX seat and clip profile. Pros: clean appearance, minimal materials. Cons: can bend clips, reduce click feel, or crack ceramic if misaligned; often requires friction-fit tools or light heat.
- Adhesives (epoxy, silicone, double-sided tape). Pros: fills small gaps and secures mis-sized inserts. Cons: usually permanent, messy, and can block the click spring or foul the bezel action. Use low-bloom silicone for less permanent results.
- Shims (thin PTFE tape or thin metal rings). Pros: reversible and good for small ID/OD mismatches. Cons: needs careful layering to avoid wobble and may alter rotation smoothness.
- Full-bezel replacement. Replaces the outer ring and insert together — the safest long-term fit but costs more and may change original feel.
Any modification can affect sealing; see the details on how bezel or crystal swaps affect water resistance before proceeding. Test rotation and pressure resistance after installation.
Start with shims or low-tack adhesives. Reversible methods preserve the original click spring and seal. If a press-fit is necessary, use a non-marring press and check engagement frequently. For doubts or worn clips, consider a full-bezel swap or professional service — repairing a ruined click spring is harder than replacing an insert.
If the insert rattles
Quick diagnostics
If a newly fitted insert rattles, first diagnose the source. Lightly shake and rotate the bezel — rattle from the insert is audible and felt as lateral play; a normal click with no side-to-side movement usually means the spring/rail is fine. Visually inspect the seat for gaps or uneven trimming; a visible gap along the inner ledge is the common sign.
Repair options
- Shims: use thin PTFE/acetate strips or tape behind the insert to take up slack. Reversible and safest first step.
- UV-curing adhesive: apply a tiny bead to the ledge, press home, then cure; choose this only when fit is nearly correct.
- Full replacement: replace the insert or whole bezel if dimensions are wrong or the steel ring is damaged.
Recheck click and water-resistance after repair. For a step-by-step, photographed walkthrough see fix a rattling bezel insert.
Buying checklist and seller inquiry
A short, scannable checklist reduces surprises. Collect numbers, photos, and the seller’s return terms before committing.
Essential checklist
- Outer diameter (OD) and inner diameter (ID) (to nearest 0.1 mm).
- Seated thickness and ledge (seat) height.
- Clip/retention method: clip profile, spring engagement or adhesive.
- Tolerance (acceptable ±mm).
- Finish, color match, and lume alignment.
- Close-up photos: top, seated side with caliper and ruler, underside showing clip profile.
- Return policy, warranty, and shipping/protection details.
Quick message to sellers
Hello — please confirm exact OD, ID, seated thickness, ledge height, clip/retention method, and production tolerances for [item/model]. Attach clear photos: top, side seated in a bezel, and underside showing the clip profile with a caliper or scale. Also state return policy and restocking fees. Thanks.
See watch modding guide for beginners and essential tools for bezel swaps for measurement and safe-install guidance.
Quick FAQ
Will any ceramic insert fit an SKX bezel?
Only if OD, ID, thickness and clip profile match. Seller measurements and photos are required.
Can an insert affect water resistance?
Yes. Improper seating or adhesive can deform the spring or seal, risking water resistance; reversible fits reduce risk.
Will the bezel click still work?
Yes. Altered ledge or spring engagement can dull the click; a full bezel swap preserves it.
How to ensure color and finish match?
Ask for SKX-case photos and stated tolerances. Expect glazing or print color variation between batches.
Three-step checklist and practical rule
- Measure OD, ID, thickness, ledge and clip; compare to seller specs.
- Require close-up photos and stated tolerances before purchasing.
- Prefer reversible installs (shims, removable press-fit) or buy a full bezel if uncertain.
Practical rule: choose reversible solutions or the full bezel if unsure. Reversible fits protect the click and seal and keep corrections inexpensive.
I’m on the fence about press-fit vs adhesive.
The article’s advice to prefer reversible fixes makes sense if you care about the original click and seal. But if I want a perfect ceramic flush look and the insert is slightly undersized, is minimal UV adhesive really safe long-term? I’m worried about melting gaskets or making it impossible to remove later.
Good question — minimal UV adhesive can be safe if applied sparingly to the insert lip only (avoid the inner seat where the gasket sits). Use a low-shrink, watch-safe adhesive and test on a donor bezel first.
If preservation and reversibility are priorities, try shims or a full replacement bezel; those protect the click and seal better. We added a short how-to on using thin brass shims in the installation guide linked in the article.
Short and sweet: if you’re not comfortable measuring ledge and clip, buy a full bezel. Saves time and the mystery of what you’re gluing into place.
Thanks for the seller email template — saved me a bunch of back-and-forth. Also love the bit about preferring reversible fixes first.
Great write-up — finally something that stresses measuring the ledge and clip profile, not just the OD. I tried a cheap insert once and the minute markers were off by like half a click because the ledge height was wrong.
Quick Q: for someone without calipers, is photographing the bezel with a ruler and sending that to the seller usually enough to get a reliable fit, or is that a gamble?
I tried buying an ‘SKX-compatible’ ceramic insert last month and it rattled like crazy. Measured OD and thickness but didn’t check clip profile — rookie move.
FYI: the seller sent a polished insert that was trimmed oddly and the markers didn’t line up with the steel ring. Ended up buying a full aftermarket bezel instead. Lesson: demand photos of the actual piece and tolerances (as you suggested).
Anyone know a reliable seller that provides the measurements + scale pics? I want to avoid another headache.
Try MaxModsCo on the watch forums — they usually post OD/ID and clip photos. Not cheap but better than the generic listings. Also ask for a photo of the insert installed in a donor SKX bezel before buying.