
Spot a Fake Rolex Fast — No Specialist Required
A quick, practical roadmap to identify common Rolex fakes using everyday checks. Follow five focused steps — paperwork, dial, case, bracelet, and tech verification — so you can spot counterfeits confidently before you buy or sell with quick visual and tech checks.
What You Need
Start with the Box, Papers, and Serial
Can fancy packaging and a warranty card fool you — or will they blow the con artist's cover?Begin with provenance. Compare the box, warranty card, manual, hang tags, and receipts against known originals for that model and era.
Compare these items for obvious flaws: sloppy printing, wrong fonts, mismatched holograms, poor-quality laminates, or incorrect logos. Check packaging details like inner cushion shape, foam inserts, and serial stickers; those often differ on fakes.
Verify the serial and reference numbers. Inspect the engraving between the lugs (remove the bracelet) or on the rehaut (inner bezel) for modern Rolexes and confirm they match the warranty card.
Run these checks:
Example: If a supposed 2010 Submariner shows a modern-style rehaut engraving but an older-style warranty card, treat that as suspicious.
Run the serial through reputable databases or ask a Rolex-authorized service center to confirm issuance dates and model pairing. Paperwork alone doesn’t guarantee authenticity, but glaring errors or mismatched numbers are immediate red flags.

Inspect the Dial, Hands, and Crystal
One misprinted logo or a crooked index — and the whole story falls apart.Use a 10x loupe and strong light to examine the dial printing. Look for razor-sharp edges on the Rolex crown, consistent font weights, and even spacing—blurry ink or uneven letters mean trouble.
Check the lume under dark or with a UV torch. Authentic Rolex lume is evenly applied and matches the model’s expected color; uneven blobs or wrong color suggest a fake.
Test the Cyclops date magnifier with the date set to a clear number. Original Rolex magnifies roughly 2.5x and centers the date fully in the window. Example: a weak 1.3x magnifier that only partly fills the date aperture is a common replica giveaway.
Inspect the crystal and hands closely. Many modern Rolexes have a tiny etched crown at 6 o’clock—find it with magnification. Confirm hand shape and finishing; incorrect lengths, rough edges, or a second hand that ticks instead of sweeping smoothly are red flags.

Examine the Case, Crown, and Caseback
If the crown looks cheap, the whole watch probably is — so don't skip this close-up.Check the case finishing: inspect the brushing and polishing transitions under strong light or a loupe. Look for razor-sharp edges and consistent finishes—blurry or uneven polishing means poor machining.
Inspect crown guards and the winding crown: confirm the crown is crisp, correctly proportioned, and screws down smoothly without wobble. Example: a genuine Submariner crown threads firmly and seals; a loose-feeling crown is suspect.
Verify the caseback style: expect a plain, solid caseback on most Rolex models. Flag any clear/see-through backs—visible movements are almost always a fake.
Confirm engraved reference and serial numbers: find sharp, deeply cut numbers between the lugs on older models or on the inner rehaut for newer ones. Watch for shallow, sandy, or misaligned engraving.
Feel the weight and crystal: expect substantial weight for the model and a scratch-resistant sapphire crystal—no flex or plastic feel.

Check the Bracelet and Clasp Details
Bracelets spill secrets faster than any sales pitch — solid links or folded metal? You'll know.Inspect the bracelet construction: genuine Rolex bracelets use solid end links or tightly fitted end pieces; cheap fakes often have hollow links or visible pin holes.
Feel the end links and how they meet the case—solid links sit flush with no gap; loose or rattling end pieces are a warning.
Examine link finish and edge quality—edges should be smooth, chamfered where appropriate, and consistently finished; rough, sharp, or uneven edges point to poor machining.
Look at the clasp: Rolex clasps carry precise, crisp stamping, a model/reference code, and a positive, secure action. Test the micro-adjustment system—Submariner Glidelock or Oysterclasp Easylink should move smoothly and lock without play.
Check for proper engraved logos, part numbers on end links, and quality screw heads—Rolex uses screws rather than cheap push-pins in many areas. Inspect screw slots for neat machining and consistent heads.
Test for stretch—excessive link play suggests low-quality materials. A flimsy clasp, wrong stamps, or mismatched bracelet reference strongly indicate a replica.

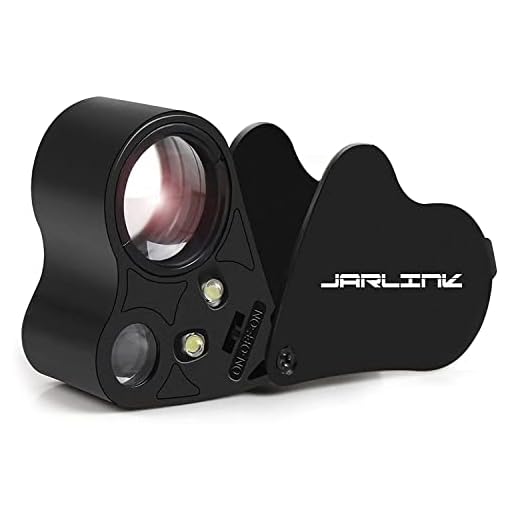
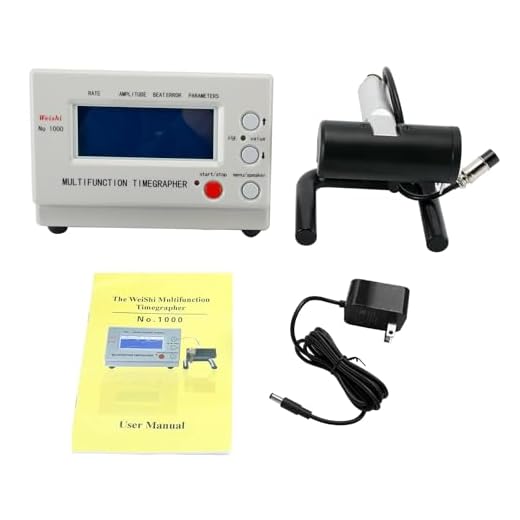
Use Tech, Weight, and Professional Verification
Scale, app, or an expert — which catches counterfeits quickest? Use all three when possible.Weigh the watch and compare the result to official specs; many fakes feel noticeably lighter. Weigh on a jewelry scale and cross-check model weight in manufacturer sheets, auction records, or watch databases.
Use online databases, reference photos, and auction records to confirm dimensions, reference numbers, and dial/hand layouts. Use examples: compare a measured lug-to-lug or case thickness to published specs.
Have a trained watchmaker open the case to inspect the movement; authentic Rolex movements show high-quality finishing, engraved rotors, specific bridge layouts, and serial/part stamps. Have the watch opened only by a pro—seeing a generic stamped movement is definitive evidence of a fake.
Use a timegrapher to measure rate and amplitude, or observe the second-hand sweep—Rolex calibers often run around 28,800 bph (≈8 beats/sec) for a very smooth motion. Use UV light to check lume color and consistency across indices and hands.
Get a Rolex-authorized service center or reputable independent watchmaker to authenticate and provide documentation — professional verification is the safest final step.
Final Word
Work through these five checks in order; if anything feels off, stop the deal and seek professional authentication. Small inconsistencies stack up—trust the combined evidence, not a single reassuring detail. Try it, share your results, and protect your purchase today.
Loved the line about ‘no specialist required’ — felt like detective work but without the trench coat. 😂
Also, pro tip: bring a small flashlight when meeting a seller in daylight. Glare can hide scratches or repaints.
I feel seen. The trench coat vs loupe dilemma is real 😆
Flashlight is clutch. I also bring a portable loupe and a mini scale, looks like I know what I’m doing lol.
If you’re buying in person always check the crown winding — fakes often have gritty winding action.
Haha, trench coat optional. Flashlight is a great tip — it helps reveal polishing marks and dial imperfections.
Don’t forget to screw the crown down (if model has it) to check the threads. Smooth but secure = good sign.
Nice layout. A few additions I use: cross-reference serial with online databases, check the font weight of the model name on the dial, and compare lug hole spacing on expected models. Small discrepancies add up.
Excellent granular tips — lug spacing and font weight are subtle but powerful indicators. Thanks for sharing.
Serial lookup saved me once when a seller sent a photo with a mismatched model. The database flagged it immediately.
Agreed. Also check the crown tube length — can’t believe how many replicas miss that.
I second the lug hole spacing advice. Even on reps that get the dial right, the case geometry often gives them away.
I liked the tech section — apps and magnifiers made the dial inspection way easier for me. But two questions: which apps are actually reliable, and how much should a proper weigh scale cost?
For apps, look for ones that offer high-res zoom and guideline overlays — nothing magical, just clarity. For scales, a basic jewellery scale accurate to 0.1g is fine and usually <$30.
I use a jeweller’s pocket scale I bought online for about $25. Works well for a quick check — compare against known specs if you can.
Short and sweet: awesome primer. Saved me time — cheers!
Same here — concise and practical.
Thanks Maya! Glad it was useful.
Practical and easy to follow. The bracelet and clasp details section saved me from buying a fake GMT recently — the clasp code was wrong. Thanks for simplifying it.
Clasp codes + endlink fit = big tell. If the endlinks wobble, that’s a red flag.
Happy to hear it helped, Hannah! Clasp codes are an underrated checkpoint.
Great guide — super clear and practical. I liked the bit about starting with the box and papers; you’d be surprised how many sellers forget that. Quick tip: always take a picture of the serial and compare fonts closely.
Agree — pictures help a lot. Also check the warranty card hologram if it’s present.
Good reminder about fonts. I once saw a serial with the wrong dash spacing and it was a fake.
Thanks Emily — glad it helped! Font differences on the serial are a subtle but telling sign. If you want, share a pic (no personal info) and I can point out what to look for.
Anyone here measured the weight differences for a Sub Date vs Sub No-Date? I’m curious what to expect. Also — do aftermarket crystals affect weight noticeably?
If you want numbers I have a 16610 and a 14060 — they differ by about 7g on my scale. YMMV.
Sub Date usually a few grams heavier due to the date mechanism and cyclops. Aftermarket crystals can change weight a bit but not drastically unless they’re thicker.
Good question. Expect a variance of ~5–10g between some variants. Aftermarket parts can alter weight, but the movement swap is usually the bigger cause.
Good article but felt a bit basic in places. For example, the caseback section could’ve dived deeper into serial placement differences across eras. Still, a solid primer for non-specialists.
+1 for more photos. Visuals of genuine vs fake casebacks would be super useful.
Yep — basics are great for newbies, but us hobbyists want the nerdy stuff. More pics would help too.
Appreciate the feedback, Daniel. We aimed for accessibility but could add an advanced section on year-by-year serial placement and hallmark changes. I’ll add that to the update list.
Okay long post incoming because I got burned once and I still remember it 😂
I bought what I thought was a vintage Submariner from a sketchy listing. The box looked legit, papers kinda matched, but the dial was off — the lume was uneven and the hands had a weird polish. I ignored the caseback because I was in a rush.
Lesson learned: always inspect the dial under a loupe, check the crown engraving, and if anything feels ‘off’ walk away. Also, don’t forget: some fakes come with fake-old papers, so serial checks are crucial.
Wow, that’s such a bummer. Did you try contacting the seller for a refund?
Vintage fakes are the worst because they’re made to age. Always ask for movement pictures — that’s a giveaway.
Agree with Daniel — movement pics and caseback shots saved me before. Also, pay attention to the printing on the dial: if it looks too bold or fuzzy under magnification, it’s likely fake.
Ouch, that sounds rough. Thanks for sharing — it’s exactly why we emphasize multiple checks (box, dial, crown, weight). If you still have the watch, a pro verification can at least get you some closure.
Quick question: for the tech apps mentioned, are there ones that can identify fakes automatically or just magnification tools? Anyone tried automated recognition?
Most consumer apps are magnifiers and photo comparison tools — automated fake detection is still unreliable. Some services offer expert-verified listings but they usually charge a fee.
I’ve tried a couple of AI apps; they gave mixed results. Use them as a helper, not a decision-maker.
Nice read. I used the crystal inspection tip last weekend and it actually helped me spot a polished dial. Felt proud lol.
Polished dial? Oof. Sellers sometimes call it ‘refreshed’ — buyer beware.
Nice catch, Tom — polished dials can really change the character of a watch. Glad the tip paid off!
Story time: bought a so-called ‘good deal’ diver a few years back. Box, papers, even the warranty card looked right. I used the weight test from the guide and it felt off by ~8g. Took it to a trusted watchmaker who opened it — wrong movement entirely. Ended up getting a partial refund.
Moral: weight + movement pics = golden combo. Don’t skip the pro verification if you’re spending big.
Thanks for sharing, Jason — that’s a textbook example of why multiple checks matter. Good you got a partial refund.
Movement pics saved me once too. Sellers who refuse usually have something to hide.
8g difference is huge. Glad you caught it before it became a wall-hanger.
This is why I keep a spreadsheet of model weights. Helps when you’re comparing in person.
Always ask for movement pics. If the seller hesitates, that’s a red flag.
Really thorough for a quick-check guide. A couple of constructive notes:
1) Consider adding a printable checklist so people can carry it when meeting sellers.
2) A short flowchart (buy/check/next steps) would help inexperienced buyers decide when to walk away.
3) Maybe include a small FAQ addressing ‘what if the seller refuses to open the caseback’ and ‘how to get professional verification cheaply’.
Otherwise, love the approachable tone and the emphasis on non-specialist tools.
If you need a simple checklist template I can share one I made in Google Docs.
Fantastic suggestions, Natalie. A printable checklist and flowchart are great ideas — we’ll draft those for the next update. FAQ on seller refusal and low-cost verification is also on the list.
A printable checklist would be super handy. Could be laminated and kept in your phone case.
Agree with the flowchart idea — helps when you’re rushed or stressed during a meet.
Honestly, some fakes are so good these days that half the job is negotiating with your brain (want > logic). This guide is solid for that first pass though. 😜
Buyer’s emotions vs facts = the eternal struggle. Bring a friend who knows nothing about watches; their fresh eyes help 😂
Lol same. I almost convinced myself a mint rep was legit once. Checklist saved me.
Totally — confirmation bias is real, especially when you really want a piece. The checklist is meant to give a more objective baseline.