Travel Hack: Resize Your Metal Watch Bracelet Without Tools
Why Knowing How to Resize a Metal Watch Bracelet on the Go Matters
Ever been stuck with a bracelet that pinches or slides because of heat, flight swelling, or a loose clasp? These small problems can spoil a day of travel. Knowing how to resize your metal watch bracelet without special tools saves time, money, and irritation.
This guide focuses on safe, reversible adjustments using everyday items you can find while traveling: paperclips, pins, pens, and coins. The goal is temporary and precise resizing you can undo later. Expect clear steps, simple safety tips, and tricks to make your watch comfortable until you can visit a jeweler. Keep your watch wearable and enjoy your trip. Carry confidence wherever you go.
Adjusting a Casio AE1200WHD Bracelet Without Tools
1
Understand Your Bracelet: Types, Links, and Where Adjustments Happen
Common bracelet types — quick ID guide
Knowing the construction saves time. Look at your bracelet from the side and underside to spot these common types:
Pin-link: slim pins join solid links; often marked with tiny directional arrows on the inside. Common on mid-range dress and sport watches (many Citizen and Seiko models).
Screw-link: visible screw heads on the link sides; remove with a proper screwdriver. Found on higher-end bracelets like many Rolex Oyster examples and some stainless steel Seiko offerings.
Stretch/expansion: accordion-style bands that expand over the hand; common on older Timex or affordability-focused designs.
Folded-link (hollow): thin, folded metal that looks lighter and can bend easily — typical on vintage or budget bracelets.
Each behaves differently when you try a field adjustment, so identifying the type is your first safety step.
Practical Choice
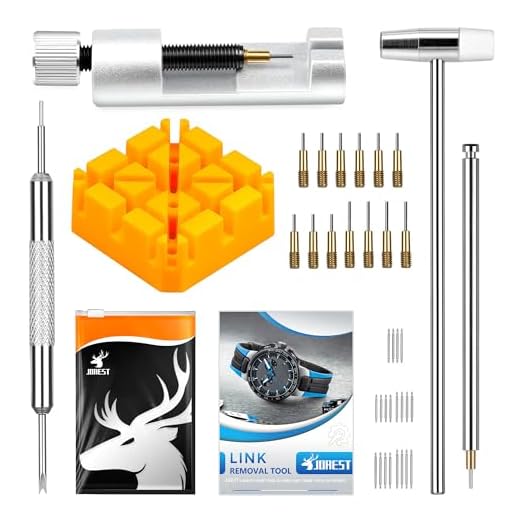
Compact Watch Band Link Removal Tool Kit
Five spare pins and sturdy plastic body
A user-friendly tool set for adjusting and repairing watch bracelets, with spare pins and multiple punch sizes for different strap diameters. Durable construction makes it suitable for quick at-home sizing and minor repairs.
Collar vs. push pin: some pins sit in a tiny metal sleeve (collar). If one side of a removed pin shows a tube, that’s a collar — it can fall out and is easy to lose.
If you see arrows, you can usually push pins out in that direction with a pin or sharpened paperclip. If you see screws, stop and only use the proper screwdriver — improvised drivers can strip heads.
Clasp micro-adjustment and quick-fit features
Check the clasp underside for small holes or a sliding clasp plate. These are micro-adjust slots that allow 1–3mm differences without link removal. Some modern bracelets also have “quick-release” pins or a diver’s extension — handy for hot days or wetsuits.
Which method is appropriate — field vs. pro?
Consider three red flags that mean “take it to a jeweler”:
Visible screw heads or specialty fasteners.
Hollow/folded links that flex or creak (easy to damage).
High-value or sentimental watches (risk of irreversible harm).
If pins match the arrows, are easy to budge, and the bracelet feels solid, a careful field adjustment is reasonable. If anything resists, corroded, or has tiny collars, stop and seek professional help.
2
Preparing for a No-Tool Adjustment: What Everyday Items Work and Safety Tips
Gather improv gear you can find anywhere
When you’re traveling, useful items often live in your pocket or toiletry bag. Helpful improvisations include:
Paper clips (straightened) — excellent for pushers.
Safety pins — a strong, thin push rod when opened.
Sewing needles or thumbtacks — for very fine pins (use with extreme care).
Thin coins (dimes, 1‑cent Euro) — as shims under a clasp or to lever a spring bar.
Small screwdrivers from eyeglass kits — only if they match screw size exactly.
Toothpicks, folded paper, or a thin strip of cardboard — nice non‑marring shims and levers.
Small ziplock, pillbox, or folded business card — to keep removed parts organized.
Anecdote: I once used a straightened paper clip and the tiny flathead from an eyeglass kit to nudge two links on a Seiko while waiting in an airport lounge — it took patience, not force.
How to make makeshift levers, pushers, and shims
Paper clip pusher: straighten, then bend a small 90° tip about 2–3 mm long to press a pin. Use the long side as a handle for leverage.
Safety‑pin rod: open and hold the locked end as a grip; the pointed end pushes pins with less chance of slipping.
Needle caution: sandwich a needle between two folded papers if you need to protect the watch head from a slipping point.
Coin shim: slide a thin coin under a stuck clasp plate to lift it cleanly without scratching.
Cardboard/toothpick: great for temporary bracelet padding if you need comfort but can’t remove links.
Editor's Choice
Complete Watch Band Repair and Resizing Kit
Includes leather punch and extended punches
A versatile repair kit that adds a leather strap punch and longer, reinforced pin punches for tougher straps. Designed for beginners and hobbyists, it includes clear instructions to help you resize and fix bands safely.
Find a stable table, good light (phone flashlight + window), and lay a soft towel or microfiber cloth to prevent scratches.
Work over a shallow tray or plate to catch tiny pins and collars.
Photograph each step and arrange removed parts in order on the towel; small ziplocks or pillboxes are lifesavers.
Keep hands clean and dry; wipe any improvised tools with an alcohol swab to avoid transferring oils or salt that can corrode stainless steel.
Personal safety — protect yourself and the watch
Work slowly; if a pin won’t budge with gentle pressure, stop.
Avoid levering from the watch crystal or caseback to prevent chips or pressure cracks.
If you encounter screws, collars, corrosion, hollow links, or excessive resistance — or if the watch is expensive or sentimental — find a jeweler or use the tools rather than risking damage.
3
Step-by-Step Methods to Remove or Add Links Without Tools
Practical, sequential steps you can follow in an airport lounge, hotel room, or campsite — using only everyday items to remove or add links safely.
Pushing out push‑pins (paper clip / needle method)
Orient the bracelet so the side with the small groove or arrow faces up.
Support the bracelet on a soft cloth; place a folded toothpick or paper under the link opposite the pin to prevent the link from collapsing.
Insert the straightened paper clip or sewing needle into the pin hole and apply steady pressure in the arrow’s direction. Tap gently with the back of a pen if needed.
Once the pin protrudes, grip it with fingernails or a folded piece of paper and pull it free.
Must-Have
All-in-One Watch Link Remover and Repair Kit
Comes with 20 spring bars and spare needles
A comprehensive kit for watch bracelet adjustment and pin replacement, featuring metal link remover, hammer, holder, numerous spare needles, and multiple spring bars. The included picture manual helps prevent mistakes and protects your watch during repairs.
Freeing screws or clamp links with a coin or folded paper
Slide a thin coin or folded business card under the clasp lip to lift and expose the screw head.
For shallow screw slots, use a thin coin edge or the flattened tip of a paper clip as a lever, turning slowly counter‑clockwise.
If the screw is rounded, sandwich a small rubber band between your improvised driver and the head for extra grip.
Compressing spring bars and collar pins with a safety pin
Open a safety pin and use its rounded tip to push the spring bar inward while holding the bracelet steady.
For collar pins, push the collar away from the link seam and slide the pin out laterally.
Always work over a tray — collars are tiny and easily lost.
Special cases: screw‑link and expandable bracelets
Screw‑link: stabilize the link with folded paper; use a tiny flat metal edge (coin, nail file) to turn the screw slowly. If it won’t budge, stop — heat from a pocket lighter for a second (careful!) can expand metal slightly, but this risks finish damage.
Expandable/“stretch” bracelets: you can coax outer end pieces apart by gently prying between segments with a thin coin. Work gradually; expansion bands are held by folded pins that can unhook — don’t yank.
Reassembly, pin orientation, and common pitfalls
Reinsert pins in the same direction they came out; many are tapered and retain best when driven from the small end toward the wider head.
Keep collars or C‑clips in place using a folded toothpick while pushing the pin.
Common problems and fixes:
Bent pins: replace or carefully straighten on a cloth; don’t hammer.
Lost collars/clamps: store spares (or use a small drop of clear nail polish as a temporary retainer).
Stripped screws: stop and seek the or a jeweler — forcing causes damage.
With these hands‑on methods you can usually tailor fit a bracelet on the spot. Next, we’ll look at micro‑adjustments and quick comfort hacks to fine‑tune the fit without deconstructing links.
4
Micro-Adjustments, Clasp Hacks, and Temporary Comfort Fixes
Use the clasp’s micro‑adjust slots
Many clasps have a set of small holes or a sliding bar that lets you fine‑tune length in 1–2 mm steps without removing full links. To move it:
Open the clasp and locate the spring bar that anchors the bracelet to the clasp.
Support the bracelet on a soft edge (cloth or your knee). Use a straightened paper clip, toothpick, or pin to press the spring bar inward and slide it to the next notch. Move in small increments and test fit after each shift.
Work slowly — spring bars can pop free and disappear into carpet or luggage.
A real‑world tip: on a hot day my Seiko needed a half‑step tighter on the subway — a folded business card under the clasp let me feel the difference before locking the spring bar into the next hole.
Essential
Stainless Steel Spring Bar Removal Tool
Solid stainless steel, pocket-sized precision
A slim, durable stainless steel tool for removing and installing spring bars and pins on watch straps. Lightweight and easy to carry, it’s useful for quick strap changes and small repairs.
Short‑term solutions that prevent rubbing, pinching, or excess sliding:
Thin strip of soft fabric or moleskin placed under the bracelet to stop metal-on-skin chafing.
Folded business card or luggage tag tucked beneath a segment to take up slack and reduce rotation.
Small silicone tube (from a cable or pen) cut and slipped over a single link as a spacer to prevent lateral movement.
Thread a tiny hair tie through a link pair to keep the watch from sliding up your arm during active moments.
Always check circulation and comfort; these are meant as temporary fixes for flights, long walks, or meetings.
When temporary is appropriate — and when to get it done properly
Use micro‑adjusts and quick hacks for one‑off discomforts: heat/swelling, sports, or brief travel days. Seek a permanent resizing (link removal/addition or professional spring‑bar replacement) if the bracelet constantly slides, leaves indentations, causes irritation, or if you repeatedly need the same hack. Next, we’ll cover troubleshooting common mishaps and making these adjustments travel‑proof.
5
Troubleshooting, Recovery, and Travel-Proofing Your Bracelet
Common problems and safe first steps
Pins that get stuck, bent, or fall out are the usual culprits on the road. Start with calm, small movements — haste often ruins parts.
Stuck pin: work on a soft, stable surface. Push the pin out from the direction indicated by the tiny arrows on the inside of many links. Use a straightened paper clip or a sewing needle to nudge it a millimeter at a time; wrap the end with tape or rubber for grip. Avoid hammering or forcing — that’s how pins bend.
Bent pin: don’t yank it. If it’s only slightly curved, you can gently roll it between two firm surfaces (cardboard-covered bench edges) to straighten a little. If it resists, stop — a brittle pin can snap.
Lost pin: treat it as missing hardware (see stabilizers below) and record which link it came from — that saves time later.
A personal note: I once lost a tiny Seiko link pin while packing — a safety‑pin held the two links aligned for the rest of the trip until I replaced it at a repair shop.
Temporary stabilizers that actually work
If a pin goes missing mid‑trip, stabilize the bracelet so it doesn’t fall apart or cut you.
Toothpick or trimmed matchstick splint: insert into the pin hole, break flush, then coat the ends with a drop of clear nail polish to lock it.
Doubled thread or dental floss: thread through the adjacent holes and tie securely; tuck the knot inside the bracelet to avoid catching.
Small safety pin or sewing pin: run through both link holes and close/trim the sharp end; tape over the tip.
Clear nail polish: a tiny drop can hold a loose pin or splint in place temporarily and is easy to remove later.
Preserve parts for professional repair
Save every removed pin, link, and spring bar in a labeled pillbox, small zip bag, or the watch’s original box. Wrap bent or fragile pieces in tissue to avoid further damage. Photograph the bracelet’s original layout (count links from the clasp to the watch head, note which side links were removed) — a jeweler will thank you.
Editor's Choice
Deluxe 155-Piece Professional Watch Repair Kit
Complete set with XL case opener
A comprehensive 155-piece toolkit covering most watch repair needs, from band resizing to battery changes and oversized case opening. Durable metal tools and a nylon storage bag make it convenient for both hobbyists and more serious repairs.
Pack a tiny kit: 2–4 common spare pins, a safety pin, a small container, a folded paper clip, toothpicks, a mini tube of clear nail polish, dental floss, and a couple tiny zip ties. Prefer bracelets with micro‑adjust or quick‑release options (mesh or NATO-style straps are travel-friendly alternatives). Photograph your current configuration before you leave so any replacement matches the original fit.
Seek a watchmaker when pins are badly bent, the clasp fails to lock, links are stretched or cracked, water resistance may be compromised, or you want a permanent match for OEM parts — especially for valuable or vintage pieces.
With those fixes and precautions in your pocket, you’ll minimize mishaps and preserve your bracelet’s integrity until professional repair is practical.
Quick Recap and Confidence to Adjust Safely While Traveling
Identify your bracelet type first, note link and pin orientation, and prepare safe improvised tools (pushpin, straightened paper clip, or small pin) with a soft pad. Follow step-by-step methods on a stable surface, push pins in the correct direction, keep removed parts organized, and test fit incrementally. Use micro-adjustments or temporary clasp hacks if a full resizing isn’t possible.
Know when to stop and seek professional help if pins resist or the finish risks damage. Cautious, reversible adjustments keep you comfortable and protect your watch; plan ahead to avoid emergency fixes.
Ouch — flying pins are the devil. Magnet tray or small bowl on a towel works wonders. Good tip about trays in kits.
Ethan
on September 1, 2025
Short and sweet: the clasp hacks section saved my wrist at a wedding. I improvised a micro-adjust with a bent paperclip — comfy for a few hours.
Noah Bennett
on September 1, 2025
Wanted to say the product list was helpful. I own the Deluxe 155-Piece Professional Watch Repair Kit — heavy duty and basically a mini-toolbox. It’s overkill for casual travelers but perfect if you like tinkering.
One small gripe: the Compact Watch Band Link Removal Tool Kit picture shows a different pin size than what came with mine. Packaging annoyances aside, 10/10 for pieces.
Jacob
on September 1, 2025
Also check return policy — some sellers will let you swap pin sizes.
Emily Stone
on September 1, 2025
If you’re into tinkering, the Deluxe kit is fun. But I keep a small All-in-One Watch Link Remover and Repair Kit in my dopp kit for trips.
Lena Fischer
on September 1, 2025
Lol at ‘mini-toolbox’ — that’s exactly what mine is. Great for rainy weekends.
Thanks for the heads-up on packaging inconsistencies. We’ll note that in an update. The Deluxe kit is definitely for hobbyists — the Portable kits are geared more for travel.
Hannah O'Neil
on September 2, 2025
LOL @ the part where they said ‘confidence to adjust safely’ — confidence comes after one successful adjust. 😆
Minor rant: photos could be clearer on pin direction for different link types. I had to rewatch a YouTube vid to be sure.
Priya Nair
on September 3, 2025
Exactly. The text was fine but the arrow diagrams would’ve helped. Still, article does build confidence after a try.
Good call — we’ll look into adding clearer diagrams or photos in a future edit. Thanks for the honest feedback!
Emily Stone
on September 3, 2025
YouTube + article = dream combo. Visuals seal the deal.
Lena Fischer
on September 3, 2025
This is one of those articles I’ll screenshot and stash in my travel notes.
TIP: If you’re worried about losing a link, tape it to the inside of your luggage tag or stick into a small zip-bag. Saved my favorite bracelet once.
Short, practical, good job.
Nice tip, Lena — luggage tag or zip-bag is a good travel-proofing move. Thanks!
Priya Nair
on September 6, 2025
Was skeptical about no-tool methods but the step-by-step removal without tools actually works if you’re patient. The article’s safety tips (wear goggles? lol) were overkill but also sensible.
Ha — goggles are optional but safety-first if you’re prying hard or working in cramped spaces. Patience is the real key.
Marcus Liu
on September 7, 2025
Patience + good lighting. Also sit on a soft towel so pins don’t bounce away into the void.
Maya Collins
on September 13, 2025
Great read — I actually had to resize my bracelet on a train once and this would have saved me so much stress.
I liked the no-tool tips (paperclip + tape hack was genius). I do worry about scratching the finish though.
Has anyone tried the Portable Watch Link Removal and Resizing Kit vs just using a spring bar tool from a travel kit?
Also, small PSA: if your watch is sentimental, maybe avoid brute force 😂
Thanks Maya — glad it reminded you of that moment! The Portable Kit gives more control and is less likely to slip than improvised tools, but the Stainless Steel Spring Bar Removal Tool is great for quick micro-adjusts. Sandwiched cloth/tape can help prevent scratches.
Sara Lee
on September 13, 2025
Yep, tape + cloth is a tiny miracle. If it’s a dress watch, I’d still book a jeweler when you can.
Ethan
on September 14, 2025
I used a compact spring bar tool once and wrapped the pin area with a bit of masking tape — zero scratches. The Portable Kit is nicer but bulkier.
Diego Ramirez
on September 14, 2025
Okay, long one — forgive me, this hit a nerve 😅
I travel a lot for work and my bracelet always behaves differently with humidity and airplane pressure. The article’s troubleshooting/recovery tips are legit. A couple real-world notes:
– I always carry a tiny roll of electrical tape and a safety pin. They helped me do temporary holds during a 14-hour layover.
– Bought the Complete Watch Band Repair and Resizing Kit after reading this. Worth it for the extra pins and different pin sizes — saved me in three countries.
– One warning: if your bracelet has clipped-in links (not solid pins), forcing them can bend the link shoulders. Be gentle!
Anyone else have an emergency-resize story from travel?
Lena Fischer
on September 14, 2025
I learned the hard way that airport kiosks have very blunt tools — don’t use them on jewelry! Carry your own tiny kit if it’s a tried-and-true watch.
Thanks for the detailed share, Diego — that exact kind of field feedback is what we hoped to capture. Good tip on taped safety pin combos and the warning re: clipped links. Which kit model did you get for versatility?
Noah Bennett
on September 15, 2025
14-hour layover story: same. I once used a toothpick to push a spring bar enough to move the clasp micro-adjustment. Not pretty but worked.
To anyone trying toothpicks: use them as last resort and pad with cloth — they can splinter and make things worse.
Priya Nair
on September 15, 2025
Diego — I had a similar problem in SE Asia. The Complete Watch Band Repair kit was my savior too. It had a few odd pins that matched my older Seiko.
Jacob
on September 16, 2025
Constructive feedback: the article should have a quick ‘what to buy for travelers’ table: minimal (spring bar tool + compact kit), intermediate (Portable kit), pro (Deluxe 155-Piece). That would help people decide fast.
Maya Collins
on September 17, 2025
Agreed. I almost bought the Deluxe then realized I only needed compact stuff for my trips.
Great suggestion — a concise buyer’s guide is a smart addition. We’ll consider adding that breakdown.
Lucas Ford
on September 25, 2025
Helpful overall. One tiny nit: the ‘everyday items’ list could include a mention of using a safety pin as a controlled push tool (instead of a random paperclip) — safer and less likely to bend.
Also lol about the ‘travel-proofing’ checklist — I now tape a tiny label to each bag with a spare link. Old habits from my RC hobby 😂
The Stainless Steel Spring Bar Removal Tool is great for micro-adjusts (moving the spring bar a slot). For removing links you might prefer the All-in-One or the Portable Link Removal Kit. Clasp hacks are typically temporary — secure them with tape or a safety pin for hikes, but best to properly fix when you can.
Emily Stone
on October 16, 2025
Anyone else paranoid about losing spring bars? 😂 I started carrying a tiny zip bag with spare bars from the All-in-One Watch Link Remover and Repair Kit — lifesaver when a bar went pop mid-conference.
Spare spring bars are the unsung heroes of travel. Good habit to keep them zipped in your dopp kit.
Zoe Park
on October 18, 2025
I tried the clasp micro-adjustes (typo: adjustments) on cheap watch and learned that not all clasps have built-in micro-slots. Article explained that well.
Good product roundup — the Compact Watch Band Link Removal Tool Kit is perfect if you don’t wanna lug the Deluxe 155-piece set around.


I laughed at the ‘wear goggles’ line but won’t deny it. Once a pin shot out and nicked my finger — not fun.
I keep a small magnet tray when doing any work. Helps find tiny pins fast. The Complete Kit and Deluxe kits both come with trays, FYI.
Magnets saved me too. Also do it over a light-colored surface so you can spot dark pins.
Ouch — flying pins are the devil. Magnet tray or small bowl on a towel works wonders. Good tip about trays in kits.
Short and sweet: the clasp hacks section saved my wrist at a wedding. I improvised a micro-adjust with a bent paperclip — comfy for a few hours.
Wanted to say the product list was helpful. I own the Deluxe 155-Piece Professional Watch Repair Kit — heavy duty and basically a mini-toolbox. It’s overkill for casual travelers but perfect if you like tinkering.
One small gripe: the Compact Watch Band Link Removal Tool Kit picture shows a different pin size than what came with mine. Packaging annoyances aside, 10/10 for pieces.
Also check return policy — some sellers will let you swap pin sizes.
If you’re into tinkering, the Deluxe kit is fun. But I keep a small All-in-One Watch Link Remover and Repair Kit in my dopp kit for trips.
Lol at ‘mini-toolbox’ — that’s exactly what mine is. Great for rainy weekends.
Good reminder: ‘universal’ isn’t universal. Brand/model lists and pin diameter are worth checking when choosing a kit.
I feel you — I bought a kit that promised ‘universal pins’ and it didn’t fit my Miyota pins. Check your watch spec before buying!
Thanks for the heads-up on packaging inconsistencies. We’ll note that in an update. The Deluxe kit is definitely for hobbyists — the Portable kits are geared more for travel.
LOL @ the part where they said ‘confidence to adjust safely’ — confidence comes after one successful adjust. 😆
Minor rant: photos could be clearer on pin direction for different link types. I had to rewatch a YouTube vid to be sure.
Exactly. The text was fine but the arrow diagrams would’ve helped. Still, article does build confidence after a try.
Good call — we’ll look into adding clearer diagrams or photos in a future edit. Thanks for the honest feedback!
YouTube + article = dream combo. Visuals seal the deal.
This is one of those articles I’ll screenshot and stash in my travel notes.
TIP: If you’re worried about losing a link, tape it to the inside of your luggage tag or stick into a small zip-bag. Saved my favorite bracelet once.
Short, practical, good job.
Nice tip, Lena — luggage tag or zip-bag is a good travel-proofing move. Thanks!
Was skeptical about no-tool methods but the step-by-step removal without tools actually works if you’re patient. The article’s safety tips (wear goggles? lol) were overkill but also sensible.
Ha — goggles are optional but safety-first if you’re prying hard or working in cramped spaces. Patience is the real key.
Patience + good lighting. Also sit on a soft towel so pins don’t bounce away into the void.
Great read — I actually had to resize my bracelet on a train once and this would have saved me so much stress.
I liked the no-tool tips (paperclip + tape hack was genius). I do worry about scratching the finish though.
Has anyone tried the Portable Watch Link Removal and Resizing Kit vs just using a spring bar tool from a travel kit?
Also, small PSA: if your watch is sentimental, maybe avoid brute force 😂
Thanks Maya — glad it reminded you of that moment! The Portable Kit gives more control and is less likely to slip than improvised tools, but the Stainless Steel Spring Bar Removal Tool is great for quick micro-adjusts. Sandwiched cloth/tape can help prevent scratches.
Yep, tape + cloth is a tiny miracle. If it’s a dress watch, I’d still book a jeweler when you can.
I used a compact spring bar tool once and wrapped the pin area with a bit of masking tape — zero scratches. The Portable Kit is nicer but bulkier.
Okay, long one — forgive me, this hit a nerve 😅
I travel a lot for work and my bracelet always behaves differently with humidity and airplane pressure. The article’s troubleshooting/recovery tips are legit. A couple real-world notes:
– I always carry a tiny roll of electrical tape and a safety pin. They helped me do temporary holds during a 14-hour layover.
– Bought the Complete Watch Band Repair and Resizing Kit after reading this. Worth it for the extra pins and different pin sizes — saved me in three countries.
– One warning: if your bracelet has clipped-in links (not solid pins), forcing them can bend the link shoulders. Be gentle!
Anyone else have an emergency-resize story from travel?
I learned the hard way that airport kiosks have very blunt tools — don’t use them on jewelry! Carry your own tiny kit if it’s a tried-and-true watch.
Thanks for the detailed share, Diego — that exact kind of field feedback is what we hoped to capture. Good tip on taped safety pin combos and the warning re: clipped links. Which kit model did you get for versatility?
14-hour layover story: same. I once used a toothpick to push a spring bar enough to move the clasp micro-adjustment. Not pretty but worked.
To anyone trying toothpicks: use them as last resort and pad with cloth — they can splinter and make things worse.
Diego — I had a similar problem in SE Asia. The Complete Watch Band Repair kit was my savior too. It had a few odd pins that matched my older Seiko.
Constructive feedback: the article should have a quick ‘what to buy for travelers’ table: minimal (spring bar tool + compact kit), intermediate (Portable kit), pro (Deluxe 155-Piece). That would help people decide fast.
Agreed. I almost bought the Deluxe then realized I only needed compact stuff for my trips.
Great suggestion — a concise buyer’s guide is a smart addition. We’ll consider adding that breakdown.
Helpful overall. One tiny nit: the ‘everyday items’ list could include a mention of using a safety pin as a controlled push tool (instead of a random paperclip) — safer and less likely to bend.
Also lol about the ‘travel-proofing’ checklist — I now tape a tiny label to each bag with a spare link. Old habits from my RC hobby 😂
Good point re: travel security. Check TSA/airport rules for sharp items; many people opt to pack sharp thin tools in checked luggage if possible.
Needles worry me in carry-on. Safety pin over needle for travel security checks.
Safety pin tip is golden. I prefer a thin sewing needle — sharper, but you must be careful.
Thanks Lucas — safety pin is a great call for controlled pushing. Love the label trick from RC hobbyists!
Question: For micro-adjustments, is the Stainless Steel Spring Bar Removal Tool enough or do you need something like the All-in-One remover?
Also, anyone have experience with clasp hacks lasting more than a day? I don’t want my watch falling off mid-hike.
If you’re hiking, get the clasp fixed properly before you go. Temporary fixes are fine but not worth losing a watch.
Agree—if it’s an expensive or sentimental watch, err on safe side and get a firm repair pre-trip.
I’ve used the Spring Bar tool for weeks of micro-adjustments with no issues. For hikes, double-tape the hack and check it every break.
The Stainless Steel Spring Bar Removal Tool is great for micro-adjusts (moving the spring bar a slot). For removing links you might prefer the All-in-One or the Portable Link Removal Kit. Clasp hacks are typically temporary — secure them with tape or a safety pin for hikes, but best to properly fix when you can.
Anyone else paranoid about losing spring bars? 😂 I started carrying a tiny zip bag with spare bars from the All-in-One Watch Link Remover and Repair Kit — lifesaver when a bar went pop mid-conference.
Spare spring bars are the unsung heroes of travel. Good habit to keep them zipped in your dopp kit.
I tried the clasp micro-adjustes (typo: adjustments) on cheap watch and learned that not all clasps have built-in micro-slots. Article explained that well.
Good product roundup — the Compact Watch Band Link Removal Tool Kit is perfect if you don’t wanna lug the Deluxe 155-piece set around.
Nice catch — fixed ‘micro-adjustes’ in our notes. And yes, compact kits are for travel; Deluxe is for home tinkering.
Same here — Compact kit + tape = my go-to travel combo.
Don’t forget to test the kit at home before you travel so you’re not learning in public.
I carry the Compact kit in my backpack always. Minimal and useful.
Exactly — a dry run will build confidence and reveal any missing sizes or tools.