
Why Remove Watch Links Yourself?
Quickly learn how to resize your watch bracelet at home without specialized tools. This guide shows safe, step-by-step techniques using common household items so you achieve a secure, comfortable fit.
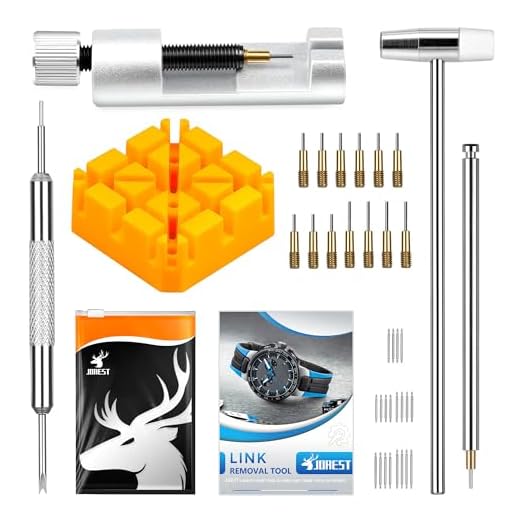
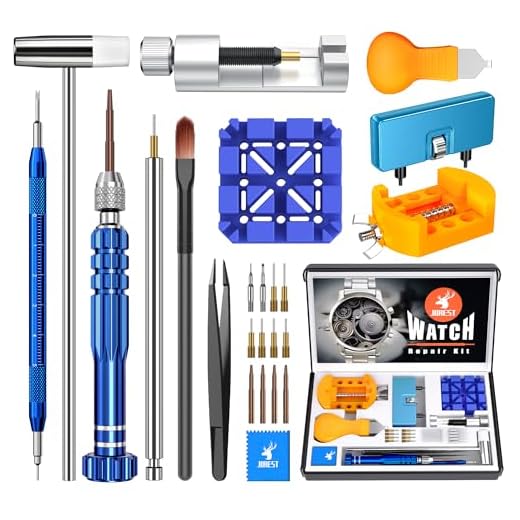
What You’ll Need

Inspect the Bracelet and Locate Removable Links
Want to know which links are safe to remove? Look for these tiny clues.Begin by examining the bracelet closely. Look for small arrows on the underside of links, tiny screw heads, or visible pins—these typically mark removable links.
Turn the bracelet over and inspect the clasp mechanism and the end links near the watch head. Note any asymmetric features so you can preserve the bracelet’s balance (for example, remove links evenly from both sides of the clasp).
Use a magnifying glass or a bright lamp to reveal faint marks or pins; faint arrows often indicate the direction to push a pin out.
Photograph the bracelet or sketch which links look removable so you have a reference during disassembly.
This careful inspection prevents accidental damage and determines whether you’ll push pins out or unscrew small fasteners.
Plan Which Links to Remove for a Balanced Fit
Cutting too many? Don’t guess—map the changes first.Measure your wrist and the current bracelet length. Wear the watch, pinch where you want the fit to sit, and note how many links overlap your pinch point.
Count how many links to remove. Aim to remove links evenly from both sides of the clasp so the watch face stays centered. If an odd number must go, remove the extra link from the side that naturally sits toward the underside of your wrist.
Mark the chosen links before you start. Use one of these quick options:
For example, if you must remove three links, plan to take one from one side and two from the other, marking them clearly so reassembly is predictable.

Stabilize the Bracelet and Prepare Your Workspace
Skipping this is the fastest route to scratches and lost pins.Set up a tidy workspace with a soft cloth or folded towel to prevent scratches and catch tiny parts.
Open the clasp fully so the bracelet lies flat and you can see both link edges clearly.
Cradle the bracelet with a rubber band, folded foam, or a small roll of paper to keep the target link steady — for example, loop a rubber band around a segment to stop it from sliding.
Place removed pins or screws in a small dish or magnet tray to avoid losing them.
Ensure you have good lighting and a magnifier or reading glasses to see tiny pin heads and screw slots.
Keep the area clean and uncluttered; a dropped pin on carpet is nearly impossible to find, so work on a clear table.

Remove Pins or Screws Using Household Items
Paperclips and needles can be heroes—yes, really.Identify the pin direction by looking for small arrows on the bracelet; those arrows show the push direction.
Straighten a paperclip or use a sewing needle and position it on the pin head. Apply steady pressure and gently push through; tap the paperclip with the rubber end of a pen to start movement if needed.
Pull the protruding pin free with tweezers or small pliers once it moves out enough to grab.
Use a small flathead (an eyeglass screwdriver or a thin blade) for screw-style fasteners. Turn counterclockwise slowly and carefully to avoid stripping the head.
Reverse direction if a pin resists; forcing it risks bending links.
Keep removed pins organized in order to make reassembly easier.

Reassemble the Bracelet and Ensure Secure Connections
Like solving a tiny puzzle—align, insert, and lock it down.Align the matching link holes and rejoin the bracelet by reinserting the pin from the recommended direction (usually opposite the arrow). For example, insert pins from the inner curve toward the outer edge.
Insert the pin partway, then use the flat edge of a small tool or the back of a pen to press it flush. Push straight—avoid angling to prevent bending.
Use this quick checklist:
Check that each joint moves naturally and that no metal edges are catching. Wipe the bracelet clean to remove fingerprints and debris. Test the clasp multiple times to confirm it closes securely and that the watch face stays centered.

Final Fit Check and Troubleshooting Tips
If it isn’t comfortable, you didn’t get it right—here’s how to fix it.Wear the watch for several minutes to assess comfort, mobility, and how it sits on your wrist.
Re-evaluate how many links were removed if it feels too tight or loose; add or remove one link at a time for fine tuning.
Press each pin fully flush and test each joint for movement. Swap pins between removed pieces if one link rattles—for example, move a snug pin from a spare link into the noisy spot.
Apply a drop of penetrating oil to stuck pins, wait 5–10 minutes, then push gently and straight.
Stop and consult a professional jeweler if screws won’t turn, pins bend, or you feel resistance that risks damage.
Ready, Set, Wear
Follow the steps methodically, resize most metal watch bracelets with everyday items; take your time, try it now, share your results, inspire others with your handiwork, and start proudly today.
Awesome guide — thank you! I was nervous about messing with my grandfather’s watch but followed the steps and it worked.
– I inspected the bracelet (step 1) and found the little arrows — lifesaver.
– Used a thumbtack and a pair of pliers like the guide suggested (step 4).
– Took it slow when reassembling (step 5) and double-checked the fit (step 6).
Won’t pay a jeweler next time. 😊
So glad it helped, Ellen! If the pins ever feel loose after a few days, try tightening them gently with the pliers and do another fit-check — sometimes they seat a bit as you wear the watch.
Nice! I was worried about the thumbtack bending — did yours hold up or did you switch to something sturdier?
Marked reply: the thumbtack bent a little but still pushed the pin out. Then I switched to a straightened paperclip for the push-through. Worked fine overall.
Tried this on my cheap bracelet — 10/10 if you have patience. One tip: plan which links to remove so it stays balanced on the clasp side (step 2). I removed two from one side and got an odd tilt, had to redo it.
Good call about balance, Jacob. If you get a tilt, removing one link from each side usually fixes it. Also worth marking links before you start so you don’t forget which ones came out.
Yep, I learned the hard way too. I put a tiny piece of tape on the clasp side links I wanted to keep — super helpful.
Helpful overall but a couple things I’d add:
1) Some pins are directional — arrows point the way to push them out (you mentioned this, but emphasize it).
2) If using household items, be careful with sharp tips near your fingers. I used a folded towel to stabilize the bracelet (step 3) and that prevented a tragedy lol.
3) For people with screw-type links, a tiny flathead from a glasses repair kit works better than a regular screwdriver.
Hope that helps others!
Fantastic additions, Priya — thank you. I’ll update the guide to stress pin direction and safer stabilizing methods. Glasses kit screwdrivers are a great recommendation for screw-type links.
Agree on the towel trick. I also rest the bracelet on a folded cardboard so the pin hole is aligned — less wobble.
Sooo glad someone mentioned the glasses kit. I tried a kitchen screwdriver once and nearly stripped the screw 🤦♀️
Exactly! Little tools make a big difference. Also, if you’re unsure, practice on a cheap bracelet first.
Quick question: after I reassembled, the clasp clicks but feels slightly loose. Guide mentioned final fit check — any troubleshooting?
Also check if any spring bars are misaligned — sometimes the clasp uses those and they can slip out of the notch a little.
If the clasp feels loose, try these steps:
1) Inspect the pin you reinserted — make sure it’s fully seated and not bent.
2) Wiggle the clasp gently and see if a tiny adjustment screw can be tightened (some clasps have micro-adjustments).
3) If still loose, remove the same link(s) and try one less/one more to change tension. If nothing helps, bring it to a jeweler to avoid wear on the clasp.
Brilliant guide for people who prefer losing tiny screws at home instead of at a jeweler. 😂
Seriously though, removed three links in about 20 minutes. My cat supervised the whole operation and tried to swat the paperclip away.
Glad it gave you something to do with the cat nearby 😄 Pro tip: keep a small dish nearby for pins so the cat can’t nab them.
My cat ate a tiny spring once. Never again — dish is a must. Also, label parts if you’re doing multiple adjustments.