Push vs Screw vs Split: Beginner’s Guide to Removing Watch Bracelet Links
Why Knowing How to Remove Bracelet Links Matters
Knowing how to resize a metal watch bracelet is a useful beginner skill. It improves comfort, ensures a proper fit, and saves money by avoiding unnecessary trips to a jeweler.
Most bracelets use one of three pin systems: push-pins, screw-pins, or split/pigtail pins. Identifying which type your watch uses is the first step.
This guide gives a clear, comparative, step-by-step approach for beginners. You will learn how to identify pins, choose the right tools, remove and reinstall links, and handle stuck or damaged pins.
Tips for photographing or filming the process are included so you can repeat results easily. Follow the simple steps here and you’ll gain confidence to adjust bracelets at home safely and accurately every time and quickly.
Getting the pin type right is the single best predictor of an easy resize. Use sight and touch first — don’t grab a screwdriver and start prying. Below are clear clues and a short decision flow to help you identify push-pins, screw-pins, and split/pigtail pins.
Visual and tactile clues
Push-pins
Look for small round holes on the outer edge of the link or tiny arrows stamped on the underside.
Pins are smooth and usually driven out in the arrow direction with a punch.
Common on many Seiko-style bracelets and budget to mid-range metal bands.
Screw-pins
Look for a slot or tiny cross-head on the visible pin end (like a miniature screw).
You’ll feel resistance turning the pin with a screwdriver rather than tapping it out.
Often found on higher-end or beefier bracelets and some vintage designs.
Split / pigtail pins
Look for a pin with a visible split or tapered, hooked end—one side thinner.
These compress and pull out; sometimes you’ll see a faint seam where the pin splits.
More common on older or simpler bracelets and certain fashion watches.
Removable end-links
Some bracelets have end-links that detach from the lug via screws or spring-bars—if the end-link looks separate, resizing may require removing it first.
Quick decision flow
Under good light, check underside for arrows — yes = push-pin.
See a slot/cross at the pin end — yes = screw-pin.
Spot a seam, taper, or hooked tip — yes = split/pigtail.
If none of the above and end-link is removable, treat as a spring-bar/ end-link removal.
Editor's Choice
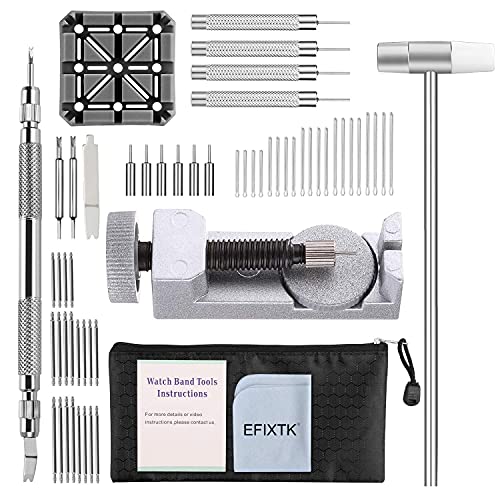
JOREST Watch Link Removal and Resizer Kit
Best for precise alignment and strap adjustments
A compact link remover with a liftable platform for accurate punch-to-pin alignment, plus a combined strap holder for easier operation. Comes with multiple replacement needles, three punch diameters, and an illustrated user manual to guide safe adjustments.
Use a magnifying loupe and bright LED lamp; place the bracelet on a folded towel to avoid scratches.
Gently probe with a toothpick or non-marring probe rather than metal tools at first.
If pins are extremely small, corroded, or if the bracelet is plated and thin, stop — forcing tools can split plated links or strip heads.
Why correct ID matters
Misidentifying a screw-pin as a push-pin can strip a head; forcing a split pin can bend or break it. I once tried to punch a screw-pin free and ruined the head — the rest of the job then needed a jeweler’s extractor. Take time to diagnose; the right approach saves links, tools, and time.
Next up: the tools, workspace setup, and safety steps that make removal predictable and damage-free.
2
Essential Tools, Workspace Setup, and Safety Precautions
Must-have and nice-to-have tools
A compact, correct toolkit is the difference between a tidy resize and a scratched bracelet. Must-haves:
Pin pusher / staking tool (adjustable pin tips or a removable punch set)
Precision spring bar tool
Small precision screwdriver set (flatheads ~0.8–1.6 mm)
Bracelet holder or link-block (keeps the bracelet steady)
Needle-nose pliers and fine-point tweezers
Soft mat or watchmaker pad and a small compartmented parts tray
Eye protection (safety glasses)
Nice-to-have items that save time on tricky jobs:
Loupe or low-power magnifier (for tiny screw heads)
Finger cots or latex gloves to avoid oils and fingerprints
Bench vise with soft jaws or a Panavise-style holder
Micro-drill or an electric screwdriver for stubborn screws
Magnetic parts tray or ice-cube style organizer for labeled link sets
Must-Have
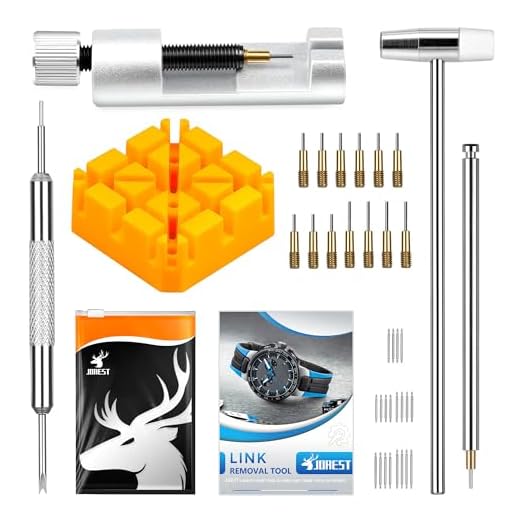
BYNIIUR Watch Band Link Removal Tool Kit
Quick, reliable bracelet sizing and link removal
Professional-grade link remover kit including spare pins, multiple pin punches, and a watch hammer for fast bracelet sizing and spring bar work. Sturdy construction fits different strap thicknesses and helps you handle common repairs at home.
A real-world tip: a cheap precision set often works for light work, but if you plan to resize several metal bracelets, invest in a quality screwdriver that seats well in the slot — stripping is the common rookie mistake.
Workspace setup and organization
Create a small, disciplined workspace to avoid lost pins and frustration.
Bright, cool LED task lighting directly over the bench.
Non-slip surface: silicone mat or leather watchmaker pad.
Use a shallow parts tray or divided pill box to keep removed pins, screws, and extra links grouped by side.
Keep a towel or soft cushion for the watch case and an empty jar or zip bag for removed links you might reuse.
Organization trick: lay out removed links in the exact order you take them out and photograph each step — it saves time when reassembling.
Steady hands: sit, brace elbows, and work slowly; take short breaks if you shake.
Protect crystal and case: apply low-adhesion painter’s tape to exposed surfaces or work on a padded case cushion.
Prevent scratches: use plastic/nylon-tipped pushers against plated links and finger cots when handling polished surfaces.
For plated finishes, avoid excessive force and repeated back-and-forth hammering — plating can flake or wear through quickly.
Digital alternatives for documentation
A smartphone macro lens and a small tripod are invaluable. Photograph each step and the pin orientation; a short video helps if you need to ask for remote advice or return a piece to the jeweler later.
3
Removing and Reinstalling Push-Pins: Step-by-Step
Orient the bracelet and find the pin direction
Most push-pins are friction-fit and have tiny arrows stamped on the underside of the links showing the direction to drive the pin out. Lay the bracelet flat in your holder with the arrows pointing down (so you push toward the arrow tail). If there are no arrows, push from the thinner-headed side toward the thicker, knurled end.
Positioning and steady support
Place the bracelet in a link-block or bench vise with the pin hole centered over the slot. Support the link directly under the pin — a poorly supported link will flex and bend the pin.
Best Seller
JOREST Comprehensive Watch Link Repair Kit with Needles
Includes 13 spare needles and 20 spring bars
A full strap adjustment kit featuring a metal link remover, pin punch, holder, double-headed hammer, 13 spare needles, and 20 spring bars in common sizes. Comes with a pictorial manual and guidance to help avoid alignment errors during repairs.
Use a fine pin pusher (0.8–1.2 mm) or Bergeon-style staking pin. Seat the pusher on the pin head squarely.
Tap gently with a light jeweler’s hammer — short, controlled taps. Don’t “ram” the pin.
Stop periodically to see how much the pin moves. If the pin only moves a millimeter at a time, alternate sides of the link-block so the link doesn’t deform.
If you have a screw-type push tool (e.g., Seiko-style screw pin remover), clamp the bracelet and turn the handle slowly; it feeds the punch steadily and reduces bending risk. For stubborn pins, a staking pin + small hammer gives more control than a single large blow.
Removing links evenly and marking positions
Always remove the same number of links from both sides of the clasp for a balanced fit. Mark removed link positions with small pieces of painter’s tape or take a quick photo of the bracelet before you start — it prevents asymmetry later.
Reinstalling the pin
Align holes precisely; use tweezers to nudge link edges together.
Insert the pin as far as you can by hand, then push it flush with the pusher tool. The pin should sit level with the link surface.
If the pin feels loose, a very light peen (rolling the pin edge inward with a rounded punch) can cold-set it. Be careful on plated bracelets — don’t peen aggressively.
Filming and photo tips
Use a small tripod and macro mode; steady close-ups at 45° show pin direction and tool contact.
Diffuse LED lighting eliminates glare; shoot from above and from the side to capture pin depth.
Record short clips before and after each move—handy when reassembling.
Common push-pin pitfalls
Pin only partially exits: re-seat the pusher and try again from the same side or use pliers to finish pulling it out.
Direction-sensitive pins: forcing backward can mushroom the pin head.
How to tell it’s seated: pin is flush, no lateral play, and links rotate smoothly without clicking.
Next up: screw-pins and split (pigtail) pins — they require a different set of tools and care.
4
Working with Screw-Pins and Split (Pigtail) Pins: Techniques and Reassembly
Screw-pins: ID and removal technique
Screw-pins have a visible screw head (flat, Phillips, or sometimes proprietary micro-head) on one side of the link. They look like tiny machine screws rather than smooth friction pins.
Choose the correct precision driver: a snug‑fitting driver is everything. Look for quality sets such as Wiha PicoFinish or the iFixit Mako driver with small flat and Phillips bits (sizes 000–00). Avoid worn or chewed bits.
Turning technique:
Seat the driver squarely in the head, apply firm downward pressure, and turn slowly and steadily. Think “press then rotate” — this prevents cam‑out.
Use short, controlled turns rather than long jerks. If it’s stiff, back off and re-seat rather than forcing.
Storing tiny screws: place removed screws into a small parts tray or a magnetic pad and photograph link orientation before you start so you can return the right screw to the correct hole.
Inspect threads: after removal, check the screw and internal thread for corrosion, flattened crests, or metal shavings. Damaged threads make reassembly insecure.
Reinstallation tips:
Start the screw by hand to avoid cross-threading, then finish with the driver using the same slow, downward‑pressure method.
If vibration loosening is a concern, a minimal amount (tiny dab) of blue thread locker (e.g., Loctite 242) can be used sparingly — avoid excess and never use permanent Loctite on serviceable screws.
Common issues and prevention:
Stripped screw heads: prevent by using the exact bit size, keeping pressure straight, and not rushing. If stripped, use a right-angle extractor or take it to a jeweler.
Best Value
JOREST Watch Band Repair Kit with Leather Punch
Includes leather strap punch and improved hammer
A multi-tool watch repair set that adds a leather strap punch and reinforced pin punch for easier adjustments and longer tool life. Designed for beginners and home use, it simplifies removing and inserting pins and includes a user manual for safe operation.
Split (pigtail) pins: what they are and how to work them
Split pins (pigtails) are rolled or split rods—one side is split and slightly turned to hook into the link. They’re common on vintage or lower‑cost bracelets.
How to remove:
Grip the bent/split end with fine needle‑nose pliers or use the blunt end of a pin pusher to unroll/separate the split section.
If there’s an inner sleeve, slide it out first; some designs have a hollow sleeve the split pin passes through.
If reusing, carefully straighten and then slightly re‑bend the split so the cut faces into the link channel when seated; the overlap should lock against rotation.
Often replacement is better: match pin diameter and length precisely. Head style (flush, domed) must match so links sit flat.
Choosing replacements and testing:
Measure pin diameter with calipers and length through the link when closed; manufacturers’ specs are ideal.
After reassembly, test link security by gently pulling and flexing the bracelet; it should hold without wiggle or audible click.
Photo/video staging and when to see a pro
Lighting and scale: use a macro lens or phone macro mode, diffuse LEDs, and include a coin or ruler for scale.
Record each step in short clips; rewind photos help if you forget order.
Take it to a pro if pins are corroded, threads are damaged, screws are rounded or shear off, or the bracelet has integrated end‑links that require special tools — a local watchmaker can save you hours (and a ruined bracelet).
5
Troubleshooting Stuck Pins, Common Problems, and Final Fit Tips
Pins that won’t budge
If a pin refuses to move, don’t force it — you’ll round heads or damage links. Try these escalating steps:
Apply a tiny drop of penetrating oil (Kroil, PB Blaster, or WD‑40 Specialist Penetrant), wait 10–30 minutes, then try again.
Freeze‑and‑heat: cool the link with an ice pack for 5–10 minutes (metal contracts), then warm the surrounding link lightly with a hairdryer — repeat and retest.
Use a micro‑vice or V‑block to hold the link steady, then tap a brass or nylon punch with a small hammer to free the pin; finish by pushing with a pin pusher rather than brute force.
Short real‑world note: a reader freed a seized Seiko push‑pin after a night with Kroil and a morning of gentle taps — patience often wins.
Stripped screw heads
For damaged micro screws try these controlled fixes:
Rubber‑band trick: press a wide rubber band over the head, then insert a precise driver and turn slowly — sometimes enough grip is restored.
Use a tiny left‑hand drill or a micro screw extractor set designed for electronics (Irwin/ITEK), but go slowly.
Micro‑drill caution: drilling out screws risks damaging threaded holes or hollow end‑links. Stop and see a pro if the head spins or you feel chatter.
Bent pins, swollen/corroded links
Bent pins: straighten only if the bend is slight and the metal hasn’t fatigued; otherwise replace. Straightening stainless steel repeatedly weakens it.
Swollen/corroded links: soak in warm water and mild detergent, then an ultrasonic cleaner if available. For rust on solid stainless, a baking‑soda paste or a vinegar soak can help; avoid acid on plated finishes.
If pins are pitted, replace them — inexpensive and saves future failures.
Editor's Choice
BYNIIUR 155-Piece Complete Watch Repair Kit
All-in-one kit for professional and home repairs
A deluxe 155-piece watchmaking set with an XL case opener (up to 55mm), link remover, screwdrivers, pliers, spring bar tools, and a nylon carrying case for organized storage. Heavy-duty stainless steel tools let you handle battery changes, band resizing, and most common watch repairs at home.
For brushed finishes, use fine abrasive pads (Scotch‑Brite) in the grain direction; practice on a spare link.
For polished faces, use jeweler’s rouge or a Cape Cod polishing cloth; deep gouges need a pro.
Always test on an inconspicuous area first.
Final fit and balance tips
Aim to remove links so the clasp sits centered under the wrist; remove evenly from both sides when possible.
Target a 1–2 mm gap between bracelet and wrist (enough to slide a finger).
Use the clasp’s micro‑adjust holes or removable half‑links to fine‑tune; half‑links and end pieces are often the key to a perfect fit.
Aftercare and documentation
Clean resized bracelet, dry thoroughly, and place a drop of light watch oil on pins before reassembly (Moebius or light sewing‑machine oil sparingly).
Keep removed pins/screws in a labeled plastic bag.
Photograph or record short clips of each step (closeups of orientation and part order) — these images are invaluable if you later consult a jeweler.
If you hit repeated resistance, rounded heads, or brittle links, stop and consult a watchmaker to avoid irreversible damage. Transitioning to the Conclusion…
Wrap-Up and Next Steps
Identify your pin type before starting, choose proper tools, and use gentle technique. Follow the specific removal and reassembly steps for push, screw, and split pins, and consult the troubleshooting checklist for stuck or misaligned links.
Practice safely on inexpensive bracelets, document tricky jobs with photos or video, seek professional help if unsure. For continued learning, use a printable checklist, a recommended tool set, and demonstration videos to build confidence and protect your watch and patience.
Long post because I actually tried every section in the guide and want to share the full experience:
1) Identified mine as push-pins (easy) and used the BYNIIUR Watch Band Link Removal Tool Kit. The pusher tool lined up perfectly.
2) Workspace: bright lamp, soft cloth, tiny magnetic tray. Saved me from disaster when a spring bar flew off. 😅
3) Reassembly was trickier than removal — the guide’s reinstallation steps were clutch.
One tiny gripe: the split (pigtail) pin photos could be zoomed in more. Other than that, fantastic — I now have a half-empty set of watch links sitting in a little baggie.
Thanks for the walk-through, Olivia — super helpful. Good note on zoomed photos; we’ll improve those in the next update.
Jake Reynolds
on September 10, 2025
Half-empty set of links = watch now fits! Win.
Emma Clarke
on September 11, 2025
I also had trouble with reinstallation at first. Using a needle to coax the split pin back in slowly did the trick for me.
Emma Clarke
on September 10, 2025
Really useful guide — clear steps for push-pins. I used the JOREST Watch Link Removal and Resizer Kit after reading the article and it made the job way less stressful. Quick tip: put a small dish under your workspace so pins don’t roll away 😂
Thanks Emma — glad the JOREST kit worked for you! The dish trick is great; I usually use a magnetic tray for tiny screws and pins.
Tom Foster
on September 10, 2025
Magnetic trays are a game changer. I keep one next to my bench now.
Priya Singh
on September 11, 2025
Did you find the included pins in the kit fit both push and screw types, or did you need extras?
David Miller
on September 10, 2025
Okay, real talk — those screw-pins gave me hell. I followed the screw-pin section step-by-step, but one of my micro-screws stripped halfway through. I ended up ordering the BYNIIUR 155-Piece Complete Watch Repair Kit because I thought having more bits would help.
The guide’s troubleshooting saved me from panicking (the part about using a proper-sized driver and taping the band). Still, I wish there was a photo showing how a stripped screw head looks compared to a normal one.
Would love an extra paragraph on how to salvage a stripped screw without destroying the link. Anyone tried glueing a nut or using a left-hand screw extractor on watch screws? Is that overkill?
Thanks for the detail, David — stripping is common with tiny screws. We avoided recommending extractors because many watch screws are too soft and you can damage the link. A safer technique: use a slightly larger flat screwdriver to get better bite, or press a tiny rubber band over the screw head then turn (rubber adds grip). I’ll add a photo example in the follow-up.
Marcus Lee
on September 10, 2025
I once had luck with a left-handed screwdriver but only because the screw was only slightly seized. If it’s stripped, be careful — you can make it worse fast.
Lena Gomez
on September 11, 2025
Rubber band trick works for many small screws. Also try using super-fine needle-nose pliers to turn if the head is exposed.
Hannah Brooks
on September 11, 2025
FYI: the BYNIIUR 155 kit has extra tiny driver bits. Replacing the bit sometimes fixes the stripping issue because a worn bit slips more.
Priya Singh
on September 10, 2025
Nice article — especially the workspace setup section. I set up a little lamp and a soft mat like you recommended. Used the 24-in-1 Watch Band Repair Tool Kit with Pins and it had most things I needed. The step-by-step for push-pins was spot-on.
One small suggestion: mention the importance of good lighting in the essential tools section (not everyone thinks of a magnifying lamp!).
Great point, Priya — good lighting and magnification really reduce mistakes. We’ll highlight magnifying lamps in the tools list.
Emma Clarke
on September 12, 2025
Agreed — I picked up a cheap LED magnifier and it made reassembly so much easier.
Marcus Lee
on September 29, 2025
Question for the community: when dealing with micro-screws, how often do you replace the drivers in those kits? I have the 24-in-1 Watch Band Repair Tool Kit with Pins but the smallest flat drivers seem to wear quickly and start rounding. Should I just buy a precision driver set separately?
David Miller
on September 29, 2025
I bought a stand-alone Wera precision set and it’s night-and-day better. The bits bite cleanly and don’t slip.
Precision drivers wear, especially cheap ones. If you plan to work on watches regularly, investing in a high-quality precision driver set is worth it. Also store bits properly — dirt and grit speed wear.
Tom Foster
on September 29, 2025
Swap bits out before they round — it’s cheaper than rescuing a stripped screw later. Also a tiny drop of thread locker can help with loose micro-screws, but use sparingly.
Priya Singh
on September 30, 2025
If you’re only resizing occasionally, the kit bits might last. For frequent work, upgrade.
Jake Reynolds
on October 12, 2025
Followed the guide, saved $80 by resizing myself. Felt like a mini surgeon for 10 minutes and then like a proud parent when it fit. 😂
Used the JOREST Comprehensive Watch Link Repair Kit with Needles — the tiny pins included were gold. 10/10 would nerd out again.
Love the mini-surgeon image. Congrats on the successful resize — and glad the JOREST kit did the trick!
David Miller
on October 13, 2025
Haha same here, felt accomplished. But hey Jake, any tips for dealing with stubborn split (pigtail) pins? Mine popped out sideways.
Lena Gomez
on November 5, 2025
Solid write-up, but I think the safety precautions could be beefed up. You touched on eye protection — can we also emphasize finger guards and the danger of forcing stuck pins? A tiny slip and you’re gouging your knuckle. Also, magnification tips would help older readers.
Overall helpful, but safety first!
Hannah Brooks
on November 5, 2025
One more: tape over the clasp when removing links to prevent the band from flopping around.
Priya Singh
on November 6, 2025
Re: finger guards — thin nitrile gloves help with grip and reduce the chance of slipping.
Marcus Lee
on November 6, 2025
Also recommended: wear safety glasses even if you’re careful. Pins can spring out unexpectedly.
Olivia Park
on November 6, 2025
Totally. I use a small bench vise with soft jaws — holds the bracelet without denting it and keeps fingers away from tools.
Thanks Lena — excellent call. I’ll expand the safety section with finger guard suggestions (rubber mat, clamp, or a watch holder) and call out magnification for older eyes.
Tom Foster
on November 5, 2025
Stuck pin? Freeze the bracelet for 10–15 minutes before trying. Metal contracts and sometimes that little bit of shrinkage helps free the pin. Worked for me on a screw-pin once. Mentioned the JOREST Watch Link Removal and Resizer Kit in case you need a proper tool.
Lena Gomez
on November 6, 2025
Good call — I’d avoid extreme temps for watches with poor seals. But the freezer trick has helped me too (short bursts).
Nice tip, Tom — thermal contraction can help. Just be sure the watch head’s water resistance and temperature tolerances are okay with that approach.
Hannah Brooks
on November 19, 2025
Appreciated the troubleshooting section — it stopped me from drilling into the band out of frustration. Bought the BYNIIUR Watch Band Link Removal Tool Kit after reading and it arrived with extra pins, which is clutch. Thanks for the clear next steps too (where to practice, what to buy).
Olivia Park
on November 19, 2025
Yes, practice on cheap bands. I scored a broken thrift-store bracelet to learn on and it was perfect.


Long post because I actually tried every section in the guide and want to share the full experience:
1) Identified mine as push-pins (easy) and used the BYNIIUR Watch Band Link Removal Tool Kit. The pusher tool lined up perfectly.
2) Workspace: bright lamp, soft cloth, tiny magnetic tray. Saved me from disaster when a spring bar flew off. 😅
3) Reassembly was trickier than removal — the guide’s reinstallation steps were clutch.
One tiny gripe: the split (pigtail) pin photos could be zoomed in more. Other than that, fantastic — I now have a half-empty set of watch links sitting in a little baggie.
Thanks for the walk-through, Olivia — super helpful. Good note on zoomed photos; we’ll improve those in the next update.
Half-empty set of links = watch now fits! Win.
I also had trouble with reinstallation at first. Using a needle to coax the split pin back in slowly did the trick for me.
Really useful guide — clear steps for push-pins. I used the JOREST Watch Link Removal and Resizer Kit after reading the article and it made the job way less stressful. Quick tip: put a small dish under your workspace so pins don’t roll away 😂
Thanks Emma — glad the JOREST kit worked for you! The dish trick is great; I usually use a magnetic tray for tiny screws and pins.
Magnetic trays are a game changer. I keep one next to my bench now.
Did you find the included pins in the kit fit both push and screw types, or did you need extras?
Okay, real talk — those screw-pins gave me hell. I followed the screw-pin section step-by-step, but one of my micro-screws stripped halfway through. I ended up ordering the BYNIIUR 155-Piece Complete Watch Repair Kit because I thought having more bits would help.
The guide’s troubleshooting saved me from panicking (the part about using a proper-sized driver and taping the band). Still, I wish there was a photo showing how a stripped screw head looks compared to a normal one.
Would love an extra paragraph on how to salvage a stripped screw without destroying the link. Anyone tried glueing a nut or using a left-hand screw extractor on watch screws? Is that overkill?
Thanks for the detail, David — stripping is common with tiny screws. We avoided recommending extractors because many watch screws are too soft and you can damage the link. A safer technique: use a slightly larger flat screwdriver to get better bite, or press a tiny rubber band over the screw head then turn (rubber adds grip). I’ll add a photo example in the follow-up.
I once had luck with a left-handed screwdriver but only because the screw was only slightly seized. If it’s stripped, be careful — you can make it worse fast.
Rubber band trick works for many small screws. Also try using super-fine needle-nose pliers to turn if the head is exposed.
FYI: the BYNIIUR 155 kit has extra tiny driver bits. Replacing the bit sometimes fixes the stripping issue because a worn bit slips more.
Nice article — especially the workspace setup section. I set up a little lamp and a soft mat like you recommended. Used the 24-in-1 Watch Band Repair Tool Kit with Pins and it had most things I needed. The step-by-step for push-pins was spot-on.
One small suggestion: mention the importance of good lighting in the essential tools section (not everyone thinks of a magnifying lamp!).
Great point, Priya — good lighting and magnification really reduce mistakes. We’ll highlight magnifying lamps in the tools list.
Agreed — I picked up a cheap LED magnifier and it made reassembly so much easier.
Question for the community: when dealing with micro-screws, how often do you replace the drivers in those kits? I have the 24-in-1 Watch Band Repair Tool Kit with Pins but the smallest flat drivers seem to wear quickly and start rounding. Should I just buy a precision driver set separately?
I bought a stand-alone Wera precision set and it’s night-and-day better. The bits bite cleanly and don’t slip.
Precision drivers wear, especially cheap ones. If you plan to work on watches regularly, investing in a high-quality precision driver set is worth it. Also store bits properly — dirt and grit speed wear.
Swap bits out before they round — it’s cheaper than rescuing a stripped screw later. Also a tiny drop of thread locker can help with loose micro-screws, but use sparingly.
If you’re only resizing occasionally, the kit bits might last. For frequent work, upgrade.
Followed the guide, saved $80 by resizing myself. Felt like a mini surgeon for 10 minutes and then like a proud parent when it fit. 😂
Used the JOREST Comprehensive Watch Link Repair Kit with Needles — the tiny pins included were gold. 10/10 would nerd out again.
Love the mini-surgeon image. Congrats on the successful resize — and glad the JOREST kit did the trick!
Haha same here, felt accomplished. But hey Jake, any tips for dealing with stubborn split (pigtail) pins? Mine popped out sideways.
Solid write-up, but I think the safety precautions could be beefed up. You touched on eye protection — can we also emphasize finger guards and the danger of forcing stuck pins? A tiny slip and you’re gouging your knuckle. Also, magnification tips would help older readers.
Overall helpful, but safety first!
One more: tape over the clasp when removing links to prevent the band from flopping around.
Re: finger guards — thin nitrile gloves help with grip and reduce the chance of slipping.
Also recommended: wear safety glasses even if you’re careful. Pins can spring out unexpectedly.
Totally. I use a small bench vise with soft jaws — holds the bracelet without denting it and keeps fingers away from tools.
Thanks Lena — excellent call. I’ll expand the safety section with finger guard suggestions (rubber mat, clamp, or a watch holder) and call out magnification for older eyes.
Stuck pin? Freeze the bracelet for 10–15 minutes before trying. Metal contracts and sometimes that little bit of shrinkage helps free the pin. Worked for me on a screw-pin once. Mentioned the JOREST Watch Link Removal and Resizer Kit in case you need a proper tool.
Good call — I’d avoid extreme temps for watches with poor seals. But the freezer trick has helped me too (short bursts).
Nice tip, Tom — thermal contraction can help. Just be sure the watch head’s water resistance and temperature tolerances are okay with that approach.
Appreciated the troubleshooting section — it stopped me from drilling into the band out of frustration. Bought the BYNIIUR Watch Band Link Removal Tool Kit after reading and it arrived with extra pins, which is clutch. Thanks for the clear next steps too (where to practice, what to buy).
Yes, practice on cheap bands. I scored a broken thrift-store bracelet to learn on and it was perfect.
Happy it helped, Hannah! Practice on a cheap band first is the best advice — saved many readers from first-time mistakes.