Removing bracelet pins at home saves time and money. This article shows how to identify common pin types, prepare safely with household items, and remove links without special tools. Expect clear, step‑by‑step methods, damage‑avoidance tips, and reassembly guidance.
Safety matters: be gentle, work on a soft surface, and wear eye protection if available. Stop and contact a professional for stubborn pins, plated bracelets, or vintage timepieces. With care and the right approach, you can adjust most metal watch bands quickly and confidently. Results vary by watch — know your limits.
Know Your Bracelet: Identifying Pin Types and How They Work
Common pin types at a glance
Before you start, take a close look at the inside of the bracelet where links meet and at the lug end near the clasp. Most bracelets use one of these five systems:
Push / push-fit pins — Smooth pins held by friction; often seen on cheaper steel bracelets and some Seiko or Citizen models. Clues: smooth pin head flush with the link, small hole on the opposite side, or tiny arrows on the inside indicating the push direction.
Spring bars — Thin bars with spring-loaded ends that snap into lug holes; typical on watches with removable straps and many casual metal/mesh bands. Clues: slender bar visible at the end link, tiny grooves where the shoulder sits, or holes in the clasp for a spring-bar tool.
Screw-type pins — Fully threaded pins with a visible slotted or Phillips head. Common on higher-end bracelets (Rolex Oyster-style and many aftermarket metal bands). Clues: slotted head on one side, threads or a nut on the other, no arrows.
Split / rivet-style pins — Solid pins peened or split over so they cannot be pushed out easily; often used on vintage pieces. Clues: flattened or peened end, no head, no arrows, and a smooth profile.
Removable link pins (detachable link systems) — Designed to be driven out; often marked with arrows showing the push direction. Clues: arrows stamped on links and visible pin-hole ends sized for a push-out.
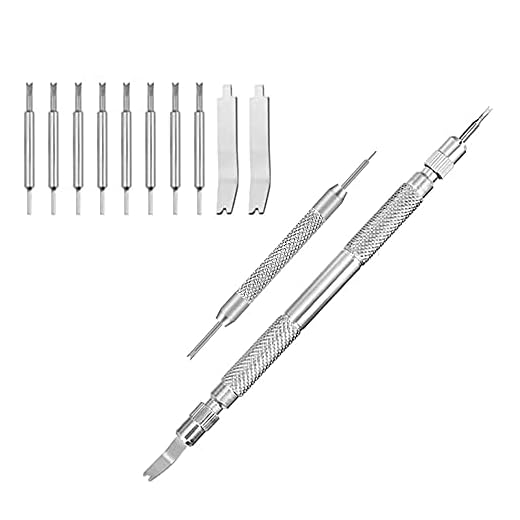
Best Value
Watch Band Strap Link Pins Remover Repair Tool
24-in-1 kit with extra replacement tips
A versatile 24-in-1 watch band tool set for removing and inserting link pins and spring bars, with extra tips and cotter pins included. It fits bands up to 30mm and makes resizing simple and affordable.
Friction (push-fit): held by tight press-fit. You can often nudge these with a small stiff object (paperclip, push-pin). Take care — forcing can bend the pin or spread the link.
Spring-loaded: retained by compressing the bar’s shoulder. A paperclip or bent safety pin can compress it briefly for removal from soft holes.
Threaded: physically screwed — DIY “no-tools” attempts risk stripping the head; you’ll usually need a proper screw driver.
Peened/rivet: mechanically deformed; removal typically needs drilling or a jeweler’s press.
Designed removable: easiest to remove at home — follow the arrow, push from the marked side.
Quick safety notes
Fragile clasps and plated finishes can deform or chip under prying — go slow.
Gold or PVD-plated links are thin; pushing too hard may expose base metal.
Welded links (no removable pins, seamless links) should not be forced — stop and seek professional help.
2
Prepare Like a Pro Using Only Household Items
Gather safe substitutes
You don’t need a fancy kit to start — common household items can do the job if prepared properly:
Small paperclips (18–22 gauge)
Sewing needles or a straight pin
Pushpins / thumbtacks
Safety pins (unfastened and reshaped)
Straightened thin nails (finish nails are better than heavy framing nails)
Pin head from a discarded ballpoint refill (the metal tip is nicely tapered)
Small nail files or an emery board
Clear tape (medical or masking)
A thin rigid edge like a butter knife, small steel ruler, or an old credit card
Magnifying glass or phone camera (use the zoom to magnify tiny ends)
How to prepare each item
Paperclip: unbend and leave one short stub as a push tip; file the tip with an emery board to remove burrs and create a slight taper.
Sewing needle / refill tip: use tape on the shaft to create a safer grip; the refill tip often fits perfectly into push-pin holes.
Safety pin: open and reshape the point into a gentle hook for compressing spring bars.
Thumbtack / pushpin: use the plastic head for leverage; the metal point can press pins out if filed down into a blunt pusher.
Thin nail: flatten the tip with a file to avoid scoring the link; use only small gauge nails to prevent widening holes.
Tape: wrap it around any improvised tool where it contacts a bracelet to prevent scratching.
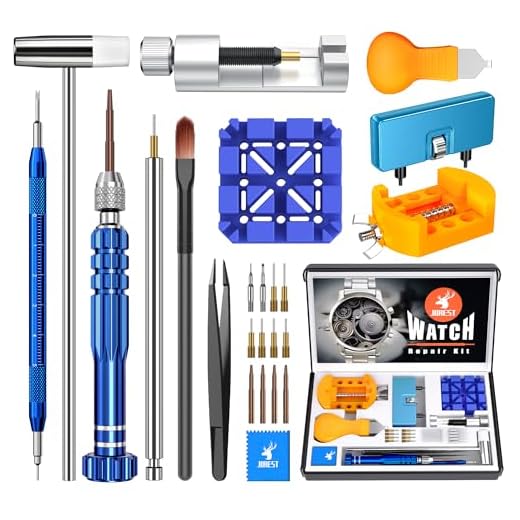
Editor's Choice
BYNIIUR 155-Piece Complete Watch Repair Kit
Professional-grade, covers most watch repairs
A comprehensive 155-piece toolkit with wrenches, pin punches, pliers, screwdrivers, and a carrying case for most watch repair tasks. Ideal for opening case backs, replacing batteries, and resizing bands so you can avoid expensive repair fees.
Light: work under a bright desk lamp or by a sunny window; phone camera with zoom doubles as a magnifier for small grooves.
Padding: a microfiber cloth, folded towel, or mouse pad prevents scratches and cushions fallen parts.
Non-slip base: place a rubber jar opener or silicone mat under your cloth to keep the watch steady.
Parts containment: use an ice-cube tray, shallow pillbox, or small labeled container (masking tape + marker) to keep removed pins and links organized.
Safety and small-part precautions
Wear eye protection if prying or pushing — tiny pins can flick free.
Use tape to mask plated finishes and delicate polished edges before contacting with metal.
Keep children and pets away; small pins are choking hazards.
With these simple preparations in place, you’ll be ready to move confidently into the step-by-step removal methods that follow.
3
Step-by-Step Methods to Remove Common Pins Without Tools
Spring bars (common on straps and bracelets)
Find the gap between the lug and the end of the bracelet; use a phone camera zoom if needed.
Compress the spring bar by pressing inward with a thin paperclip, straightened safety pin, or sewing needle.
While the bar is compressed, rotate the bracelet slightly toward the case to disengage the opposite shoulder of the bar and lift the link free.
Repeat on the other side.
Must-Have
WOCCI Stainless Steel Spring Bar Tool
Compact and lightweight spring bar tool
A small, solid stainless steel tool for removing and installing spring bars and pins when changing watchbands or doing light repairs. Its compact design makes it easy to carry and use for jewelry or watch maintenance.
Tips: protect the case with masking tape, support the watch on a soft pad so the lugs don’t bend, and work in short presses rather than one big shove. Catch the popped bar with tape or a pillbox.
Locate the tiny arrow on the inside of the bracelet indicating push direction.
Align the link over a padded edge or non-slip mat.
Push the pin in the arrow direction using a straightened paperclip, small nail head, or the metal tip from a pen refill.
Once the pin protrudes, grip it with tape and pull it the rest of the way; then slide the link apart.
Real-world note: on Seiko and Citizen bracelets, pins often move easily with a coarse paperclip; fine tolerances on Swiss bracelets may require firmer support.
Screw-type pins
If the head has a slot, try a thin flat substitute—an old small flat-head screwdriver, a flattened nail, or the edge of a metal ruler—to turn it counterclockwise.
To prevent the head from spinning, insert a tiny pin or needle from the opposite side to act as a counter-hold.
Stop immediately if the head strips or rounds.
Warning: stripped screws are common if you don’t have the exact driver; proceed only if you can easily feel the threads turning.
Split/rivet pins
Identify the non-headed side and rest the link on a padded edge with that side down.
Use a sewing needle, thumbtack, or homemade pin punch to drift the pin out by pushing from the non-headed side.
As the pin advances, catch and secure it with tape or a small container.
For stubborn pins
Use thin tape wrapped around a partially exposed pin to pull it out.
Place the link over a table edge cushioned with cloth and apply short, controlled taps to the pin with a blunt tool (fingernail or capped marker) to coax movement.
If a pin won’t budge after steady attempts, stop to avoid bending the link.
Quick checklist before you move on:
Support the link to avoid bending.
Work in short increments; don’t force.
Mark the direction each pin was driven.
Store tiny parts in labeled compartments.
Next, we’ll cover finishing touches: reassembly techniques, protecting finishes, and how to make sure your adjusted bracelet stays secure.
4
Avoiding Damage: Finishing, Reassembling, and Securing Links
Inspect pins and links for wear
Every pin and link you remove deserves a quick forensic look. Bent, mushroomed, corroded, or heavily scratched pins won’t sit tight and can shred a link hole over time. Lay parts on a white cloth and check for:
obvious bends or flattened ends
burrs on pin shoulders that prevent seating
stretched spring bars or cracked plastic collars on clasps
If a pin looks marginal, replace it before reassembly — small failures become big problems when you’re wearing the watch all day.
Clean pinholes and lubricate lightly
Dirt and dried sweat are common culprits for stiff pins. Use a cotton swab dampened with isopropyl alcohol to clean holes, or blow compressed air if you have it. For stubborn grime, gently probe with a wooden toothpick or pegwood.
Beginner Friendly
Selizo Spring Bar and Link Removal Kit
Includes 10 extra tips and manual
A user-friendly spring bar and link removal set that comes with 10 spare tips and a detailed instruction manual to guide beginners. Built from durable stainless steel, it’s suitable for most band adjustments and basic repairs.
If pins move smoothly after cleaning, add a microscopic touch of lubricant — a watch oil or light sewing-machine oil applied with a toothpick. Avoid heavy oils (they attract dirt) and never soak plated surfaces.
When you’re ready to reassemble, protect plated finishes and get creative:
Use folded tape to hold a spring bar or pin tip in place while aligning the link.
A narrow folded business card makes a low-cost wedge to steady links and keep alignment.
A straightened paperclip trimmed to length can act as a temporary pin if you lose one.
Steps to reinsert:
Seat one end of the pin or spring bar into its hole.
Hold the opposite side with tape, a folded card, or a paperclip bent into a small hook.
Press links together on a soft pad; use a folded cloth, rubber pad, or the rounded end of a wooden dowel (not metal) to press or gently tap the pin flush.
Remove the tape or card and confirm the pin is flush and snug.
Ensure alignment and test retention
Proper seating is subtle — the pin should sit flush, not cocked. Test by:
Gently pulling and twisting the two links; any movement means reseat.
Re-wearing for an hour, then re-checking pins after you put the watch through normal motions.
Count, mark, and prepare spares
Mark removed links with small pieces of colored tape and a number for repeatable fits (e.g., “L1” left wrist removal). Store spare pins in a pillbox, zip bag, or the Selizo kit compartment. If you lose a pin in the field, a trimmed, straightened paperclip works in a pinch until you replace it with a proper pin.
5
Troubleshooting and When to Stop: Common Problems and Professional Options
Common issues and quick, safe fixes
Even with care, things go sideways. Typical problems and gentle no-tools remedies:
Stuck pins: warm, soapy water or a 70% isopropyl alcohol soak (5–10 minutes) loosens grime. Use a toothpick to clear debris, then try pushing with a bent paperclip.
Bent or mushroomed pin ends: If bend is slight, straighten on a soft surface with a wooden toothpick and finger pressure; replace if not perfect.
Stripped screw heads: use a magnifier to find the remaining groove and press a sharpened safety pin straight into the slot for extra grip.
Fragile vintage bracelets: inspect under magnification for folded links or thin metal; avoid force and only attempt cleaning and alignment, not heavy leverage.
Clasp misalignment: warm the clasp slightly (run under warm water), then gently bend back into alignment using two opposing household items (e.g., a pen and a folded card) for controlled leverage.
All-in-One
JOREST Complete Watch Repair and Battery Kit
All-in-one set for battery and strap repairs
A multi-purpose watch repair kit containing a link remover, case opener, screwdrivers, spring bar tool, and spare needles for battery replacement and strap resizing. The included manual and case holder make common repairs straightforward and safe at home.
Stop immediately and seek pro help if you see any of the following:
Significant resistance that doesn’t budge with gentle, repeated effort (you’ll risk bending or tearing links).
Permanently damaged or broken screws, missing tiny springs, or cracked collar pieces.
Welded or riveted links — these require specialist tools.
High-value or sentimental vintage pieces, especially gold, plated, or fragile folded-link bracelets.
Trying to force these can turn a $100 fix into a $200+ repair or replacement.
Professional options and what to expect
When DIY isn’t safe, consider:
Local jeweler: best for simple resizes, clasp adjustments. Cost: $10–$40. Turnaround: same day to a few days.
Independent watchmaker: ideal for threaded pins, screws, or mechanical/clasp complexity. Cost: $30–$120. Turnaround: a few days to 2 weeks.
Authorized service center (brand-specific): necessary for integrated, proprietary bracelets or valuable watches (Rolex, Omega, etc.). Cost: $75–$300+, turnaround: 1–6 weeks.
Professionals have calibrated presses, pin vises, replacement OEM pins, and knowledge of materials (titanium, PVD finishes, plated gold) — using right tools prevents irreversible damage. If you’re unsure, a watchmaker’s opinion often costs less than a mistaken DIY attempt.
Transitioning to the final touches, next we wrap up safe, simple adjustments you can confidently do at home.
Safe, Simple Adjustments at Home
Correctly identifying pin type, preparing a protected workspace with household substitutes, and following careful step‑by‑step removal and reassembly methods are the essentials. Work slowly, use soft surfaces and improvised punches or pushers, and keep tiny parts organized so reassembly is straightforward.
If a pin resists, is damaged, or you risk scratching the case or crystal, stop and consult a professional. Patience, protection, and knowing your limits prevent costly mistakes. Try these techniques at home, but don’t hesitate to seek watchmaker help for complex or sentimental pieces. Share your success or questions with the community today.
Tried the ‘Step-by-Step Methods to Remove Common Pins Without Tools’ — I think the instructions are solid but some of the household-item solutions are borderline surgical. 😂
Long story short, used a paperclip and a wooden skewer to push a stubborn pin: took patience, but no damage. The article’s ‘Avoiding Damage’ section saved me — follow that polish/reassembly order.
Also, FYI: if your bracelet has screwed links (not mentioned much), don’t try to force them — they need a tiny screwdriver. The JOREST Watch Link Removal and Resizing Kit has a decent driver set.
Lina Patel
on September 6, 2025
Paperclip + skewer = classic MacGyver move. I actually scratched a link once — pro tip: use masking tape on the metal to protect it while you work.
Adding masking tape and the screw warning into the main article. Thanks for the heads-up, everyone.
Derek Huang
on September 7, 2025
If it’s a screw, don’t use improvised drivers. I rounded a screw head using a wrong bit, had to take it to a jeweler after. Buy the right tool or stop.
Good call on screwed links — we’ll add a short note about them and which kits include screwdrivers. Glad it worked with patience and common items!
Derek Huang
on September 5, 2025
Short and honest: article was practical. I tried the DIY spring-bar method with a safety pin and it worked for the spring bars on my leather-attach watch, but not the solid link pins. The article correctly warns when to stop — I gave up and used the Watch Band Strap Link Pins Remover Repair Tool for those.
One suggestion: add close-up photos of common pin heads. Visuals would help beginners avoid punching the wrong side.
Great suggestion, Derek — we’ll add more close-up images of pin heads in the next update. Happy you had success with the spring-bar hack and switched to the proper tool for solid links.
Maria Lopez
on September 7, 2025
Totally agree on pictures. Words only go so far. Also, the Watch Band Strap tool is pretty cheap and worth it. Saved me a ton of frustration.
Lina Patel
on September 6, 2025
This was the exact article I needed. Quick notes from my experience:
– For spring bars, the WOCCI Stainless Steel Spring Bar Tool is worth the money — easier and less frustrating than bent paper clips.
– If you’re nervous about messing up, buy the Selizo Spring Bar and Link Removal Kit or the BYNIIUR 155-piece and practice on cheaper bracelets first.
– Troubleshooting section saved me when a pin got stuck — the ‘reverse side tapping’ trick worked after a few tries.
Love the conversational tone. Made a couple of dumb mistakes but now I can swap bands like a pro 😄
So glad it helped, Lina! Practice on cheap bracelets is the best tip — you learn without the panic. Thanks for sharing which tool felt worth it.
Marcus Reed
on September 7, 2025
Agreed on the WOCCI tool. Still struggling with tiny screws though — BYNIIUR’s screwdriver bits are a lifesaver if your watch has them.
Maria Lopez
on September 20, 2025
Okay I have feelings about this article — mostly good, but a few nitpicks.
1) Love that it emphasizes safety and knowing when to stop. I wrecked a vintage bracelet once and still cry about it.
2) The ‘Prepare Like a Pro Using Only Household Items’ section is gold. I used a sewing needle and a rubber eraser as a block and it actually worked for one stubborn link.
3) Product list is useful but maybe clearer callouts: which kits are best for beginners vs collectors? e.g., BYNIIUR 155-Piece vs the smaller JOREST kit.
4) Minor typo in the troubleshooting section: ‘re-align’ is spelled twice in a row? 😅
Overall: helpful, practical, would recommend to friends who like tinkering.
Lina Patel
on September 20, 2025
I agree about the comparison. I bought the WOCCI Stainless Steel Spring Bar Tool first and then realized I needed more link-specific bits — ended up with Selizo kit later. Wish I’d read a recommendation table first.
Thanks for the thorough read, Maria — great point about recommended kits for different users. We’ll add a small comparison (beginner vs collector vs pro) and fix that typo ASAP.
Owen Blake
on September 21, 2025
Not a typo — it’s a dramatic stylistic choice. Kidding. Good catch, Maria. Also, rubber eraser as block = genius hack, never thought of that.
Ethan Price
on September 21, 2025
Vintage bracelet cry 😭 — same. For collectors, I’d recommend the BYNIIUR 155-piece so you have loads of pins and spare parts. For casual use JOREST or Selizo is fine.
Adding the comparison and a quick ‘which kit to pick’ checklist now. Appreciate the detailed suggestions!
Sara Mills
on September 27, 2025
Awesome guide — saved me a trip to the jeweler last weekend. I used the kitchen push-pin + a small hammer trick from the article and it worked on my Seiko bracelet. A couple notes:
– My pins were a tight fit; tap gently or you’ll scratch the link edges.
– The section on identifying pin types was super helpful — I realized mine were tapered, not friction pins.
Thanks for including the product list too; I ended up ordering the JOREST Complete Watch Repair and Battery Kit for when I need something more precise.
(Also — pro tip: put a towel under the bracelet so the pin doesn’t roll away into the abyss 😅)
Owen Blake
on September 27, 2025
Towel = lifesaver. Also, keep small containers nearby for pins. I lost two trying to be fancy and now I’m buying the BYNIIUR 155-Piece kit just to be safe.
Thanks for the detailed feedback, Sara — love the towel trick! Glad the identification section helped. If you try the JOREST kit, let us know how the pin punch compares to the kitchen push-pin.
Derek Huang
on September 28, 2025
Nice write-up, Sara. I had the same issue with tapered pins. The JOREST kit worked way better for me than improvised tools — much less risk of bending the pin.


Tried the ‘Step-by-Step Methods to Remove Common Pins Without Tools’ — I think the instructions are solid but some of the household-item solutions are borderline surgical. 😂
Long story short, used a paperclip and a wooden skewer to push a stubborn pin: took patience, but no damage. The article’s ‘Avoiding Damage’ section saved me — follow that polish/reassembly order.
Also, FYI: if your bracelet has screwed links (not mentioned much), don’t try to force them — they need a tiny screwdriver. The JOREST Watch Link Removal and Resizing Kit has a decent driver set.
Paperclip + skewer = classic MacGyver move. I actually scratched a link once — pro tip: use masking tape on the metal to protect it while you work.
Adding masking tape and the screw warning into the main article. Thanks for the heads-up, everyone.
If it’s a screw, don’t use improvised drivers. I rounded a screw head using a wrong bit, had to take it to a jeweler after. Buy the right tool or stop.
Good call on screwed links — we’ll add a short note about them and which kits include screwdrivers. Glad it worked with patience and common items!
Short and honest: article was practical. I tried the DIY spring-bar method with a safety pin and it worked for the spring bars on my leather-attach watch, but not the solid link pins. The article correctly warns when to stop — I gave up and used the Watch Band Strap Link Pins Remover Repair Tool for those.
One suggestion: add close-up photos of common pin heads. Visuals would help beginners avoid punching the wrong side.
Great suggestion, Derek — we’ll add more close-up images of pin heads in the next update. Happy you had success with the spring-bar hack and switched to the proper tool for solid links.
Totally agree on pictures. Words only go so far. Also, the Watch Band Strap tool is pretty cheap and worth it. Saved me a ton of frustration.
This was the exact article I needed. Quick notes from my experience:
– For spring bars, the WOCCI Stainless Steel Spring Bar Tool is worth the money — easier and less frustrating than bent paper clips.
– If you’re nervous about messing up, buy the Selizo Spring Bar and Link Removal Kit or the BYNIIUR 155-piece and practice on cheaper bracelets first.
– Troubleshooting section saved me when a pin got stuck — the ‘reverse side tapping’ trick worked after a few tries.
Love the conversational tone. Made a couple of dumb mistakes but now I can swap bands like a pro 😄
So glad it helped, Lina! Practice on cheap bracelets is the best tip — you learn without the panic. Thanks for sharing which tool felt worth it.
Agreed on the WOCCI tool. Still struggling with tiny screws though — BYNIIUR’s screwdriver bits are a lifesaver if your watch has them.
Okay I have feelings about this article — mostly good, but a few nitpicks.
1) Love that it emphasizes safety and knowing when to stop. I wrecked a vintage bracelet once and still cry about it.
2) The ‘Prepare Like a Pro Using Only Household Items’ section is gold. I used a sewing needle and a rubber eraser as a block and it actually worked for one stubborn link.
3) Product list is useful but maybe clearer callouts: which kits are best for beginners vs collectors? e.g., BYNIIUR 155-Piece vs the smaller JOREST kit.
4) Minor typo in the troubleshooting section: ‘re-align’ is spelled twice in a row? 😅
Overall: helpful, practical, would recommend to friends who like tinkering.
I agree about the comparison. I bought the WOCCI Stainless Steel Spring Bar Tool first and then realized I needed more link-specific bits — ended up with Selizo kit later. Wish I’d read a recommendation table first.
Thanks for the thorough read, Maria — great point about recommended kits for different users. We’ll add a small comparison (beginner vs collector vs pro) and fix that typo ASAP.
Not a typo — it’s a dramatic stylistic choice. Kidding. Good catch, Maria. Also, rubber eraser as block = genius hack, never thought of that.
Vintage bracelet cry 😭 — same. For collectors, I’d recommend the BYNIIUR 155-piece so you have loads of pins and spare parts. For casual use JOREST or Selizo is fine.
Adding the comparison and a quick ‘which kit to pick’ checklist now. Appreciate the detailed suggestions!
Awesome guide — saved me a trip to the jeweler last weekend. I used the kitchen push-pin + a small hammer trick from the article and it worked on my Seiko bracelet. A couple notes:
– My pins were a tight fit; tap gently or you’ll scratch the link edges.
– The section on identifying pin types was super helpful — I realized mine were tapered, not friction pins.
Thanks for including the product list too; I ended up ordering the JOREST Complete Watch Repair and Battery Kit for when I need something more precise.
(Also — pro tip: put a towel under the bracelet so the pin doesn’t roll away into the abyss 😅)
Towel = lifesaver. Also, keep small containers nearby for pins. I lost two trying to be fancy and now I’m buying the BYNIIUR 155-Piece kit just to be safe.
Thanks for the detailed feedback, Sara — love the towel trick! Glad the identification section helped. If you try the JOREST kit, let us know how the pin punch compares to the kitchen push-pin.
Nice write-up, Sara. I had the same issue with tapered pins. The JOREST kit worked way better for me than improvised tools — much less risk of bending the pin.