
Quick and Clean: Replace a Watch Battery in Minutes
Swap your watch battery FAST and SAFELY with six clear, practical steps. Identify battery type, open the case without scratches, replace the cell, and reseal. Avoid common mistakes, use simple tools, and get your timepiece running again in minutes quickly.
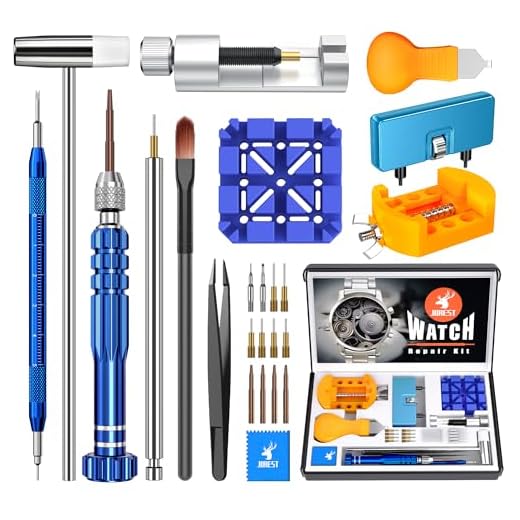
What You’ll Need

Watch Battery Replacement: Step-by-Step Guide for Fast, Safe Results
Identify the Battery and Case Type
Which tiny coin makes your watch tick? Guess wrong and you’re doomed — so don’t.Flip the watch and inspect the case back for markings and fastener types.
Check whether the back is screw-down, snap-back, or held by small screws—each needs a different opener.
Open any paperwork, warranty card, or the original box and note the battery code printed (e.g., SR626SW, CR2032).
Search the watch model online if no code appears on the case; manufacturer specs list the exact cell.
Look for these common battery examples:
Confirm the case type and battery model before buying parts or attempting to open the watch.

Prepare a Clean, Stable Workspace
A steady table beats frantic laps to the repair shop — set up like a pro in three minutes.Lay a soft cloth face-down to protect the crystal and keep small parts from bouncing away. Use a table with steady, level surface—avoid laps or beds.
Place these items within easy reach:
Work slowly and keep movements deliberate. Remember: being organized cuts the job time and reduces stress.

Open the Case Without Scratches
This is where most watches get scarred — learn the gentle art of opening.Select the correct opener.
Use one of these tools depending on the back type:
Insert tools carefully at the designated notch or slot and apply gentle, steady pressure. Protect the crystal by resting the watch face-down on a soft cloth while you work.
Stop and reassess if you meet resistance; forcing the case can bend the back or damage the gasket.

Remove the Old Battery Safely
Don’t touch the movement—think of it as delicate machinery, not a toy.Locate the battery retaining clip or holder and examine how it’s secured.
Use plastic tweezers or a non-magnetic tool to lift the clip slightly — if a tiny screw holds the clip, loosen it gently first. Slide the battery out along the same plane it sits in; don’t twist or force it.
Note the battery orientation clearly (which side faces up). Take a photo or make a quick sketch if unsure — I once saved time by snapping a phone picture before removing the cell.
Avoid metal tweezers that can short the contacts. Never pry on the movement itself; if the battery won’t come out smoothly, stop and re-evaluate the clip or seek help.
Install the New Battery and Test
New battery, instant gratification? Almost — test before you seal it up.Place the new battery in the same orientation using plastic tweezers. Align the polarity mark (+ or −) exactly as the old cell sat and set the cell gently into its seat.
Re-seat the retaining clip or spring gently so it holds the cell without bowing the contact. Ensure the contact points press flat against the battery rim.
Before closing the case, reattach the crown if you removed it and observe the movement or display. Watch for the second hand to start ticking or the digital screen to power up — for example, an analog watch often jumps a couple of seconds to sync.
If it doesn’t, recheck orientation, clean contact points, and confirm the clip makes firm contact.

Reseal the Case and Final Checks
A waterproof watch is useless if the seal’s gone — finish like a technician.Inspect the gasket and case lip for nicks, cracks, or dirt. Replace the gasket if worn and fit a new one of the same size. Lubricate lightly with silicone grease; do not use petroleum-based oil.
Align the case back and press evenly. Snap-backs: press with steady, even force or use a case press with matched dies; avoid levering on the crystal. Screw-backs: thread evenly and tighten with the correct case wrench.
Set the time and date, push the crown to its final position, and observe operation for a minute to confirm movement.
Dispose of the old battery responsibly at a recycling point.

Done — Fast, Safe, and Cost-Effective
With these six steps you can replace most watch batteries quickly and safely; if you encounter unusual resistance or complex movements, stop and consult a professional to avoid irreversible and costly damage—wouldn’t you prefer brief caution over a ruined timepiece?
lol tried this with a cheap watch and the ‘case back opener’ I bought was so flimsy it broke. 😂
So, spend a bit more on tools or improvise with care. Also, the guide’s step 2 about stable workspace is underrated — I lost a screw once to the couch abyss.
I macgyvered with a rubber ball once and it worked surprisingly well for snap backs.
Good call — quality tools make a difference. We recommend budget-friendly but sturdy options in the tools list. Never trust the couch for watch screws!
I was skeptical but actually enjoyed doing this. The hardest part was getting the old battery out without losing it under the movement.
Anyone else use a small vacuum pen for tiny parts? That saved me once. 👍
A vacuum pen is a great tool for tiny components — excellent suggestion for folks who want to upgrade their toolkit.
I use a tiny suction tool too. Works wonders and feels like you’re in a spy movie.
Tried it and it worked, but heads up: some watches have rubber seals that can slip out during reseal. Make sure the seal sits flat or you might lose water resistance.
Also, store old batteries properly — don’t toss them in the trash!
Excellent reminder about the gasket/seal and battery disposal. We added a short note about checking the gasket and local recycling rules in the guide.
Yep. Replace the gasket if it’s dry or cracked. Many watch supply stores sell replacement gaskets cheap.
And glove up if you can — oils from fingers can affect the seal and contacts.
Concern: what about anti-static? I worry about damaging electronic parts. The guide didn’t mention grounding or anti-static wrist straps.
I’ve never used anti-static for basic watch battery swaps and never had problems, but if you’re working on expensive or vintage pieces, be cautious.
Good point — most quartz watch movements are pretty tolerant, but for high-end or complicated electronics, an anti-static wrist strap and handling parts by edges is recommended. We’ll add a short note to the guide.
Okay this guide saved me $40. Went to replace my wife’s watch battery instead of the jewelry store.
Pro tip: put the screws in a small pill box so they don’t roll off the table.
Also, test the new battery before sealing — don’t be like me checking the time after resealing and realizing it’s dead 😅
I use a magnetic parts tray — best investment. But careful with magnets and delicate watches!
Haha yes, testing before resealing is in step 5 for that reason. Pill box/small tray idea is excellent — keeps tiny parts organized.
Long read but worth it.
I usually take photos at each step so I know how to put things back. Took a ton of pressure off me the first time I tried this.
Also — mark the crown position so you don’t mess up the settings when testing.
Photos at each step is a terrific workflow tip — we’ll mention that as a quick pro tip in the guide. Marking crown position is smart too.
Agree — photos saved me when I disassembled something weirdly oriented.
I do the same! Phone camera is the best assistant.
Nice and straight to the point — loved the quick steps. I tried this on an old Seiko and it actually took me 10 minutes.
A couple of notes:
– Step 1: my watch had a sticker under the band with the battery code, saved me a search.
– Step 3: I used a plastic pry tool to avoid scratching.
Thanks for keeping it simple!
Same here, sticker saved me twice. Also, tweezers with plastic tips are a lifesaver when pulling the battery out.
10 minutes is impressive — I keep getting distracted by coffee. ☕️
Great tip about the sticker — many people miss that. Glad the plastic pry tool worked for you!
Constructive nitpick: step 1 could include a quick table of common battery codes and equivalents. Might save people a trip to the store.
Otherwise solid guide.
Thanks — that’s a practical suggestion. We’ll add a small equivalence table for common button cells in a future revision.
Yes! I always forget whether CR2032 equals LR44 or something. A cheat sheet would rule.
Neutral take: the steps are fine but I felt a couple of photos or short vids would help, especially for the case opening bit. Words alone are tricky when you’re holding a tiny case back.
Would you consider adding a short clip for step 3?
Yes please! Even a GIF showing how to position the blade would help a ton. I was scared of scratching my watch.
Thanks for the feedback — totally agree. We’ll look into adding short how-to clips for the trickier steps (especially opening the case) in the next update.
You can find many short vids on YouTube for specific case types. But having them embedded in the guide would be ideal.
Quick question: for step 4, how do you safely remove batteries in watches with tiny clips? Mine seemed to snap when I tried.
If there’s a clip, look for a small screw or hinge holding it — sometimes you push it gently away from the battery using a plastic tool. If it’s very stiff, stop and prefer a watch tech to avoid damage.
I once bent the clip — doh. Use a small screwdriver and support the clip with your finger so it doesn’t warp. Slow and steady wins!
Short and sweet. I liked the ‘Done — Fast, Safe, and Cost-Effective’ ending. Felt rewarding to say that after resealing my watch.
Also: if your watch is a fashion brand, sometimes the back is glued — careful!
Glad the ending resonated! And thanks — glued backs are tricky. We added a note to look for adhesive edges before prying.
If it’s glued, heat (low setting) sometimes softens adhesive — but only for experienced hands.
I almost ruined a watch with glue once. Clinic repair fees were NOT worth it. Watch out for that glued seam.
Random funny: I replaced a battery and then realized the watch stopped because the crown was pulled out. Spent 20 minutes panicking. 🤦♀️
So yeah, step 5 should maybe remind people to check crown/stem position. 😄
Been there. The heart-sink moment when you think you’ve broken something only to find the crown is out.
Great anecdote — added a one-liner to step 5: check crown/stem and ensure it’s pushed fully in before concluding.
Minor gripe: the guide assumes a lot of basic tool knowledge. For absolute beginners, naming the exact screwdrivers and sizes would help.
Still, appreciated the safety reminders and the part about testing before sealing.
Good feedback — we can add a small ‘tools for beginners’ section listing common screwdriver sizes and recommended brands. Thanks!
If you’re just starting, a watchmaker’s kit on Amazon with multiple bits is cheap and covers most jobs.
Also: if you want, tell us your watch model and we’ll suggest the right driver size — happy to help.