
Can You Resize a Metal Watch Band at Home Without Tools?
Some metal watch bands can be resized at home without specialized tools, while others require a pin pusher or professional help. This guide explains realistic possibilities, common risks like scratched links or bent pins, and when to stop to avoid damage.
You’ll learn how to identify band types and adjustment mechanisms, use clasp micro-adjusts or quick-release clasps, manage expansion (stretch) bands, try safe improvised techniques with everyday items, and troubleshoot reassembly and fit. Finally, we cover alternatives and when to seek a pro for secure, reliable results and peace.


Identify Your Metal Band Type and Its Adjustment Mechanism
Expansion / Stretch Bands
These are the old-school, flexible metal bands (Speidel Twist-O-Flex, some Seiko models) that expand over your hand and contract on the wrist. Adjustment is usually done by removing special links or by stretching—many are designed to be resized by removing inner “spring” inserts, but some require a pin tool. If your band feels like a continuous accordion with no visible pins, it’s likely an expansion band.
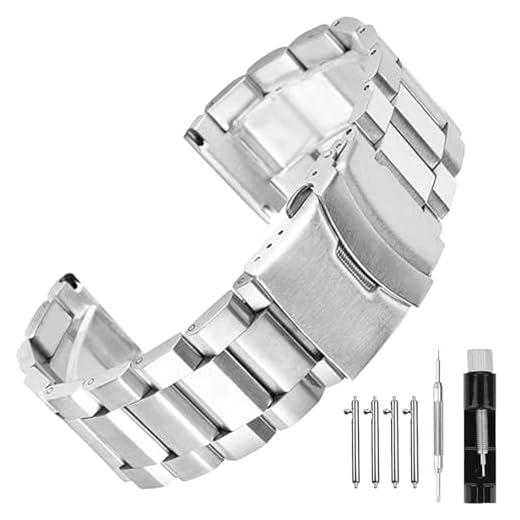
Link Bracelets — Pins, Screws and Directional Arrows
Most classic metal bracelets are made of individual links connected by pins or screws. Look on the underside of each link for:
Affordable or vintage Citizen/Seiko bracelets often use friction pins; higher-end (Rolex Oyster-style) sometimes use screws. If you see arrows, you can usually remove links in the arrow direction — but pushing pins typically requires a pusher or a thin pointed tool.
Quick-Release and Quick-Adjust Link Systems
Modern aftermarket and some OEM bands include quick-release levers or push-buttons on the end links or removable links. These let you remove links or the entire band without tools—look for a tiny metal tab you can slide with your finger or nail.
Clasp Micro-Adjust and Ratcheting Clasps
Many clasps have micro-adjust holes or a ratchet track. Dive-style clasps (Seiko, many generic divers) often have several holes on the clasp where the spring bar sits; you can nudge the spring bar to a different hole for small size changes. Luxury brands (Rolex Glidelock, some Omega) use tool-free ratchets or levers for fine tuning.
Quick Inspection Checklist
A careful visual + fingertip check tells you whether a true no-tool resize is realistic or if a small tool is unavoidable.
Use the Clasp Micro-Adjust or Quick-Release Clasp — The Easiest No-Tool Method
Locate the adjustment points
Open the clasp fully and look for:
Release and slide the clasp (step-by-step)
- Lay the watch flat, clasp open.
- Use your fingernail (or nail + steady thumb pressure) to push the spring bar out of its current hole or to depress the tiny catch.
- While holding the catch depressed, slide the clasp plate toward the direction you want to move (toward the watch head to shorten, away to lengthen).
- Align the spring bar with the new hole and release—listen for a reassuring click.
- Close the clasp and try it on.
If the catch is stiff
Count clicks and make small changes
What not to force
A quick, confident micro-adjust can often solve fit problems in minutes; if this feels unfamiliar, the next section shows how to handle expansion (stretch) bands without tools.
Adjustable Expansion (Stretch) Bands: Shrinking and Expanding Without Tools
Expansion-style bands (often called stretch bands) use interlocking links and internal coils to flex over your hand. Popular examples include the Speidel Twist-O-Flex family and many generic stainless expansible bands. Some models let you make small, tool-free adjustments; others hide coils that require a jeweler’s bit. Below we cover what you can safely do at home and when to stop.
Quick comfort fixes (no disassembly)
Before attempting any link work, try these simple, reversible tweaks:
When links separate easily by hand — step-by-step
Some expansion links are designed to separate or compress by finger pressure. If yours feel like that, proceed gently:
- Find the seam: look for tiny gaps or a visible hinge on the link edge.
- Support the band with one hand and use your thumbnail to pull the seam apart or compress the link ends together—work slowly and evenly.
- Remove or add the small section you need, then realign the mating tabs and press until you feel or hear the click that secures the link.
- Test on the wrist, then recheck the join after 10–15 minutes of wear.
Limits and safe alternatives
If the band resists or metal parts feel brittle, stop and move to the troubleshooting and professional options in the next section.
Improvised, Low-Tool Techniques Using Everyday Items (When True 'No Tools' Isn't Possible)
Before you start: clean, protect, and set up
If you must improvise, treat the job like a small surgery. Clean your hands and the substitute tool with rubbing alcohol. Lay the watch on a soft cloth on a flat, steady surface under bright light. Use a shallow dish or small bowl for pins and tiny parts so nothing rolls away. Know that improvised methods raise the chance of scratches, bent pins, or lost parts — proceed only if you accept that risk.
Safe substitutes and what they can do
Common household items that often work:

Quick tip: thin stainless paperclips (not soft copper ones) resist bending; bend a small hook at one end to grab exposed pins. Always test force on a non-visible section first.
Pinned links — careful step-by-step with a thin stiff object
- Find the direction arrows stamped on the underside — always push pins out the arrow way.
- Support the band on the soft cloth so the link sits over a gap (or the edge of a hardcover book) to let the pin move freely.
- Position your paperclip/needle against the pin head; apply gentle, steady pressure until the pin nudges out a few millimeters.
- Use tweezers or fingers to pull the pin fully and remove the link.
- To reseat, line the holes, feed the pin in the reverse direction, and press until flush — use the flat of your thumb or the edge of the plastic card; do not hammer.
Do not attempt this on screw-type links, brittle vintage pieces, or if the pin won’t move with light pressure. If you feel resistance, stop and consider the professional options in the next section.
Troubleshooting, Reassembly, and Ensuring a Secure Fit
Quick post-adjust checks (do these first)
Fixing common problems

Minor tweaks without tools
Lost, bent pins and safety
If these checks don’t resolve the issue, the next section outlines alternatives to DIY and when pro help is the right move.
Alternatives to DIY and When to Seek Professional Help
When to stop and take it in
If you encounter any of the following, pause your home attempts and bring the watch to a jeweler, watchmaker, or authorized service center:
What professionals provide (and why it matters)
A trained technician brings calibrated screwdrivers, pin punches, precision vises, pressure‑test equipment, and OEM parts—tools you won’t replicate safely at home. Benefits include:
Many shops will perform a simple link removal during the same visit; more complex work or factory service can take days to weeks depending on parts and queue.

Non‑destructive alternatives for a better fit
If you want to avoid resizing entirely, try these safe options first:
If any doubt remains about damage or water resistance, consult a pro—that decision preserves both your watch and peace of mind as we move toward the article’s final guidance.
Making the Right Choice for a Safe, Comfortable Fit
Many metal watch bands can be adjusted safely at home without tools — chiefly via clasp micro-adjusts, quick‑release clasps, and some expandable bands. Other designs need pins, screws, or professional work; attempting risky fixes can damage your watch.
Identify your band type, use the no‑tool methods and safety tips above, and stop if you meet resistance. When in doubt, choose a jeweler or watchmaker to protect fit and value. Always stay safe.
I tried shrinking an expansion band and the guide’s troubleshooting helped a lot. One weird thing: after reassembly the clasp felt loose — turned out a retaining clip wasn’t fully seated. The reassembly checklist saved the day.
Kudos on including that checklist.
Fantastic — glad the checklist came in handy. Those little clips are easy to miss but make all the difference.
Been there. Give the band a gentle pull test before wearing it out.
If you still feel unsure, a jeweler can double-check for free sometimes if they’re small fixes.
Short and sweet — if you have an expansion band (I have a Hearkent), the section on stretch bands saved me a trip to the jeweler. The method for shrinking without tools is clever, though I used a flat plastic card as an improvised wedge.
Nice! Glad the Hearkent example resonated. A plastic card is a great low-risk improvised tool.
Same here — used an old gift card and it worked perfectly. No scratches.
I’m cautious and appreciated the ‘When to Seek Professional Help’ section. Tried the DIY first and realized my band had a weird pin system, so I took it to a shop. Saved myself a broken link.
Also, the list of Amazon kits — JOREST, EasyTime, BYNIIUR — is great. If you’re uncertain, buy a cheap kit (like the 108-piece) and practice on an old strap.
I bought the JOREST kit and practiced on a cheap steel band first. Good confidence builder.
Exactly the mindset we hoped to encourage — try simple no-tool fixes but don’t push risky moves if the mechanism looks unusual. Thanks for the note!
Agreed. Took my vintage piece to a pro after a failed DIY attempt. They fixed it in 10 minutes. Worth the $15.
Long rant incoming but this helped me so much:
I bought a cheap stretch band (Hearkent) years ago and it was always too loose. Tried resizing at home using the expansion band tips from the article. Took longer than I thought, but the step-by-step troubleshooting part (reassembly, making sure the pins sit correctly) prevented me from making it worse.
Also, tip: keep a small dish nearby to hold pins and tiny parts — they vanish like socks in a dryer. 😂
Love the dish trick — we should put that in the article as an official watch-hacker tip. Thanks for sharing your detailed experience!
Nice detailed write-up Grace — saved me from panicking the first time I took my band apart.
Socks and spring bars have a quantum theft relationship. I now always use a muffin tray for small parts 😅
Helpful guide. Quick note: the ‘improvised, low-tool techniques’ are useful, but don’t use metal knives or screwdrivers unless you like scratches and tears. I learned that the hard way.
Totally — we emphasized low-risk improvised items for that reason. Plastic cards, toothpicks, and rubber bands are safer than metal tools for no-tool attempts.
Oof, same here. Scratched my clasp with a tiny screwdriver. Lesson learned.
Two cents: If you’re buying a kit, check the product dimensions. I bought a BYNIIUR 155-piece set and it had everything, but some pins were too long for my thinner bands. Might be worth measuring first.
Great buying tip — measuring band pin width and length before purchasing saves returns and frustration.
Yes! I had the same experience. The BYNIIUR is comprehensive but not one-size-fits-all for vintage watches.
Question: For the SINAIKE quick-release bands, do you still need to worry about micro-adjust on the clasp? Or is it redundant? I want to buy one but don’t want to end up with two fiddly adjustments.
Good question. Quick-release refers to the spring bars for easy band removal. The micro-adjust is a separate clasp feature. Many people use both: the quick-release for swapping straps and the micro-adjust to fine-tune fit. Not redundant, just different purposes.
I have a SINAIKE strap with micro-adjust — it’s nice. Quick swaps + small clasp tweaks = perfect fit throughout the day.
This is more of a beginner PSA: if your watch has quick-release pins (like SINAIKE straps), pull the little slider gently, not hard. I yanked too fast once and nearly bent the lug. Be gentle!
Also — pro tip: keep an old towel on the table to avoid bouncing spring bars across the room.
Excellent PSA. Gentle tension and steady hands are key. Towels are a simple but effective containment system for tiny parts.
Yep, the towel trick saved me from losing two pins under the couch last month 😂
Not everything has to be DIY — the ‘Alternatives to DIY’ section was surprisingly reassuring. I ended up buying a Meliya silicone strap for workouts and letting a pro handle the metal band resize. Best mix of convenience and safety.
Same route here. Swapped to Meliya straps for the gym, pro handled the dress band. Zero regrets.
Smart approach — combine DIY for simple swaps and professionals for fiddly metalwork. Happy you found the alternatives helpful.
Neutral take: The guide is solid, but I would’ve liked more close-up photos of the different pin types. Text descriptions are good, but pics would make it foolproof.
Otherwise, I appreciated the safety warnings and the section about when to see a pro.
Great feedback — we’ll look into adding more close-up images in the next update. Photos do help a lot with pin ID.
Agreed. A video clip for each band type would be ideal. Maybe the author can add a short demo?
I tried the improvised method using a push pin and a phone SIM ejector. Worked for one stubborn link. My only gripe: the article didn’t mention wearing protective gloves when squeezing expansion bands — my fingers got sore.
Phone SIM ejector is underrated. Just be careful not to poke yourself lol.
Good point — adding a note about gloves or padding for hand comfort is sensible. Thanks for the practical add.
I use a strip of cloth or thin gardening glove. Pads the pressure points and keeps things steady.
Great article — I actually resized my old Seiko with the clasp micro-adjust trick from the piece. Didn’t need any fancy kit, just patience. The SINAIKE quick-release band mention was super helpful too; swapping bands was a breeze.
Two small notes:
1) If your clasp is stiff, warm it a bit with your hands first.
2) Watch out for those tiny spring bars, they can fly off 😂
Warming helps a ton. I also used a toothpick to steady the bar when removing it.
Totally — lost one spring bar once and it was a pain to track. The BYNIIUR kit in the article has spare bars, which saved me later.
Thanks Maya — glad that worked for you! Good tip about warming the clasp. Spring bars are the true ninjas of watch work 🙂
Loved the product roundup. I own the Meliya silicone straps and they’re comfy for summer. Thought I’d try a metal resize first though — article made the micro-adjust feel doable even for beginners.
Thanks Nora — good combo: metal for dress, silicone for comfort. Glad the micro-adjust section was approachable.
Meliya straps are my go-to for workouts. If you alternate, the SINAIKE quick-release option is a time-saver.
I laughed at the part about using everyday items — my first watch resize involved a paperclip and a lot of swearing. 😂 The article balances ‘no-tools’ ambition with safe alternatives nicely. Would love more tips on protecting polished surfaces.
Haha, paperclip adventures are a right of passage. We’ll add a short section on surface protection (masking tape, soft cloths) in the future update.
Masking tape over the area works wonders. Also use a plastic prying tool if you can get one.