Change a Leather Watch Strap Fast — No Drama, No Damage
Learn to swap a leather watch strap quickly and safely. This step-by-step guide shows simple tools, avoids common pitfalls, and gives pro tips so you can replace straps in under five minutes — even if you’ve never touched a watch.
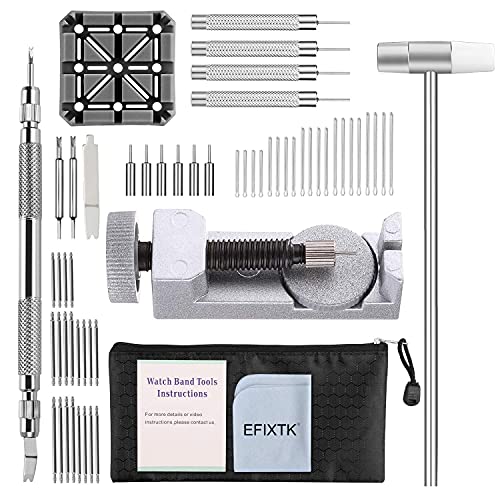
What You Need

Set Up Your Workspace and Protect the Watch
Want a scratch-free swap? A soft surface and a methodical setup make all the difference.Clear a well-lit, flat workspace and remove anything that could fall or snag — keys, bracelets, or a heavy bag.
Place a soft cloth or silicone mat down to protect the crystal and case from scratches.
Lay out your tools and parts where you can reach them quickly:
Wipe the watch clean and dry. Remove fingerprints and grit from the caseback and crystal so nothing gets trapped between the new strap and the case.
Position the watch face-down with the lug ends closest to you to get better access to the spring bars and to reduce slipping.
If the watch uses screws instead of spring bars, switch to the correct screwdriver head and hold the tool steady to avoid cam‑out (stripping the screw).
Check and note the current strap orientation and which side holds the buckle — many watches place the buckle at 12 o’clock but yours might differ; take a quick photo if unsure.
Keep a small dish or tray beside you for spring bars or screws; losing one is the fastest way to derail a five-minute change.

Remove the Old Strap Cleanly
Don’t force it — coax the spring bars out like you’d ease a stuck zipper.Turn the watch face-down and locate the spring bar ends inside the lug recesses.
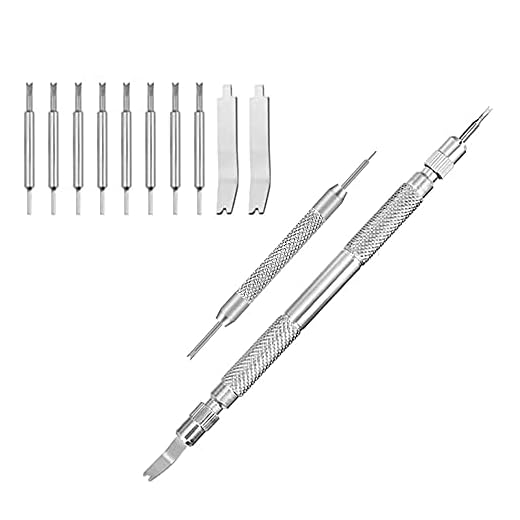
Use the forked end of your spring-bar tool (or a small flat screwdriver with caution) to compress the spring bar inward toward the strap and gently pull the strap away from the lug.
Compress the spring bar slowly and guide the released end into a small container or magnetic dish so it doesn’t disappear.
Work slowly so the spring bar doesn’t flip or fly out; if the bar is stubborn, lever from the opposite side and use a magnifier to ensure you’re compressing the correct spot.
Unscrew slowly for screwed bars, keeping threads aligned to avoid stripping.
Avoid prying on the caseback or applying sideways pressure that could scratch the case.
Tilt the strap out once one side is free, then release the other spring bar the same way.
Inspect and set each spring bar aside; if you plan to reuse them, check for bends or worn ends and replace if needed.
Recall once when a spring bar launched into carpet—using a magnetic dish or small tray saves time and frustration.

Inspect Lugs and Measure Lug Width
A tiny measurement prevents ugly gaps — do this once and your straps will always fit like a glove.Inspect the lug holes and spring bars for wear, debris, or damaged threads. Clean any dirt with a soft brush or a gentle air blast so grime won’t stop the spring bar from seating.
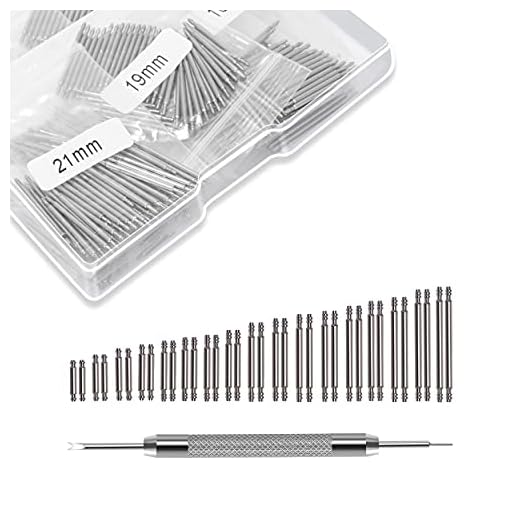
Measure the inner distance between lugs (lug width) using a ruler or calipers to confirm the new strap matches. For example, if the gap measures 20 mm, choose a 20 mm strap—common sizes are 18, 20, and 22 mm.
Note the thickness of the old strap at the lug end; thick or untapered leather can prevent proper seating. Test-fit the strap end against the lug to ensure it sits flush.
Decide which strap side has the buckle (usually the shorter piece) and which attaches at 12 o’clock vs 6 o’clock—this affects balance and how the watch wears.
Match any supplied spring bars or hardware to the lug diameter and hole position. Replace any bent spring bars now; damaged bars are the most common cause of strap failure.
Accurate measurement and inspection at this stage avoids awkward re-work, misaligned stitching, and the frustration of a strap that won’t seat properly.
Attach the New Leather Strap
This is the satisfying part — click it into place and you’re almost done. Yes, it’s really that easy.Begin with the buckle side (shorter piece) unless the strap maker directs otherwise. Insert a spring bar into the strap’s lug-end tube and push one end into the lug hole while compressing the other end with your spring-bar tool.
Angle the bar slightly so one end sits in a lug hole, then compress and slide the opposite end into its hole. Listen for a light click when the bar seats. Visually confirm both spring-bar ends are flush in their recesses and not protruding.
Repeat the same process for the other side.
Warm the leather briefly by rubbing it between your palms or bend it gently if it’s stiff to ease the bar’s entry—avoid sharp creases. Start one bar end into the lug hole before compressing the other on recessed lugs to reduce slippage.
Tug each strap gently to test security. Use tweezers to nudge bars hidden by thick leather or piping. Ensure proper seating to prevent the strap detaching during wear and to keep the watch centered on your wrist.
Final Checks, Fit Adjustment, and Care Tips
Want it comfy and long-lasting? A quick fit test and a couple of care moves will extend strap life dramatically.Put the watch on and fasten it to check fit — you should be able to insert one finger between strap and wrist comfortably.
Set your watch and enjoy — with practice, these steps take under five minutes and protect both your watch and your new strap.

You’re Done — Fast, Secure, and Stylish
With a clean workspace, right tools, and these steps, you can swap leather straps confidently in under five minutes—practice speeds it up. Try it now, post a photo of your watch, and tag or share your results with others today.
This was hilarious and super helpful.
I had been avoiding changing straps because I feared ruining the spring bars or scratching the lugs. Step 2 and 3 in your guide made me stop overthinking.
Question: when measuring lug width, do you round up if it’s between sizes? My watch measured 19.2mm and I couldn’t find a 19mm strap easily.
Also, your ‘Final Checks’ list saved me from wearing a crooked strap — had to redo it once. 😅
Thanks everyone — rounding up it is. Saved me another trip to the watch shop!
Alternatively some sellers offer half sizes but they’re rare. I usually pick the next size up too.
Great question, Leah — if it’s 19.2mm, go with 20mm. It’s better to have a snug fit with a tiny gap than a strap that’s loose and wobbly. Most leather will compress a bit.
I had the same issue. I bought a 20mm and it’s been fine after a week. Just trim the leather keeper if it’s too long.
If you want, we can add a quick chart in the guide explaining the rounding rule. Might make life easier for readers.
I laughed at the ‘No Drama’ headline but it really is that straightforward. One tiny trick I add: put a strip of painter’s tape over the case back to avoid slipping tools off the spring bar and scratching the case.
Also: be patient with leather straps — they need a few days to break in and sit right on the wrist.
Painter’s tape — love that. Practical and cheap. We’ll include it in the workspace setup.
Painter’s tape is genius. Tried it and no scratches — plus cheap.
Wow, this guide actually made me brave enough to swap my strap for the first time.
I followed the ‘Set Up Your Workspace’ part — used a microfiber cloth and a small tray for the parts — and it took maybe 6 minutes because I fumbled the spring bar once. 😂
Tips for anyone trying: hold the watch face-down on a soft surface, use a small flat tool to compress the bar, and don’t rush the final fit check.
Also love the care tips at the end — leather conditioner saved my new strap.
Thanks for making it feel doable!
Maya — the 6 minutes is still impressive for a first try! I was scared of scratching mine but the cloth trick works wonders.
So glad it helped, Maya! Great call on the tray — little parts love to escape. If you want, send a pic of the strap and I can double-check the lug width for future swaps.
Nice! Which conditioner did you use? I’m paranoid about changing the color of my strap.
Tried this in the kitchen (bad idea lol) — crumbs everywhere but the strap swap itself was painless.
Would add: keep good lighting. I used my phone flashlight and it made all the difference. Also, those tiny spring bars are sneaky — I nearly lost one in the sink.
Kitchen is classic. 😂 Yes, good lighting + a tray = fewer lost parts. Also avoid doing it near sinks — agreed!
Phone flashlight is a life-saver. I also put a towel under the watch so it doesn’t slide.
Helpful guide but a small nit: the section on ‘Remove the Old Strap’ could use a picture showing the exact angle to press the spring bar. I had to watch a 2-min video to be sure.
Still, the steps are clean and I appreciate the care tips at the end.
Thanks, Priya — good feedback. We’ll try to add a quick diagram for the spring bar angle in the next update.
Yes please — pictures would help me. I’m visual and the text alone felt a bit abstract.
I swapped straps in under 4 minutes today after trying this — the 5-minute promise checks out. 😎
My only constructive feedback: mention using a loupe or magnifier for older watches with compressed lugs. I ruined one spring bar trying to pry it out without seeing clearly.
Awesome, Marcus! Great point on magnification for older watches — we’ll add that to the ‘Inspect Lugs’ section.
Agreed — vintage watches are a different beast. Go slow!
Thanks all — glad someone else has been there. Vintage straps are like a puzzle.
Magnifier saved me when I had a vintage piece. There’s often crud you can’t see with naked eye.
Not a watch person usually but this made me want to try changing straps for dad’s old watch. The ‘Protect the Watch’ tips are legit — don’t underestimate a microfiber cloth!
Also, small typos in step 4 (missing comma) but nothing major. 😄
Thanks for the heads-up, Ellie. We’ll fix that typo. And if you try your dad’s watch, let us know how it goes!
Short and to the point — loved the no-drama vibe. Pro tip: plastic spring bar tool if you’re clumsy like me.
Thanks, Daniel. Good shout on the plastic tool — less likely to nick the lugs for sure.
Low-key impressed. Used a spring bar tool I got off Amazon and the new strap snapped in quickly.
One cautionary tale: I forgot to check the spring bars for wear — one of mine was bent and popped during the swap. Replaced them afterwards.
So: inspect spring bars too!
Exactly — little safety step that saves a crash later.
Super important reminder, Samir. We’ll update the ‘Inspect Lugs’ section to explicitly include checking spring bars for bends or rust.
Good call — I swapped mine without thinking and found one was corroded. Replacing them is cheap and worth it.