
Small cents and hours multiply fast when engraving hundreds of watches.
Imagine a pallet of 300 watch casebacks due in ten days: a $0.75 per-piece price gap or a two‑day delay can add hundreds of dollars or force overnight rush charges. Per-unit price, minimum runs, setup fees, and scrap rate all scale; so do tiny alignment inconsistencies that become visible across a cohort.
Use a simple comparison frame: calculate total cost = (per‑piece price × quantity) + fixed fees + expected rework; factor in guaranteed throughput (items/day) and sample approval time. Require a signed delivery window and a small production sample before the full run. For setup and handling best practices, consult the how to personalize a watch in bulk to reduce surprises.
Small essentials

Engraving methods and when to use them
Quick comparison
- Laser (fiber/CO2) — Cost: moderate per piece, low setup. Visual: crisp, high-contrast marks; can be surface-darkening, color-change, or removal of anodize. Durability: very good on metals (fiber anneals stainless), moderate on painted or plated surfaces. Compatibility: stainless, anodized aluminum, plastics, wood, glass. Risk: thin plating or painted finishes can blister, discolor, or burn.
- Rotary / diamond drag — Cost: low–moderate, simple setup. Visual: fine incised lines or shallow cuts; excellent for serial numbers. Durability: excellent (physical removal). Compatibility: metals, hard plastics, leather. Risk: can scrape through thin plating or soft surface coatings — not recommended for plated jewelry or gilt finishes.
- Chemical etch — Cost: low per piece at high volume, higher tooling/setup. Visual: clean, shallow etched areas with little heat effect. Durability: good for corrosion-resistant marks but shallow. Compatibility: ferrous and non-ferrous metals, stainless with proper masking. Risk: chemical processes will remove or alter plating; avoid on thin decorative layers.
- CNC milling — Cost: high per piece, slower. Visual: deep, precise cuts and engraved pockets. Durability: highest (mechanical depth). Compatibility: metals, plastics, wood. Risk: aggressive material removal can ruin thin parts or exposed plating edges.
Practical rule of thumb
For plated or thin-finish parts, prefer non-abrasive laser settings tuned for surface marking or chemical-safe masking; avoid aggressive rotary or deep CNC cuts unless plating is stripped first.
Low-cost engraving often damages thin platings. Test on sacrificial parts, request vendor samples, and prefer non-contact marking for delicate finishes. If depth is required, remove plating first or accept visible edge wear.
Separate setup charges from per-piece costs
- One-time setup Setup fees cover fixturing, artwork prep, machine programming, and first-run tests. These are charged per design and are often waived for identical reorders.
- Per-piece cost Per-piece pricing includes engraving machine time, handling, consumables, and basic cleanup. Laser jobs are often billed by seconds or characters; rotary by minutes or depth. Material choice shifts the rate.
- Volume tiers Vendors lower unit price at quantity thresholds. Compare the effective per-item cost at the intended batch size (e.g., 100, 500, 1,000) rather than headline unit price.
- Hidden fees Common extras: setup retries after sample rejection, secondary finishes (anodize, masking removal), scrap/rework charges, rush fees, and shipping. Clarify which are included versus billed separately.
Typical timeline: quote → proof → pilot → production → inspection → shipping
-
Quote
Initial quotes typically arrive in 1–5 business days. Turnaround depends on material availability, artwork quality, and order size. Common delays include incomplete specs, missing material certificates, or unusual part geometries.
-
Proof
Digital proofs usually take 24–72 hours; physical mockups require 3–7 business days. Multiple revision rounds add time—vector cleanup and logo approvals are frequent causes of back-and-forth.
-
Pilot (pre-production run)
A pilot batch often requires 3–10 business days after proof sign-off to set fixtures and validate settings. Material lead times or custom tooling can extend this step.
-
Production
Production time ranges from hours to several weeks depending on quantity and engraving method. Typical bulk runs (500–5,000 pieces) commonly finish in 3–14 business days; machine capacity, staffing, and scrap rate affect throughput.
-
Inspection and QA
Inspection normally takes 1–3 business days for sampling and measurement. Discovery of defects or dimensional failures may trigger rework or a repeat run, adding days to the schedule.
-
Shipping and delivery
Domestic transit is usually 2–10 business days; international shipments take longer. Common hold-ups are carrier delays, customs clearance, and incorrect labeling or paperwork.
Build a 20–30% time buffer into schedules; for mission‑critical deadlines, obtain a written lead‑time guarantee or pay for expedited service.
Artwork approvals: often add 2–5 days—provide production‑ready vector files.
Material availability: confirm stock before finalizing dates.
Tight tolerances or custom fixtures: increase setup and pilot time.
Approval lag: slow client signoff multiplies delays.
Holidays and maintenance: vendor downtimes often extend lead times.
Vendor fact checklist before requesting quotes
Verify daily/weekly throughput for the requested operation and peak-season constraints. Ask for a realistic lead-time range including proof and pilot stages.
Confirm accepted file formats, required DPI/vector specs, engraving depth targets, and whether file cleanup is charged. Clarify revision limits and costs for proof corrections.
Ask whether fixtures are charged or reusable, minimum order for pilots, and sample approval process (who signs off, sampling rate). Verify fixture ownership/return terms.
Request declared tolerances, inspection methods, scrap-rate expectations, and proof of liability/transport insurance for valuable goods.
Quick alignment aid
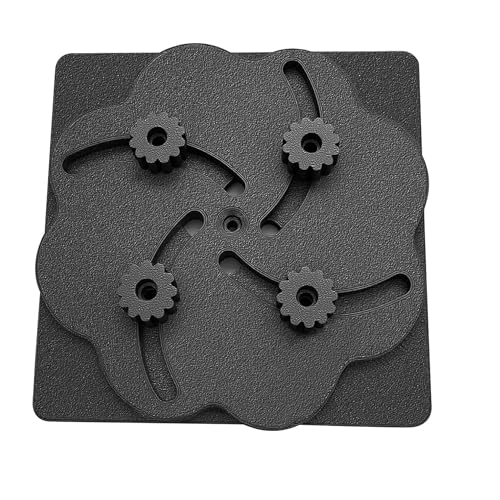
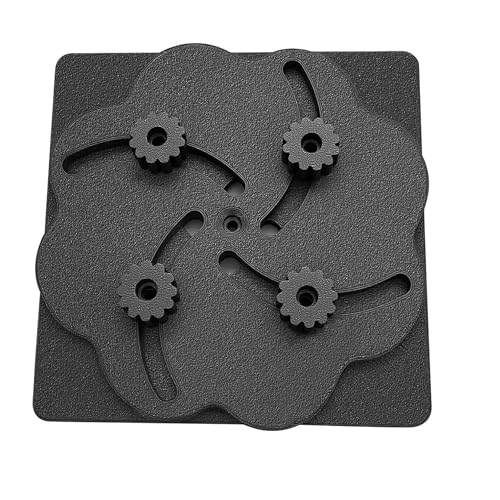
Compatibility: Designed for xTool F1 & F1 Lite.
Specs: Adjustable diameter 0.4″–3.15″ (10–80 mm), anti‑slip clamps, model qazw1.
Why it helps: Reduces setup time and positioning errors for watch backs, rings, and small discs; useful when vendors charge fixture/setup fees or when quoting requires proof of fixturing.
Price indicator: Approximately $25 (retail), handy as a low‑cost in‑house fixture or to reference when asking vendors about equivalent tooling.
Compare and Negotiate Quotes — Q&A
How to normalize setup fees across vendors?
Convert setup into a per-piece figure by dividing the fee by intended run and present numbers for 1×, 10×, and 100× runs. Request that setup be amortized, waived on repeat orders, or capped so comparisons use the same basis.
What to ask for with tiered pricing?
Request a clear price table with breakpoints and the per-piece cost at each level, including minimums and tooling reuse assumptions. Ask vendors to quote midpoints and confirm whether price steps are negotiable if volumes change.
How should pilot-run pricing be handled?
Request a small pilot at a discounted per-piece rate or have pilot costs credited toward production if approved. Require that the pilot includes inspection and explicit approval criteria to prevent surprise rework charges.
What practical levers lower per-piece cost without risking quality?
Reduce engraved area, switch to standard materials/finishes, increase batch sizes, reuse fixtures, and relax noncritical tolerances. Consolidating parts or nesting multiple items per substrate often improves throughput with minimal quality impact.
Other negotiation tactics to include in quotes?
Bundle SKUs, offer forecasted repeat volumes, accept longer lead times, or trade payment terms for lower unit pricing. Ensure any concessions are written into the quote or contract to avoid later disputes.
Sampling and acceptance protocol
-
Request a representative sample
Ask the vendor for an engraved sample on the exact material, artwork, and finish. Request two pieces: one untouched production-like part and one marked with measurements and machine settings.
-
Run a pilot batch
Agree a pilot size (typically 50–200 pieces for small runs). Produce the pilot with full production fixtures, packaging, and handling to reveal real failure modes.
-
Define measurable acceptance criteria
Specify numeric tolerances for placement (mm), depth (µm), contrast/legibility, permitted cosmetic defects, and target scrap rate. Include go/no-go examples (photos).
-
Specify rework and scrap rules
State allowed rework methods, who pays, maximum rework cycles, and the scrap threshold above which the batch is rejected.
-
Inspection rates and required evidence
Require 100% first-article inspection, ~10% pilot sampling, then AQL-based production sampling (commonly 2–5%). Vendor must supply checklist, measurement logs, dated photos with scale, lot IDs, and a certificate of conformity.
Use 30–60× for routine acceptance and 90× for fine detail or burr checks. LED lighting improves contrast; UV helps detect fluorescent markings.
Recommended quick checklist:
30–60× for alignment, legibility, contrast 90× for burrs, micro-chips, engraving depth verification Photo-document failures with scale and lot IDAffordable sets (for example, the JARLINK 3‑pack ~ $15) provide LED and UV options suitable for standard shop inspections.
Shipping and logistics for mail‑in projects
Mail‑in engraving projects live or die on secure, accurate transit. Treat shipping as part of the production workflow rather than an afterthought.
Practical shipping checklist
- Insure shipments for full replacement value and buy carrier liability that covers declared worth. Use a trackable courier and require signature on delivery.
- Use tamper‑evident packaging (security tape or tamper seals) and photograph each sealed box before pickup.
- Include a packing list inside each box and attach an external manifest that maps serial numbers or SKU ranges to customer order IDs (CSV preferred).
- For cross‑border shipments, prepare commercial invoices, HS codes, origin statements, and any necessary export licenses; allow extra customs buffer time.
Pickup, concierge, and vendor handoff
Offer scheduled vendor pickup or a concierge/kitting service to stage batches, verify counts, and hand over the manifest. Send tracking and a photographed seal to the vendor immediately.
Common logistical risks
Lost or misrouted parcels, incomplete customs paperwork, mislabeled boxes, and damaged goods are the usual schedule killers. Mitigate with redundancy (insured, tracked, photographed) and a single-point contact for carrier exceptions.
Sturdy small mailer for parts and samples
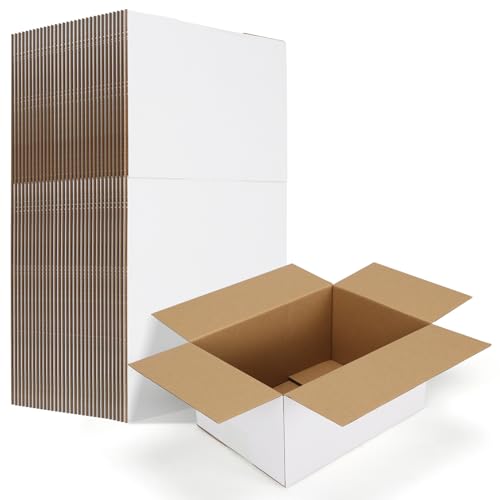
Single‑wall corrugated cardboard boxes (10 x 7 x 5″) sold in a 30‑pack. Pre‑cut, quick to assemble, recyclable white finish. Good for small engraved pieces when paired with cushioning; 32 ECT grade supports standard stacking.

Cost, Quality & Timeline Myths
Cheap unit rates often hide setup fees, high scrap, or extra inspections.
A low quoted rate can inflate total spend through hidden charges, rejects, and rework.
Laser results vary by machine, power, focus, and operator skill.
Different equipment and settings change contrast, edge crispness, and repeatability even on identical materials.
Some vendors offer built-in quick slots or efficient batching with modest premiums.
Rush pricing depends on capacity and scheduling; negotiating tiered timing can cut premiums.
Scaling can amplify tooling wear, fixture issues, and process drift.
Pilots must validate controls because defects that hide at low volume can spike in production.
Proofs show layout but won’t reveal material reactions like discoloration or depth variation.
Physical pilots on the actual parts are required to confirm appearance and durability.
How vendors were evaluated
Vendors were assessed using written quotes, physical sample inspection, a paid pilot run, and checks of capacity and quality controls to ensure recommendations reflect real-world performance.
-
Quote normalization
All bids were normalized for setup, per-piece, rework, and shipping so comparisons matched the same scope and volumes.
-
Sample inspection and pilot
Supplied samples were examined for mark clarity, durability, and cosmetic defects; a short paid pilot measured throughput, scrap rate, and reporting accuracy.
-
Capacity and controls
Confirmed lead times, backup capacity, inspection protocols, and traceability documentation to identify scaling or quality risks before recommending a vendor.
Final decision checklist
- Obtain three competitive bids to compare total landed cost and lead times.
- Require a paid pilot run with written acceptance criteria and retained sample for inspection.
- Lock tiered per-piece pricing and delivery windows in a signed quote or PO amendment.
Before awarding the contract, insist on a short, enforceable checklist: three competitive bids; a paid pilot with written acceptance criteria and a retained sample; and a signed quote that locks tiered pricing and delivery windows. Arrange insured, trackable shipping with packing lists mapped to serials and an agreed inspection/rework path if the pilot fails.
Single next action: request three bids and require a paid pilot that must meet written acceptance criteria before authorizing full production—only accept a bid after the pilot and a signed quote lock price, delivery, and shipping terms.