
Get a Perfect Fit Fast
Quickly tailor your watch clasp for a small wrist with simple tools and clear steps. Measure precisely, identify the clasp, remove links or use micro-adjustments, then reassemble and test. Finish with care for a secure, comfortable fit in minutes today.
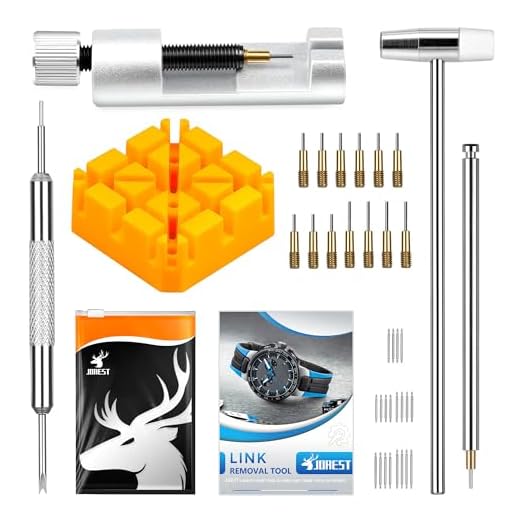
What You'll Need

Mastering the Rolex Glidelock Clasp: Precise Fine Adjustment for Submariner, Deepsea & Sea-Dweller
Measure and Mark Your Wrist Size
Skip the guesswork — measure like a pro so your watch doesn’t slide or squeezeMeasure your wrist where you normally wear the watch. Use a flexible tape or wrap a strip of paper around your wrist, mark the overlap, then lay the tape or paper flat and measure that length in millimeters. Record the number.
Decide on the fit you want and use this quick rule of thumb:
Note your watch’s current bracelet length in millimeters (lay it flat and measure end-to-end). Subtract your desired wrist measurement from the bracelet length to find how many millimeters you need removed. Example: bracelet 190 mm − wrist 170 mm = remove 20 mm (about two 10 mm links).
Mark the side of the clasp you prefer for link removal for balanced appearance. This step prevents over-removal and keeps the watch centered on your wrist.
Identify Your Clasp and Link System
Not all clasps are created equal — spot the system before you poke or pryInspect the bracelet closely to determine the link type. Look for these common systems:
Locate any micro-adjustment holes on the clasp and note whether the clasp is folding, deployant, or butterfly style. Identify arrows indicating pin-removal direction and check for removable end links adjacent to the clasp.
Use examples: if you see flat slots, prepare a precision screwdriver; if you see arrows, use a push-pin tool or a pin pusher. Note which side of the clasp has removable links for a balanced look. Correct identification tells you which tool and technique to use and avoids damaging pins, screws, or end links. Proceed to the removal step with the right tool ready.

Remove Links or Adjust the Micro-Adjustment
Tiny tweaks, big comfort — choose the fastest safe methodUnscrew the link screws if your bracelet uses screws — hold the link steady and turn with a proper precision screwdriver. Remove equal links from both sides so the clasp stays centered (for example, take one link off each side rather than two from one).
Place the bracelet in a holder for push-pin (pin-and-collar) systems. Align a pin pusher with the pin’s head or follow the arrow direction on the inside of the link, then gently tap or push until the pin comes free.
Use a small punch for friction pins: position the punch on the pin head and push steadily until it slides out. Work slowly to avoid bending pins.
Use a spring-bar tool for micro-adjustment or sliding clasps: depress the spring bar and move it to the next tighter hole or slide the clasp to a tighter setting. This often gives minute but critical fit improvements without removing full links.
Keep removed pins, screws, and links organized in a small container and note which order links came from so reassembly is easy.

Reassemble and Test the Fit
You’re almost there — don’t skip the fit checks that save returns and regretsReattach links and ensure pins or screws are fully seated and flush with the bracelet. Tighten screws gently with the correct screwdriver — turn until snug, then stop to avoid stripping. Push pins until they click into place; hammer lightly only if the design calls for a light tap and you use a proper watchmaker’s hammer.
Reconnect the clasp and close it so the bracelet forms a continuous loop. Try the watch on and check the fit in several positions: standing, with the wrist bent, and while moving the hand (shake or write) to simulate daily motion.
Check these points:
Remove or add links accordingly or fine-tune the micro-adjustment when the fit is still too tight or loose. Finally, verify the clasp locks securely with no rattles.

Final Touches and Care to Keep It Perfect
Keep it snug without damage — maintenance tips most people overlookPolish the bracelet lightly with a soft, lint-free cloth. Buff single links and the clasp until fingerprints and smudges disappear.
Check screw threads and pin ends for burrs or damage. Clean debris from holes with a toothpick or soft brush.
Reapply a tiny drop of thread locker only if you’re experienced; use a needle-tip applicator and the low-strength formula. Tighten screws until snug — stop before you feel resistance increase sharply to avoid stripping.
Ensure spring bars and case-back or crown seals sit correctly to maintain water resistance. Replace any cracked seals or bent spring bars before swimming.
Store removed links, screws and pins in a labeled pouch or small container so future resizing is simple. Include a note with the watch model and date of removal.
Re-check the fit after a few hours and again the next day; leather, metal and clasps can settle with wear. If pins are bent, screws stripped, or you feel unsure, visit a qualified watchmaker for professional adjustment to prevent long-term damage.

Wear with Confidence
A properly adjusted clasp improves comfort and watch longevity. With careful measuring, correct identification, and methodical adjustment, you can achieve a professional fit in minutes. Try it, share your results, and consult a pro if unsure for lasting satisfaction today.
Followed the ‘Final Touches and Care’ section and now my watch stays perfect all day. The tip about checking the clasp springs monthly is underrated. Also — if you’re unsure, take it to the shop once and watch how they do it, then you can DIY next time. 🙂
Good idea to watch a pro. I filmed mine on my phone so I could replicate the exact steps later.
Film everything. Then you have evidence in case you break something 😂
Exactly — seeing a pro do it once can teach you a lot. Monthly quick checks really prevent surprises.
A tip I haven’t seen mentioned: when you remove pins, keep a magnet tray or small dish nearby — those pins are tiny and will roll away. Also, use a magnifying loupe if your lighting is poor.
If you’re worried about the aesthetic, after reassembly buff the clasp lightly with a microfiber cloth and a tiny bit of metal polish (for steel). Keep it gentle.
Excellent additions, Priya — magnet trays are lifesavers for small parts, and polishing gently keeps the finish even.
I use a cheap LED desk lamp pointed at the bracelet when working. Makes seeing pins so much easier.
Agree on the dish — I once spent 20 minutes crawling under furniture looking for a stray pin. Never again 😂
This guide was a lifesaver! I tried the micro-adjustment first and it fixed the fit in less than 2 minutes.
Steps I followed:
– Measured with a soft tape (tip: bend your wrist like you normally do)
– Used a push-pin for the link pin (worked fine for my bracelet)
– Re-checked and polished the clasp
Seriously, whoever wrote this: thank you 😊. Saved me from returning the watch!
Nice, I did the exact same but ruined a spring bar once. Did you use any lubrication on the pins?
If it’s stainless steel pins, I usually avoid oil — just clean and dry. For older watches, a tiny dab of watch oil helps, but very little!
Glad it helped, Emily! Great tip about bending your wrist — people often forget to account for how they actually wear the watch during the day.
I followed step 3 but got stuck removing the pin — it wouldn’t budge. Ended up taking it to a shop. Maybe my pins are too tight or old. Anyone else face this?
Pro tip: warm the bracelet slightly with a hairdryer (not too hot) — expands metal a hair and can help free stuck pins. Worked for me on a vintage bracelet.
Tight pins are common on older or seldom-worn watches. Try applying a bit of penetrating oil and waiting 10-15 minutes, or use a proper pin pusher and hammer gently. If it still resists, a watchmaker can remove it without damage.
Sometimes the pin has a directional arrow; push the arrow direction. If you pushed the wrong way it can jam more. Worth checking.
If it’s stubborn, don’t be a hero — shops have the right tools. I once used a hammer and learned a costly lesson 😂
Long post because I tried several watches and methods over the weekend — hope this helps someone.
First: measure twice. I used a paper strip, marked, then compared to a tape measure to confirm.
Second: identify the clasp type. I had one with a screw-link and one with push-pins — the screw-link was WAY easier.
Third: when removing links, remove from both sides of the clasp to keep it centered. Looks better and feels balanced.
Fourth: after reassembly, wear it for 30 minutes and recheck — wrists swell a bit and you want to be comfy.
Also, store any removed links in a labeled zip bag — you’ll thank yourself later. 😂
Fantastic detailed walkthrough, Olivia. Removing links from both sides is a tip lots of people miss — keeps the clasp centered and the watch balanced on the wrist.
Screw-links sound nice but do I need a tiny screwdriver set? Where do you buy those?
Rechecking after 30 minutes is golden advice. My wrist swelled after coffee and I needed the micro-adjust again lol.
Also: write down which links you removed (e.g., 1 left, 2 right). Makes future adjustments easier, especially if you vary straps.
Good call on the zip bag. I lost my extra link in a move and felt dumb. Lesson learned!
Short and dumb question: can I just bend the metal a little to make the bracelet tighter? Seems easier than removing links lol
Don’t bend the metal — you’ll damage the bracelet and weaken the links. Use micro-adjustment or remove links instead.
Yeah, don’t do the MacGyver bend. I learned that the hard way. Took it to a jeweler to fix a warped lug.
Constructive feedback: the guide is great for basic bracelets, but it skimmed over delicate vintage pieces. For heirlooms, I’d recommend explicitly advising readers to consult a pro before forcing old pins or plated bracelets. I almost stripped the plating on a 1970s band following a generic push-pin trick.
Agreed — nothing kills a Sunday afternoon hobby like a ruined heirloom. Pro help is worth the cost sometimes.
Thanks for bringing that up. Vintage watches often need gentler handling — patience and the right tools are key.
Good point, Daniel. I’ll add a cautionary note about vintage/fragile pieces and recommend professional help for plated, very old, or brittle bracelets.
Would love a follow-up on what ‘right tools’ mean for vintage — small screwdrivers, pin pushers, or something else?
I tried to measure my wrist and felt like a tailor measuring a giraffe. Ended up eyeballing it and it fits just fine. 😂
But for real — the micro-adjustment was clutch. If you hate tools, that’s the way.
Same — I’m impatient so I skipped most of the prep and it still worked. But I keep the measuring tape now for future straps.
Haha — eyeballing works for some, but measuring helps prevent surprises. Still, happy the micro-adjustment did the trick for you!
Quick question: the guide mentions different clasp types. My watch has a deployant clasp — do I just remove links the same way? I’m a bit nervous about scratching it.
Deployant owner here — yes, micro-adjust first. And put a microfiber cloth under the bracelet to avoid scratches. Takes patience but doable at home.
Deployant clasps often have a micro-adjustment on the clasp itself, so try that before removing full links. If you must remove links, work on a soft surface and use a proper link pin tool or a push pin with steady pressure.