
Quick, Safe Metal Bracelet Sizing
A clear, 6-step method lets you size most metal watch bracelets using push pins at home. Follow simple measured steps to remove or add links safely, protect pins and finishes, and achieve a snug, professional fit without a jeweler today.
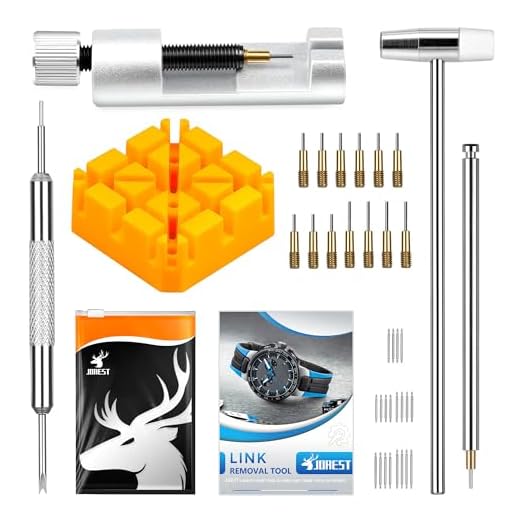
What You’ll Need

Measure Your Wrist and Plan the Adjustment
Not sure where to start? A quick measurement saves time and avoids removing too many links.Measure your wrist snugly with a tape measure or a piece of string; mark where it meets and measure that length. Subtract about 3–6 mm for a comfortable fit depending on whether you like a close or slightly loose feel.
Count how many links the bracelet has and measure one link to learn how many millimetres each removed link will change the fit (many links are roughly 4–7 mm, but check yours).
Plan which links to remove and from which side of the clasp. Remove links from both sides of the clasp when possible to keep the clasp centered and the bracelet balanced.
If you must remove an odd number, take the extra link from the side that keeps the clasp aligned with the underside of your wrist.

Prepare a Stable Workspace and Arrange Tools
Good light and a steady surface reduce mistakes — you’d be surprised how much this helps.Lay a soft cloth on a flat table to protect the watch finish and keep small parts from rolling away. Position a bracelet holder or a wooden block with a centered pin hole to support the link while you push pins out.
Place the following tools within easy reach:
Arrange tools in a line so you can move smoothly from one action to the next. Work in bright light and wear nitrile or cotton gloves if you’re worried about fingerprints or scratches.

Identify Removable Links and Pin Direction
Tiny arrows or faint seams? Read the bracelet — it tells you how to remove links.Inspect the inside of the bracelet in bright light or under a loupe for small stamped arrows or tiny side holes.
Note the arrows and always push pins in the direction the arrow points.
Identify removable links by their side holes or slightly different end shapes; these are the ones you can remove.
Check common pin types to avoid mistakes: many bracelets use friction or tapered pins that require pushing in the arrow direction, while some links use screws that need a screwdriver—not a pin punch.
Inspect the inside of the bracelet for arrows or small holes that indicate pin direction. Most bracelets use friction or tapered pins that must be pushed in the direction of the arrow. Determine which links are removable (they’ll often have holes on the side) and note if some links use screws instead — these require a screwdriver, not a pin punch. Knowing pin type and direction prevents damage and saves time.
Drive Out Pins Carefully Using the Push Pin Tool
Gentle taps, not brute force — this is precision, not demolition.Place the bracelet on the block so the pin hole lines up over the block’s opening. Align it so the pin can move straight through the gap.
Position the push-pin tool or a small pin punch against the flat head or exposed end of the bracelet pin. Hold the bracelet steady; don’t let it tilt.
Tap lightly with the hammer to start the pin moving. Avoid forcing the pin or bending the bracelet — a few light taps usually do the job. For example, remove two links from one side (or one from each) to keep the clasp centered.
Once the pin protrudes, use needle-nose pliers to pull it the rest of the way out. Keep removed pins and links in order and repeat until you’ve removed the planned number of links.

Reconnect the Bracelet and Seat Pins Securely
One pin misplaced can ruin the feel — here’s how to make reassembly foolproof.Align the two bracelet ends so the link holes match and the clasp sits in its intended position.
Insert the pin from the correct direction (usually opposite the removal arrows); for example, push it in from the inside if arrows pointed outward.
Push the pin by hand as far as it will go, then place the bracelet on the block with the head-side up.
Tap the pin gently with the push-pin tool or small hammer until it is flush with the link surface — use light, controlled taps.
Ensure the pin is fully seated and the link pivots smoothly without excess play.
Recheck clasp alignment so it closes centered on your wrist.

Final Checks, Troubleshooting and Care Tips
A secure bracelet is a happy bracelet — avoid slips with a couple of quick tests.Wear the watch and perform a wiggle test: gently shake your wrist and check that pins stay put and links don’t separate.
Inspect each link and the clasp for burrs or scratches. Buff minor burrs lightly with a jeweler’s cloth or very fine steel wool (0000), testing first on a hidden spot — for example, polish a tiny snag near the clasp.
Store removed links and pins in a labeled small container or zip bag so you can re-size later.
Replace any pin that feels loose or shows damage; do not rely on glue.
Visit a watchmaker if you feel uncertain or the bracelet behaves oddly.

Done — Comfortable, Secure Fit
With steady hands and the right tools you can size most metal bracelets in minutes; keep spare pins and links, perform quick security checks regularly, and store removed parts safely for future adjustments—ready to try it yourself today with confidence?
Great guide, but what about bracelets that use tiny screws instead of push pins? I started to size a Seiko that had screws and panicked. Are the steps similar or totally different?
Yep — treat screws like actual screws. Use the correct driver head size, and consider a bit of blue threadlocker for screws that keep loosening (only a tiny amount).
If you post a photo of the screw head, we can help identify the driver size. Cross-head vs flat vs torx all need different bits.
For screw-link bracelets, you need a precision screwdriver set and a different approach: unscrew the tiny screws (turn counterclockwise) and remove links, then screw back in securely. Don’t mix up screw types with push pins — they require gentler handling and different tools.
Thanks — I’ll take a pic and post it later. Appreciate the quick tips!
Long tip dump — hope it’s useful:
1) Use a towel to keep parts from bouncing away.
2) Tape the bracelet to the table edge to keep it steady.
3) If pins are microscopic (lol), use a piece of blu-tack to pick them up.
4) Don’t force pins — back off and try from the other side if it feels wierd.
5) After reassembly, wear it around the house for an hour to test comfort and security.
Sorry for the essay but these little things saved me time and swearing 😂
Taping the bracelet down was a game changer for me — no slipping at all. Also, use eye protection if you’re tapping pins with a hammer.
Thanks! Eye protection is underrated, so true.
Fantastic list, Sara — blu-tack is a clever trick for tiny pins. And testing it at home first is excellent advice.
Thought sizing a metal bracelet would require a jeweler and a cape. Turns out, I just needed patience and decent lighting.
I did make a rookie move and tried to push a pin with a screwdriver at first — don’t be me.
Easy, but not necessarily fast if you’re clumsy like I am 😂
Glad it was doable without a jeweler! And yeah — avoid screwdrivers for pushing pins; they can slip and damage the bracelet or your finger.
Noted. Bought a tool after the scratch. Lesson learned.
If the bracelet has a polished finish, place a small piece of painter’s tape over the link while you work to reduce the risk of scratches.
Same — used a screwdriver once, scratched the finish. Invest in a cheap push pin tool, it pays off.
Quick question: after seating the pin, how long should I let the bracelet sit before wearing it? I had one come loose after a week once.
Also, are there any pins that should be replaced rather than reused?
If a pin loosened for me it was because it wasn’t hammered in all the way. Double-check both sides after seating and give a gentle tug to confirm security.
You can wear it right away after confirming the pins are fully seated and flush.
If a pin looks bent, corroded, or the end doesn’t seat flush, replace it. Some manufacturers use special pins; if unsure, get a matching replacement.
Good guide. I appreciated the ‘Prepare a Stable Workspace’ section — saved me a lot of fumbling.
One nit: the photo showing the push pin tool angle could be a smidge clearer (maybe zoom in?). Otherwise, straight to the point and safe.
Thanks!
Yeah agree. A macro shot showing the tool pressing the pin halfway out would’ve helped me the first time. Still, the text was enough to get me through.
Thanks for the feedback, Lily — I’ll pass that along for a clearer close-up in the next edit. Zooming on the tool angle is a great suggestion.
Ok wow, I was nervous about sizing my husband’s watch but this actually made me feel confident.
Step 1: measured his wrist twice (he kept changing his mind lol).
Step 2: laid an old towel on the table, used a tiny flashlight, and lined up everything.
Step 3 & 4: push pins out slowly. Don’t rush — I pushed once, then nudged a bit more.
Step 5: reconnecting was fiddly but worth it. It’s comfy now! 😄
So glad it went well, Maya — great practice measuring twice! The ‘nudge, then nudge again’ approach is perfect for avoiding bent pins.
YouTube has some close-up clips that helped me visualize seating the pin. Also keep a small hammer or firm plastic pusher — gentle taps finish the job cleanly.
Thanks for the tips everyone! I used a tiny rubber mallet for the last tap and it seated nicely. No scratches. 🙂
If reconnecting feels fiddly, try using the tip of the push pin tool to guide the pin into place before tapping it fully — gives better alignment.
Haha measuring twice is a must. If he keeps changing his mind, measure for the looser fit and you can always take out another link later.
Tried this last weekend — thanks for the clear steps.
The push pin tool did the trick but I almost messed up the direction of one of the pins. The guide’s note about pin direction saved me.
Question: is it okay to push pins from either side if they look symmetrical? Or always follow the arrow marks?
Also, any tips to keep tiny pins from rolling away? I lost one under the workbench 😅
I use a small magnetic tray (from a hardware store) — lifesaver. Keeps pins & screws in one place. Also use a flashlight to see the pin head direction better.
If you lost a pin under the bench, try a magnet on a stick or use a vacuum with a stocking over the nozzle to avoid sucking the pin away.
Always follow the arrow marks if present — they indicate the removable direction. If there are no arrows, look for the thinner end of the pin or the side with a visible groove to push from the thicker side out.
For rolling pins, lay down a thin towel or a shallow tray to catch them.