Why change your watch battery at home — what to expect
Replacing a watch battery at home is often practical and cost‑effective. You can save money, get a faster turnaround, and learn skills you’ll reuse. Simple quartz watches are common DIY candidates.
Know the limits: water resistance, sealed case‑backs, and high‑end movements may need a pro and pressure‑testing. This guide covers CASE‑BACK types, an exact tools checklist, how to identify battery size and chemistry, step‑by‑step opening and replacement methods, plus damage prevention, troubleshooting, and safe battery disposal.
You’ll gain confidence and know when to stop and call a watchmaker for help.
When you open a watch to replace the battery, these are the components you’ll see and need to respect:
Case and case-back: houses everything; different opening styles change how you approach the job.
Crystal: protects the dial — avoid prying or putting pressure on it.
Crown and stem: used to set time; remove carefully if you need full movement access.
Movement: the heart of the watch (quartz module) — fragile electronics and gears.
Battery contact / retainer: clips or plates that hold the cell in place.
Gaskets and seals: rubber rings that preserve water resistance; compress or replace them if disturbed.
Best for Battery Replacement
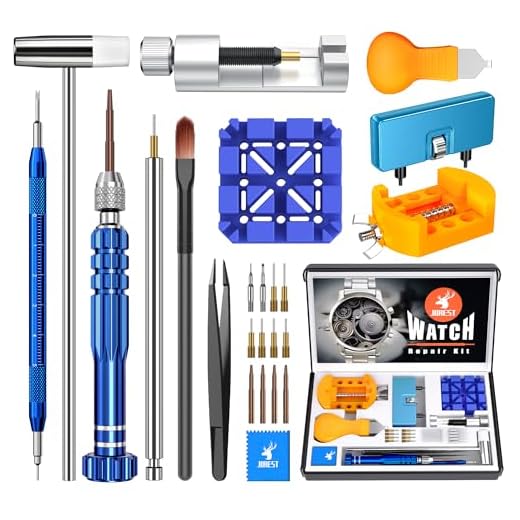
JOREST Watch Battery Replacement Tool Kit
Precise tools for 15–60mm watch backs
This kit focuses on battery replacement with a case opener, case holder, five-in-one screwdriver, spring bars, and tweezers, plus a picture manual. The adjustable back wrench fits 15–60mm cases so you can safely remove and replace batteries on many watches.
Common coin-cell chemistries, voltages and why they matter
Silver‑oxide (SR / SW): nominal 1.55 V. Stable discharge curve, excellent for accuracy and low‑drain quartz. Common examples: Renata SR626SW (377), Maxell SR920SW.
Alkaline (LR): nominal 1.5 V. Cheaper but voltage drops faster under load and higher self‑discharge — less accurate and more leak-prone (example: Maxell LR626).
Lithium (CR): nominal 3.0 V. High capacity, long shelf life; used for digital watches and watches that require 3V (examples: Energizer CR2032, CR2025).
Never substitute chemistries just because the cell fits. A CR (3V) in a movement designed for 1.55V can damage circuits; an LR may give poor runtime and leakage risk.
Signs: battery failure vs movement faults (quick checks)
Battery aging: slow timekeeping, second hand skipping 2‑second EOL jumps, intermittent stopping, or loss of functions (chronograph failing to reset).
Movement faults: sudden stops with proper battery voltage, grinding sounds, or stuck gears — often physical/mechanical issues or dirty contacts.How to act: measure battery voltage under load with a multimeter; inspect contacts for corrosion; try a fresh correct‑chemistry cell before deeper disassembly.
2
Identify your case-back type — the opening method affects the whole job
Before you reach for a blade, identify the case-back style — it dictates tools, technique, and how much risk you accept.
Snap / press‑fit backs (pry open)
How to verify: look for a tiny lip or notch on the edge; the back is otherwise smooth. Typical tools: case knife or thin pry tool; friction ball can help for stubborn backs. Risk level: medium — easy to bend or mar the back and disturb the gasket, reducing water resistance. Red flags: no visible notch, heavy dents, or signs of previous prying — stop if the edge looks painted or glued.
Screw‑down backs (multiple notches around rim)
How to verify: you’ll see evenly spaced notches or grooves around the perimeter. Typical tools: adjustable case‑opener wrench (Jaxa style) or Bergeon 5700; bench vice/holders help. Risk level: medium‑high — improper jaws slip and round notches; cross‑threading can ruin the case. Red flags: rounded or filled notches, missing gasket, or past amateur tool marks — consider a pro.
Must-Have
OTOOLWORLD Friction Ball Watch Case Opener
Simple twist tool for snap and screw backs
A rubber friction ball that grips and unscrews watch backs by hand—just press and twist to open many screw-on case backs. It is 2.5 inches across, comes with a needle to inflate, and can be re-inflated if needed.
How to verify: several tiny screws hold a back plate or flange. Typical tools: precision screwdriver set (J0–J3), magnetic mat for parts. Risk level: low — straightforward, but tiny screws strip or go missing easily. Red flags: stripped heads, corroded screws, or straps blocking access — stop if you can’t secure screws safely.
Screw‑in backs with slots (coin‑slot)
How to verify: one or two straight slots for a coin or flat driver. Typical tools: case knife, flat driver, or specialized wrench. Risk level: medium — slots can strip; gaskets still matter. Red flags: painted slots, evidence of glue, or a recessed design that hides the seal.
One‑piece / unibody or sealed designs
How to verify: no seam between case and back; movement accessed via crystal removal or through the top. Typical tools: specialized presses or crystal removal gear (usually not recommended at home). Risk level: high — DIY can damage crystal, seals, or integrated straps. Red flags: integrated bracelet blocking access, heavy corrosion, or factory adhesives — take these to a professional.
Next, we’ll match these types to the exact tools you’ll want to buy or borrow and how to use them safely.
3
Tools checklist: exactly what to buy or borrow (and why each matters)
Before you start, set up one tidy station — a good tool saves hours (and a dented case). Below are the prioritized items, what they do, minimum quality to look for, price ranges, and safe one‑time alternatives.
Essential openers
Case knife / thin pry tool — for snap backs; buy a stiff, beveled blade to avoid slipping. (Min quality: heat-treated steel; $10–$40.)
Case‑back wrench / Jaxa — for screw‑backs; adjustable jaws fit most notches. (Min quality: hardened steel; $15–$80; Bergeon 5700 is pro grade $100+.)Safe one‑time alternative: friction ball or jeweler’s sticky pad for easy snap‑backs — lower risk than a bad blade.
Editor's Choice
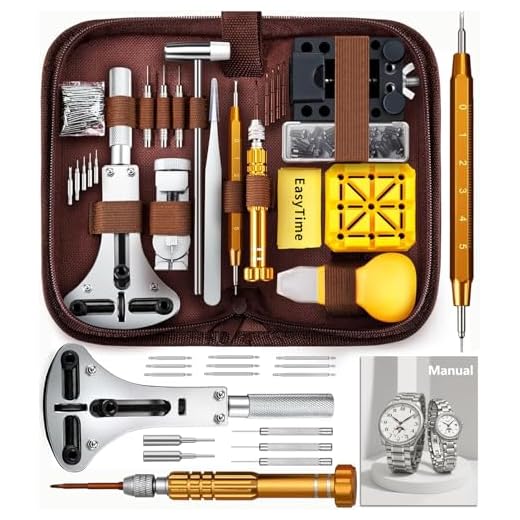
JOREST Comprehensive Watch Repair and Resizing Kit
All-in-one for strap, battery, and case repairs
A multi-function repair kit with link remover, case opener, five-in-one screwdriver, case holder, pin punches, and an illustrated manual to guide repairs. It helps you adjust straps, replace batteries, and open various case types while reducing professional service costs.
Soft watch holder/cushion and bench block — stabilizes the case; bench block aids crystal or case presses. (Holder $5–$25; bench block $15–$60.)
Loupe or magnifier (10x) — tiny screws and gasket grooves demand magnification. ($10–$40.)
Dust blower and fine brush — keep movement dust‑free; never breathe across the movement. ($3–$15.)
Battery handling, testing & parts
Plastic spatula — lift battery without shorting. ($3–$12.)
Small parts tray or organizer — prevents lost screws. ($5–$20.)
Battery tester or multimeter — confirm new cells and polarity. (Tester $8–$30; multimeter $10–$40.)
Replacement gaskets + silicone grease — restore water resistance after opening. (Gaskets $2–$10; grease $3–$12.)
Safety & optional pro gear
Latex/nitrile gloves or finger cots — keep oils off seals. ($5–$15.)
Anti‑static mat — useful with electronic quartz movements. ($10–$30.)
Optional: crystal press and watchmakers’ bench press — necessary for sealed crystals; only if you’ll do many watches. (Crystal press $40–$150.)
Quick tip: if this is a one‑off, borrow a Jaxa wrench or buy a modest watch kit (contains most basics) rather than splurging on pro tools you’ll rarely use.
4
How to identify the correct battery size and chemistry step-by-step
1) Read the code on the old cell first
Most watch cells are stamped with a code: SR626SW (377), SR927SW (395), CR2032, etc. The prefix tells chemistry (SR = silver‑oxide, CR = lithium, LR = alkaline). Those small letters matter — SR626SW and LR626 look similar but behave very differently in life and voltage.
Best Seller
LiCB 10-Pack SR626SW (377) Silver Oxide Batteries
Grade A, 1.55V long-lasting power
Ten high-quality SR626SW (377) silver-oxide button cells providing 1.55V power and a long shelf life, suitable for watches and many small electronics. They are CE/ROHS tested and arrive in a blister pack for easy storage.
If the print is gone, measure diameter and thickness in millimetres with a caliper:
Diameter (mm) — e.g., 6.8 mm for “626” types.
Thickness (mm) — many codes imply thickness (2032 = 20 mm × 3.2 mm).
Write the numbers down and use them to cross‑reference.
3) Use a cross‑reference chart
Enter the stamped code or your measurements into a battery cross‑reference (online or printed). This gives:
Equivalent numbers (SR626 = 377).
Chemistry and nominal voltage (SR = 1.55V silver‑oxide; LR = 1.5V alkaline; CR = 3.0V lithium).
Tip: prefer silver‑oxide (SR) for most analogue watches — stable voltage and low leakage.
4) Test the old cell before you throw it away
Use a multimeter or dedicated tester:
Silver‑oxide new ≈ 1.55V; replace if below ~1.4V.
Lithium CR new ≈ 3.0V; replace if below ~2.8V.A dedicated tester with load gives a truer read for real‑world performance.
5) Consequences of wrong chemistry/voltage
Wrong voltage: movement may not run or can be damaged (3V into a 1.55V circuit is risky).
Wrong chemistry: shorter life (alkaline vs silver‑oxide), poor timekeeping, higher leakage risk and possible corrosion.
6) Where to source quality replacements
Buy from trusted retailers or watch suppliers (brand service centers, Esslinger, Cousins, reputable online sellers). For high‑value or water‑resistant watches, OEM parts are worth the extra cost.
7) Handling corroded contacts
Light corrosion: remove battery, gently clean with a cotton swab dipped in 90% isopropyl alcohol; use a fiberglass pen for contact surfaces if needed.
Alkaline white crust: neutralize with a tiny amount of white vinegar, then rinse with alcohol and dry thoroughly.
Heavy corrosion or pitting: if contacts are eaten away, or the movement is loose/contaminated, stop — this typically requires professional servicing.
Next up: step‑by‑step replacement procedures tailored to each case‑back so you can put the right cell back in safely.
5
Step-by-step replacement procedures tailored to each case-back
Snap / press-fit case-backs
Locate the pry slot (usually a small notch at the edge) by eye or with loupe.
Protect the case with tape. Insert a thin case knife at a low angle and apply a steady, controlled pry—don’t twist wildly.
Lift the back a little at several points rather than trying to yank it off in one go. Remove and place the gasket on a clean tray.
Use plastic tweezers to lift the old cell straight up; avoid scraping the movement or touching coils. Check polarity and drop the new battery in with non‑metallic tweezers.
Test briefly: press the crown to the run position and watch the second hand for movement before reseating.
Re-seat the gasket (replace if brittle), align the back, then press evenly with a case-press or by hand until it snaps home.
Real-world tip: a 1970s Seiko I opened once required several gentle pries around the rim rather than one big pull.
Best for Beginners
EasyTime Complete Watch Repair and Adjustment Kit
Beginner-friendly toolkit with 108 watch pins included
An all-in-one, beginner-friendly kit including a case opener, strap remover, screwdrivers, case holder, tweezers, hammer, and 108 pins, plus an illustrated manual. Tools are made from durable steel and organized in a portable case for DIY watch maintenance.
Fit the wrench exactly to the case grooves—wrong teeth position slips and mashes the finish. Protect the case with masking tape.
Loosen with slow, steady counterclockwise turns; use micro‑adjustments if it’s stiff. Don’t use brute force—stop and reposition if it slips.
Remove gasket, clean the seat, grease a new or healthy gasket lightly with silicone grease, replace battery, test movement, then start threads by hand to avoid cross-threading.
Close with the wrench using light, even torque—aim for fingertip-firm plus a small additional click; over-tightening damages threads.
Product models: use a 3‑jaw Jaxa wrench for most screw-backs; Bergeon-style openers give finer control.
Screw-held backs (tiny screws)
Organize screws on a numbered tray. Use a high‑quality flat or Phillips watch screwdriver (e.g., Bergeon 30080) sized to the screw head to avoid stripping.
Remove tiny screws slowly; clean threads with pegwood if dirty. Replace battery, test, then reinsert screws evenly—alternate corners where possible.
Special cases — sealed / unibody / press-fit crystals
If the back is seamless, glued, or the case is one-piece (some dive watches, smartwatches, integrated trunks), stop. These often need heat, press machines, or factory tools and a pressure test afterward.
Quick checks after reassembly:
Movement running, crown positions set and date advances correctly, chronograph hands reset to zero.
Replace brittle gaskets and re‑lubricate seals to help restore water resistance before wearing.
6
Avoid damage, troubleshoot problems, and dispose batteries safely
Prevent scratching, magnetizing and shorting
Always pad the case and crystal with low‑tack tape or a watch cushion before prying; a single slip with a case knife will leave a permanent nick.
Use non‑magnetic or plastic tweezers (nylon/PEEK) and beryllium‑bronze tools for springs and batteries to avoid magnetizing the balance. A small brass pusher is safer than a steel screwdriver near coils.
Keep metal tools away from the circuit and coil windings; cover exposed parts with folded paper or a movement holder when you lift the battery.
For button cells, avoid touching both terminals with metal simultaneously — shorting them can damage the cell and the movement, and may produce heat.
Stuck batteries and corroded contacts
If a battery is stuck, apply a little penetrating oil around the rim, wait, then gently lever with plastic tweezers; never force or pry under the movement.
Corrosion (white/green deposits) needs careful cleaning: use pegwood to remove loose gunk, then a 90%+ isopropyl swab or a fibreglass pick. Severe corrosion on springs often requires part replacement.
Check battery polarity and seating; many cells are recessed—ensure good contact.
Inspect contact springs for tension loss or contamination; lightly bend back for better contact if safe.
Clean contact surfaces and retry with a known‑good, fresh cell.
Verify the crown is in the run position and the contact tab didn’t shift.
If the watch still won’t start after a fresh battery and clean contacts, suspect movement faults (stuck gear, broken coil, bad IC) — time to consult a movement technician.
Safe disposal & recycling
Tape both terminals on used button and lithium cells, store in a non‑metallic container away from heat.
Recycle at electronics retailers (many batteries accepted at Best Buy, Home Depot) or municipal hazardous waste centers; some watchmakers accept old cells.
Laws vary—many areas ban household trash disposal of lithium/button cells—check local rules.
Environmentally: button cells contain heavy metals and lithium cells are fire hazards in landfills; recycling recovers materials and prevents pollution.
With these precautions and checks done, you’ll be ready to finish up and decide whether to wear the watch or seek professional service.
Wrap-up: confident, careful battery changes and when to seek a pro
Identify your case-back first, match the correct battery and chemistry, use proper tools, follow the step-by-step for your case type, protect gaskets for water resistance, and recycle used cells responsibly.
Quick checklist — DIY if simple snap/screw back, correct tools, steady hands; seek a pro for deep-seated movements, high-value water-tested watches.
Loved the tools checklist — saved me from buying junk. I ended up with the JOREST Watch Battery Replacement Tool Kit and the OTOOLWORLD opener; combo worked perfectly for both screw-back and snap-back watches. Also, the ‘how to identify battery size’ flow chart was spot on — no more guessing between 377 and 364.
Sophia Nguyen
on September 10, 2025
Do you keep any spare batteries on hand? I usually buy a 10-pack LiCB SR626SW and it lasts me ages.
Noah Carter
on September 11, 2025
Yes, I keep an extra LiCB pack and a few spare gaskets. Less downtime when a watch dies!
Thanks for sharing your setup, Noah. That combo is a favorite — OTOOLWORLD for gentle opening, JOREST for precision work. And good call checking sizes carefully; wrong chemistry/size can be disastrous.
Maya Thompson
on September 10, 2025
Really important that you covered safe disposal. The local recycling place refuses loose batteries sometimes — anyone know whether returning the LiCB 10-Pack batteries’ blister to a store is ok? I feel bad throwing old cells in the trash.
Great question. Many battery retailers and electronics stores accept used button cells for recycling, and some municipalities have household hazardous waste drop-offs. Don’t put button cells in regular trash — check your local council site or call a big retailer to confirm their take-back policy.
Hannah Brooks
on September 11, 2025
At my hardware store they accept old watch batteries in a small bin. If in doubt, call ahead — policies vary by place.
Liam Patel
on September 15, 2025
Solid write-up! The chemistry breakdown helped — I didn’t know silver oxide (like the LiCB SR626SW) has steadier voltage than alkaline. One thing: are there any brands to avoid? I found some super cheap generic cells that died in a week. 😑
Priya Sharma
on September 15, 2025
I had a bad batch from an unknown vendor once — battery leaked and corroded the contact. Learned my lesson: buy packs with good reviews and avoid single, super-cheap replacements.
You’re right to be cautious. Stick to known brands or the LiCB pack you mentioned — they tend to be reliable. Cheap no-name alkaline or counterfeit silver-oxide cells are the usual culprits for short life and leakage.
Hannah Brooks
on September 22, 2025
Nice balance between DIY confidence and warnings. Personally, I bought the Complete 155-Piece Professional Watch Repair Kit because I like having options and the magnetic mat is super useful. But the article is fair — you don’t need every single tool if you’re only swapping batteries.
One nitpick: could mention torque on screw-backs — overtightening can strip threads. Otherwise, thumbs up!
Emma Clarke
on September 22, 2025
Agree on torque. Tiny screwdrivers can round screws if you’re not careful. Take it slow.
Noah Carter
on September 22, 2025
Magnetic mat is a game-changer. Parts stay put and you can label positions.
Good point about torque — we’ll add a sentence about gentle, even tightening and using the correct driver size to avoid stripping. Happy you liked the article and the kit recommendation!
Sophia Nguyen
on September 24, 2025
Nice article overall but felt a bit light on photos for the different movement clips and battery clips. Text is great, but I’d have loved labeled close-ups showing which contact to avoid touching with fingers. Also, the JOREST Comprehensive kit is mentioned several times — can someone confirm it’s got proper anti-static tweezers? I’m fussy about that.
Otherwise, really practical tips, loved the disposal section.
Thanks, Sophia — good feedback. We’ll add more close-up photos of movement contacts in an update. The JOREST Comprehensive kit generally includes stainless-steel tweezers (non-ESD). If electrostatic sensitivity is a concern, look for ESD-safe tweezers or touch a grounded metal surface before handling.
We’ll prioritize adding diagrams in the next revision. Appreciate the suggestion.
Noah Carter
on September 24, 2025
I bought the JOREST kit last month — the tweezers are decent, but not ESD-rated. For cheap quartz movements it’s fine. For high-end electronics, get ESD-specific tools.
Maya Thompson
on September 25, 2025
Agree on pics!! I had to re-open the article a few times to visualize the clips. Even simple diagrams would help.
Oliver Reed
on September 24, 2025
Tried changing a battery yesterday — lost a screw and my cat now has a tiny shiny toy. 😂
The troubleshooting tips saved me though: the watch still wouldn’t run because I hadn’t depressed the coil properly. Not a pro but the EasyTime kit’s little screwdriver set was good enough for me. Pro-tip: put tape on the bench so screws don’t roll away!
Emma Clarke
on September 24, 2025
I use a small ice cube tray to separate screws and parts. Works fine and cheap.
Carlos Mendez
on September 24, 2025
Haha, same — my dog tried to swallow a spring once. Magnetic tray is worth the few bucks.
Screws and cats are a classic combo 😂 Glad the troubleshooting section helped. Tape or a magnetic parts tray (often included in bigger kits) is a lifesaver — it keeps tiny bits from escaping.
Good tips — adding a ‘catproof your workspace’ line to the article now. 😉
Priya Sharma
on September 25, 2025
Also try working over a shallow box — anything that catches parts if they fall.
Emma Clarke
on October 13, 2025
Great guide — super detailed! I appreciated the step-by-step for different case-backs. I used the OTOOLWORLD Friction Ball opener once and it saved me from scratching my watch.
Quick question: for a snap-back case, how tight should the gasket be when reinstalling? The article mentions checking water resistance but not how to judge if the gasket is still good. Also, the Complete 155-Piece kit looks tempting — is that overkill if I only do batteries occasionally?
Olivia Grant
on October 13, 2025
If you do more than 2–3 watches a year, the 155-piece pays off. Otherwise, the JOREST kit is lighter and cheaper.
Liam Patel
on October 13, 2025
I agree about the ball opener — smooth and less risky. For gasket feel, I compare to how the case felt new. If you’re unsure, get a replacement gasket or ask a pro; water resistance testing requires special gear.
Good spot — thanks for asking, Emma. Gaskets should sit flush and not be visibly pinched; if it takes real force to snap the back on, the gasket may be twisted or damaged. For occasional battery changes the Complete 155-Piece kit is handy but a smaller kit (like the JOREST or EasyTime) often covers the essentials and is easier to store.
Priya Sharma
on October 17, 2025
Totally new to this. The article was encouraging but I’m nervous about ruining water resistance — I have a diver’s watch and don’t want to blow its seal. The article says seek a pro sometimes — how do I know when it’s time to stop and go to a shop?
Hannah Brooks
on October 17, 2025
My rule: if the watch cost more than a small holiday, pay the pro. Peace of mind is worth it.
Carlos Mendez
on October 17, 2025
If it’s cheap or vintage, DIY is fine. For a true dive watch, don’t risk it — water can wreck everything.
Good question, Priya. If the watch has a high water-resistance rating (100m+), screw-down crown, or you care about guaranteed pressure resistance, go to a pro with pressure-testing equipment. Also go pro if you see a fragile movement, corroded contacts, or if the caseback is specially sealed or glued.
Love the confidence boost — congrats, Ethan! EasyTime is indeed a good starter kit. Remember to dispose of the old battery properly.
Priya Sharma
on October 22, 2025
Gonna try this this weekend. Any tips for steady hands? Mine shake after coffee 😂
Carlos Mendez
on October 29, 2025
Yo — replaced my grandma’s vintage watch using the OTOOLWORLD ball opener + LiCB batteries. It worked like a charm! Few typos in the article tho, but nothing major. Also, pro tip: warm the caseback slightly (not hot!!) and it pops easier. 😅
Olivia Grant
on October 30, 2025
Nice! I do the same warming trick with a hairdryer on low, short bursts. Works wonders.
Thanks for sharing, Carlos — great success story! We’ll sweep the article for typos; appreciate the heads-up. And yes, gentle warmth can help loosen old sealant — but like you said, caution is key.


Loved the tools checklist — saved me from buying junk. I ended up with the JOREST Watch Battery Replacement Tool Kit and the OTOOLWORLD opener; combo worked perfectly for both screw-back and snap-back watches. Also, the ‘how to identify battery size’ flow chart was spot on — no more guessing between 377 and 364.
Do you keep any spare batteries on hand? I usually buy a 10-pack LiCB SR626SW and it lasts me ages.
Yes, I keep an extra LiCB pack and a few spare gaskets. Less downtime when a watch dies!
Thanks for sharing your setup, Noah. That combo is a favorite — OTOOLWORLD for gentle opening, JOREST for precision work. And good call checking sizes carefully; wrong chemistry/size can be disastrous.
Really important that you covered safe disposal. The local recycling place refuses loose batteries sometimes — anyone know whether returning the LiCB 10-Pack batteries’ blister to a store is ok? I feel bad throwing old cells in the trash.
Great question. Many battery retailers and electronics stores accept used button cells for recycling, and some municipalities have household hazardous waste drop-offs. Don’t put button cells in regular trash — check your local council site or call a big retailer to confirm their take-back policy.
At my hardware store they accept old watch batteries in a small bin. If in doubt, call ahead — policies vary by place.
Solid write-up! The chemistry breakdown helped — I didn’t know silver oxide (like the LiCB SR626SW) has steadier voltage than alkaline. One thing: are there any brands to avoid? I found some super cheap generic cells that died in a week. 😑
I had a bad batch from an unknown vendor once — battery leaked and corroded the contact. Learned my lesson: buy packs with good reviews and avoid single, super-cheap replacements.
You’re right to be cautious. Stick to known brands or the LiCB pack you mentioned — they tend to be reliable. Cheap no-name alkaline or counterfeit silver-oxide cells are the usual culprits for short life and leakage.
Nice balance between DIY confidence and warnings. Personally, I bought the Complete 155-Piece Professional Watch Repair Kit because I like having options and the magnetic mat is super useful. But the article is fair — you don’t need every single tool if you’re only swapping batteries.
One nitpick: could mention torque on screw-backs — overtightening can strip threads. Otherwise, thumbs up!
Agree on torque. Tiny screwdrivers can round screws if you’re not careful. Take it slow.
Magnetic mat is a game-changer. Parts stay put and you can label positions.
Good point about torque — we’ll add a sentence about gentle, even tightening and using the correct driver size to avoid stripping. Happy you liked the article and the kit recommendation!
Nice article overall but felt a bit light on photos for the different movement clips and battery clips. Text is great, but I’d have loved labeled close-ups showing which contact to avoid touching with fingers. Also, the JOREST Comprehensive kit is mentioned several times — can someone confirm it’s got proper anti-static tweezers? I’m fussy about that.
Otherwise, really practical tips, loved the disposal section.
Thanks, Sophia — good feedback. We’ll add more close-up photos of movement contacts in an update. The JOREST Comprehensive kit generally includes stainless-steel tweezers (non-ESD). If electrostatic sensitivity is a concern, look for ESD-safe tweezers or touch a grounded metal surface before handling.
We’ll prioritize adding diagrams in the next revision. Appreciate the suggestion.
I bought the JOREST kit last month — the tweezers are decent, but not ESD-rated. For cheap quartz movements it’s fine. For high-end electronics, get ESD-specific tools.
Agree on pics!! I had to re-open the article a few times to visualize the clips. Even simple diagrams would help.
Tried changing a battery yesterday — lost a screw and my cat now has a tiny shiny toy. 😂
The troubleshooting tips saved me though: the watch still wouldn’t run because I hadn’t depressed the coil properly. Not a pro but the EasyTime kit’s little screwdriver set was good enough for me. Pro-tip: put tape on the bench so screws don’t roll away!
I use a small ice cube tray to separate screws and parts. Works fine and cheap.
Haha, same — my dog tried to swallow a spring once. Magnetic tray is worth the few bucks.
Screws and cats are a classic combo 😂 Glad the troubleshooting section helped. Tape or a magnetic parts tray (often included in bigger kits) is a lifesaver — it keeps tiny bits from escaping.
Good tips — adding a ‘catproof your workspace’ line to the article now. 😉
Also try working over a shallow box — anything that catches parts if they fall.
Great guide — super detailed! I appreciated the step-by-step for different case-backs. I used the OTOOLWORLD Friction Ball opener once and it saved me from scratching my watch.
Quick question: for a snap-back case, how tight should the gasket be when reinstalling? The article mentions checking water resistance but not how to judge if the gasket is still good. Also, the Complete 155-Piece kit looks tempting — is that overkill if I only do batteries occasionally?
If you do more than 2–3 watches a year, the 155-piece pays off. Otherwise, the JOREST kit is lighter and cheaper.
I agree about the ball opener — smooth and less risky. For gasket feel, I compare to how the case felt new. If you’re unsure, get a replacement gasket or ask a pro; water resistance testing requires special gear.
Good spot — thanks for asking, Emma. Gaskets should sit flush and not be visibly pinched; if it takes real force to snap the back on, the gasket may be twisted or damaged. For occasional battery changes the Complete 155-Piece kit is handy but a smaller kit (like the JOREST or EasyTime) often covers the essentials and is easier to store.
Totally new to this. The article was encouraging but I’m nervous about ruining water resistance — I have a diver’s watch and don’t want to blow its seal. The article says seek a pro sometimes — how do I know when it’s time to stop and go to a shop?
My rule: if the watch cost more than a small holiday, pay the pro. Peace of mind is worth it.
If it’s cheap or vintage, DIY is fine. For a true dive watch, don’t risk it — water can wreck everything.
Good question, Priya. If the watch has a high water-resistance rating (100m+), screw-down crown, or you care about guaranteed pressure resistance, go to a pro with pressure-testing equipment. Also go pro if you see a fragile movement, corroded contacts, or if the caseback is specially sealed or glued.
Exactly — if preserving water-resistance matters, a pro is usually the safer and often cheaper route in the long run.
Short and sweet: followed the steps, didn’t ruin my watch, and now I feel like a tiny watch surgeon. 😎
The EasyTime kit was beginner-friendly. Would recommend to anyone who’s nervous but willing to try.
Love the confidence boost — congrats, Ethan! EasyTime is indeed a good starter kit. Remember to dispose of the old battery properly.
Gonna try this this weekend. Any tips for steady hands? Mine shake after coffee 😂
Yo — replaced my grandma’s vintage watch using the OTOOLWORLD ball opener + LiCB batteries. It worked like a charm! Few typos in the article tho, but nothing major. Also, pro tip: warm the caseback slightly (not hot!!) and it pops easier. 😅
Nice! I do the same warming trick with a hairdryer on low, short bursts. Works wonders.
Thanks for sharing, Carlos — great success story! We’ll sweep the article for typos; appreciate the heads-up. And yes, gentle warmth can help loosen old sealant — but like you said, caution is key.