
Swap Spring Bars Without a Scratch
Learn how to swap spring bars safely and scratch free with this guide showing protective setup, correct tools, step by step removal and fitting, plus inspection and testing tips so you can change straps confidently and protect your watch finish
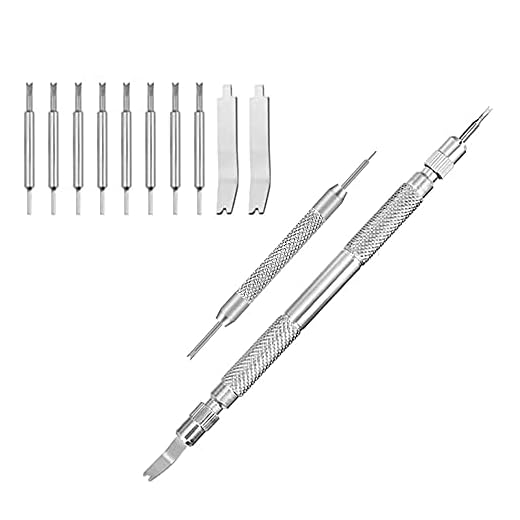
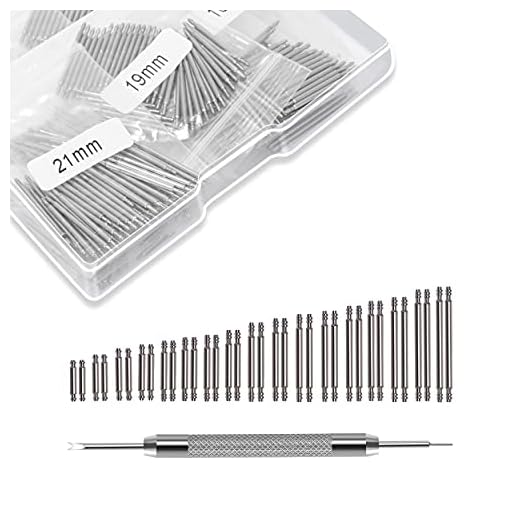
What You’ll Need

Set Up and Protect the Lugs
Why prepping and a taped lug are the only tricks you need — try them before anything else.Prepare a calm, well-lit workspace and gather everything before you begin. Lay a soft microfiber cloth on a stable table and place the watch face down on a small padded cushion or folded cloth so the lugs sit supported (e.g., a folded T‑shirt or jewelry cushion).
Protect the lug edges where the spring bar meets the case using masking tape or thin adhesive protectors—this is the single best way to prevent scratches. Loosen or remove bracelet links first if the strap is on a bracelet to reduce tension.
Keep a small parts tray and a bright light within reach. Steady the watch with one hand, supporting the caseback only—do not grip the bezel or glass. Good preparation halves the chance of slips and keeps the job quick, safe, and tidy. Work slowly, breathe, and take breaks if needed sometimes.

Remove the Old Spring Bar Carefully
Want a safe remove trick? Compress toward the strap center — don’t let the bar fly.Compress the spring bar toward the strap center while keeping the lug edge protected with masking tape or a plastic guard. Use the forked end of a spring bar tool, slip it between the strap and lug, then gently lever the flange inward.
Apply controlled sideways pressure — don’t jab or pry. Hold the strap close to the lug with your fingers or additional tape so it won’t spring away when the bar releases. For example, angle the watch so the open end faces down and gravity helps the bar move outward toward the tool.
If using a screwdriver on hollow‑end bars, apply tiny controlled turns and avoid twisting the case. Remove the bar with tweezers, place it in your parts tray, and label bars to match their lugs.
Inspect Bars and Lug Holes
Skipping inspection is asking for trouble — corrosion or wear costs watches, not just straps.Inspect both the spring bars and lug holes thoroughly before installing new bars. Look for corrosion, bent or worn flanges, shortened ends, or pitting that weakens retention.
Clean lug holes and recesses with a toothpick, cotton swab, or pegwood and a drop of isopropyl; remove dust, old grease, or debris that could prevent full seating. Example: push a toothpick around the hole rim to dislodge dried grime, then wipe with a swab.
Measure bar length versus lug width to ensure a snug fit — bars too short will slip, too long will bind.
Seat the New Bar Correctly
One flange first, then compress and release — the simple sequence pros swear by. Curious why it matters?Insert one flange of the new spring bar into the lug hole first — usually the side with the fixed hole — and hold it steady with a magnifier and a steady hand.
Compress the opposite flange with the forked tool, align the bar between the lugs, then gently release so the flange snaps into the second hole. Use a slow, controlled motion; misalignment is the most common cause of scratched lugs.
Warm a stiff leather strap briefly in your hands to increase flexibility before fitting. For thin leather or NATO straps, thread or fold the strap so the bar sits straight and isn’t stressed at an angle.

Test and Inspect After Installation
A quick tug test prevents lost watches — how hard should you pull? About a firm handshake.Perform a systematic inspection and functional check. Verify the bar remains centered when you pull the strap gently in multiple directions — use about the force of a firm handshake to simulate real wear (try pulling toward 1–2 o’clock and 7–8 o’clock).
Verify the strap sits parallel to the case and that no gap or angled stress appears at the lug; use a loupe or good light to inspect the flange engagement.
Ensure any seals disturbed were reseated or replaced and confirm the crown is fully closed. For dive watches, consider professional pressure testing after a strap change.
Note any unusual movement or creaks — they indicate poor fit or damage. Log the replacement date and bar size, and schedule routine checks every few months. When in doubt, visit a professional to avoid costly mistakes altogether.

Troubleshoot and Maintain for Longevity
Don’t force jammed parts — discover quick fixes and when to surrender to a pro.Check for binding: if a spring bar won’t compress, inspect the lug hole for grit or a bent flange. Clean the lug with a toothpick and compressed air; visibly bent flanges often need gentle reshaping by a pro.
Measure and replace: if a bar slips out repeatedly, re-measure the lug width and fit a slightly thicker or tapered replacement made for your case (example: use a 0.5 mm thicker bar or a tapered end for narrow holes).
Stop and consult: if tiny screws or hollow bars strip, do not force them — seek professional help to avoid scratches or broken parts.
Avoid shortcuts: do not use thread locker as a casual fix; use the correct size bar instead.
Organize and prepare: store extras by size/type and keep spare straps and a compact tool in your travel kit.
When unsure, pause and prioritize safety over speed every time.

Final Check — Wear with Confidence
Follow these steps to swap spring bars without scratching lugs: prepare, protect, remove, inspect, fit, and test; small precautions prevent damage and loss—try, share your results, or ask a pro.
Nice walkthrough. Quick q: when you say ‘inspect lug holes’ — are you checking for burrs only or also for tightness of the hole? I had one lug hole that felt a bit loose and the bar popped out after a week. Didn’t want to break anything trying to force a new bar in.
If it’s loose, sometimes leather straps with thicker spring bars helped me. But if it’s really wobbly get it looked at — could be a repair job.
I’ve used a slightly thicker (1mm more) bar before. Works but make sure it seats fully on both sides.
Good question — check for burrs/corrosion and also for excessive widening. If the hole looks or feels oversized, consider a thicker bar or have a pro check it. If it’s actually damaged, don’t force a standard bar in — that risks the case.
I have a weird question — can I reuse the old spring bars if they look okay? The guide says inspect bars but doesn’t clearly recommend new vs reuse. I’ve seen mixed advice online.
I reuse bars on beater watches but swap them on valuable pieces. Metal fatigue is sneaky.
Short answer: you can reuse bars if they’re straight, not corroded, and the spring is strong. But for peace of mind, replacing them every couple years or when changing straps is safer. Better to replace than risk a drop.
I mark the date I installed them with a tiny dot of nail polish — helps track age. Might be overkill lol.
Tried this on a Seiko 5 and it worked like a charm. Tip for anyone nervous: use the fork end of the spring bar tool parallel to the spring bar rather than perpendicular — gives better leverage and less chance of the tool slipping. Also, don’t rush step 4 — seating the bar correctly is the whole game.
Nice practical tip, Marcus. The angle of the tool makes a big difference. Appreciate the Seiko-specific mention too.
Good tip. I did the perpendicular move once and ouch — gouged the lug. Learned the hard way.
Same here, had a bad slip. Now I always brace the case with my fingers to keep it steady.
Loved the step-by-step pics (wish there were more close-ups tho). I almost scratched my lug last year and now I’m paranoid — this’ll be my checklist from now on.
A tiny nitpick: the section on troubleshooting is short. Maybe add common issues like “spring bar keeps popping” with causes (wrong size, damaged hole, worn bar). Other than that, solid guide.
Thanks Zoe — noted about adding more troubleshooting examples and extra close-ups. We’ll expand that in the next update.
Agree on more pics. A macro of a seated bar would be golden. Also, quick tip: use a loupe to inspect the seat — saved me once.
Short and sweet: follow step 4 slooooowly. I made the rookie mistake of seating one side too quick and the bar popped later. Also, invest in a good pair of spring bars — cheap ones bend. Worth the $5.
PS: the final check section should be required reading. Seriously.
Where do you buy decent bars? I always get lost in size/quality choices online.
Agreed — take the seating slow. And quality bars do make a difference. Glad the final check resonated.
Local watchmaker shop or established brands on Amazon. Look for hardened stainless steel, not plated junk.
This guide made me less scared to change straps myself. One tip: warm the bar gently with your fingers if the movement feels sticky — sometimes grime makes the spring sluggish. Not a huge fan of the tape trick though, I prefer a dedicated watch holder.
Also, step 2’s removal technique helped me avoid the classic slip-and-scratch move. Thx!
I use an old folded towel and a rubber band to create a DIY holder. Cheap and works well.
Great to hear it gave you confidence. The warm-fingers trick is clever — heat can free up grime but be gentle. Watch holders are definitely safer when available.
Okay real talk: I tried this guide and still managed a tiny nick on the lug — sigh. It was on an old Casio so not the end of the world. Next time I’ll use more tape and maybe a thinner tool tip. Loved the troubleshooting section though, it pointed me to checking the bar ends for burrs which was the issue.
Also LOL at my hand shaking — I need to practice steady hands or maybe become ambidextrous 😂
Thanks for sharing — even with precautions, accidents can happen. Burrs are a sneaky cause. Practicing on less valuable watches first is a good call.
Don’t feel bad — we’ve all nicked a lug. Happens to pros sometimes. 😂
Try a small clamp or watch holder for steadiness. Or prop your elbow on the table to reduce shake.
This guide was super clear — I actually swapped my NATO strap spring bars last weekend and survived! The tip about taping the lugs really saved me from a tiny panic attack 😂
One thing I did differently: I used a microfiber cloth under the case instead of tape, and it worked fine. Anyone else try that? Also, step 5 (test and inspect) is underrated — I wore the watch for a day and felt a bit more comfy knowing it was seated properly.
Microfiber is my go-to too. Less sticky than tape, no residue. Glad it helped 🙂
Thanks Emily — great to hear the microfiber trick worked for you. Both tape and cloth are fine as long as the lugs are protected. Good reminder on the testing step!